

Enter Yak Lang, a language designed to address the evolving needs of security practitioners and organizations. As technology advances and the scope of security projects expands, there is a growing necessity for languages that excel in both efficiency and suitability for product distribution, engineering research and development, and platform building. This is where Golang has emerged as a prominent player, offering enhanced efficiency and scalability.
The shift towards a more professional “security research and development” phase has prompted various security organizations and white hat practitioners to leverage Golang’s capabilities. This shift is not only about developing security platforms but also delves into the intricate realm of security capabilities. The understanding that security research and development encompass more than just platforms is gaining acceptance.
In traditional practices, security tools often use the “most appropriate” language to fulfill their specific needs, resulting in fragmentation of security capabilities across different projects. This raises a fundamental question: why segregate security capabilities into distinct projects? Can’t we consolidate them within the same platform?
Yak Lang seeks to answer this question by providing a comprehensive solution for security capabilities integration. By offering a unified platform for the development of security tools and systems, Yak Lang aims to overcome the challenges posed by module fragmentation. This innovative language enables security practitioners to streamline their efforts, ensuring that security capabilities can be seamlessly integrated into a cohesive and efficient platform.
Features
Key features that define Yaklang’s prowess include its dynamic strong typing, enabling users to alter the type of a variable when modifying its value. This flexibility extends to expression operations, allowing the program or function to dynamically identify the exact type at runtime and execute corresponding calculations. Yaklang further demonstrates its versatility by being both compilable and executable as bytecode, seamlessly integrating with the supportive YakVM.
Yaklang’s syntax is a testament to its user-friendly design, drawing on numerous strengths to provide an accessible and easily learnable language. The simplicity and intuitiveness of its syntax contribute to a smoother learning curve for developers and security practitioners.
1. Function Library: Codec – Encryption and Encoding
In the realm of computers, encoding and decoding are crucial processes for converting data between different forms, ensuring seamless data transfer and storage. Encryption and decryption, on the other hand, play a pivotal role in safeguarding sensitive information, addressing privacy, data integrity, and confidentiality concerns.
2. Encode and Decode Operations
Base64 Encoding and Decoding
ret := codec.EncodeBase64("abcdefghijklmn\x99\xFf")
res, err := codec.DecodeBase64(ret)
Base64 encoding and decoding support, ensuring secure data transmission and processing.
HTML Entity Encoding
ret := codec.EncodeHtml("abcdefghijklmn\xA0")
res := codec.DecodeHtml(ret)
HTML entity encoding for bypassing XSS and ensuring proper data display.
URL Encoding
ret := codec.EncodeUrl("abcdefghij<>:;{]{]|\\$^&^&#@klmn\xA0")
res, err := codec.DecodeUrl(ret)
URL encoding and decoding for secure data transmission in web development.
Double URL Encoding (XSS)
ret := codec.DoubleEncodeUrl("abcdefghij<>:;{]{]|\\$^&^&#@klmn\xA0")
res, err := codec.DoubleDecodeUrl(ret)
Double URL encoding, often used in XSS scenarios.
Hexadecimal Encoding
ret := codec.EncodeToHex("abcdefghij<>:;{]{]|\\$^&^&#@klmn\xA0")
res, err := codec.DecodeHex(ret)
Hexadecimal encoding for converting data into a hexadecimal string.
ASCII Encoding
ret := codec.EncodeASCII("abcdefghijklmn\x99\xFf")
res, err := codec.DecodeASCII(ret)
ASCII encoding for handling invisible characters, ensuring visible content with quotes.
3. Encryption and Decryption
AES Encryption and Decryption
key := []byte("encryptionKey123")
data := "sensitiveData"
iv := []byte("initializationVec")
encryptedData, _ := codec.AESCBCDecrypt(key, data, iv)
decryptedData, _ := codec.AESCBCEncrypt(key, encryptedData, iv)
AES encryption and decryption for safeguarding sensitive information.
DES Encryption and Decryption
key := []byte("encryptionKey123")
data := "sensitiveData"
iv := []byte("initializationVec")
encryptedData, _ := codec.DESCBCDec(key, data, iv)
decryptedData, _ := codec.DESCBCEnc(key, encryptedData, iv)
DES encryption and decryption for enhanced data security.
Irreversible Hash Calculation
data := "sensitiveData"
md5Hash := codec.Md5(data)
sha256Hash := codec.Sha256(data)
Irreversible hash calculations such as MD5 and SHA-256 for data integrity verification.
Make an HTTP request using a URL
Basics: Quickly send a GET/POST request
rsp = http.Get("http://example.com")~
http.show(rsp)
This code sends a GET request to “http://example.com” and prints the response.
Advanced: Using a client to send requests
req = http.NewRequest("HEAD", "http://baidu.com")~
http.show(req) // show packet

rsp = http.Do(req)~
http.show(rsp) // show packet
In this example, a HEAD request is created using http.NewRequest and then sent using http.Do.
Handling parameters and HTTP headers
HTTP request with parameters
req = http.NewRequest("GET", "https://www.baidu.com", http.params({"key": "value"}))~
http.show(req)
Setting parameters for a GET request using http.params({"key": "value"}).
Communicate using JSON
req = http.NewRequest("GET", "https://www.baidu.com", http.json({"key": "value"}))~
http.show(req)
Sending a JSON request using http.json.
Set User-Agent for HTTP requests
req = http.NewRequest("GET", "https://www.baidu.com", http.useragent("Yaklang-User-Agent/1.1"))~
http.show(req)
Setting the User-Agent header using http.useragent.
Set any header for HTTP requests
req = http.NewRequest("GET", "https://www.baidu.com", http.header("User-Spec-Header", "AwesomeYaklang!"))~
http.show(req)
Setting a custom header using http.header.
Set cookies
req = http.NewRequest("GET", "https://www.baidu.com", http.cookie("abc=123"))~
http.show(req)
Setting a cookie using http.cookie.
HTTP network control
Control HTTP timeout limits
rsp = http.Get("http://www.example.com", http.timeout(0.3))~Setting a timeout of 0.3 seconds for the HTTP request.
Set proxy for HTTP requests
rsp = http.Get("http://ifconfig.me", http.timeout(5), http.proxy("http://127.0.0.1:7890"))~
http.show(rsp)
Setting a proxy for the HTTP request.
Redirect settings support
rsp = http.Get("https://baidu.com/", http.timeout(5), http.noredirect())~Disabling HTTP request redirection using http.noredirect().
Handling HTTP response information
Get HTTP response status code
url = "https://www.example.com"
rsp = http.Get(url)~
statusCode = rsp.StatusCode  // 200
printf(f`
Request to ${url}
Response StatusCode: ${statusCode}
`)
Fetching and printing the HTTP response status code.
Get HTTP response data (Body)
rsp = http.Get("https://www.example.com")~
dump([]byte(rsp.Data()))
Printing the response body data using dump.
Get the response data of the packet
rsp = http.Get("https://www.example.com")~
dump([]byte(rsp.Raw()))
Printing the raw response packet data using dump.
Send malformed packets
To send arbitrary malformed data packets, users need to utilize fuzz testing or other relevant libraries, as http in Yaklang does not directly support this.
Expert-level HTTP Library
Code:
rsp, req = poc.HTTP(`
GET / HTTP/1.1
Host: www.baidu.com
`)~
Dynamically Change Packet Parameters
func sendPacket(target) {
    packet = f`
GET / HTTP/1.1
Host: ${target}
`

    rsp, req = poc.HTTP(
        packet,
        poc.https(true),
    )~
}

sendPacket("www.baidu.com:8080")
Additional Parameters (TLS/HTTPS)
Code:
packet = `GET / HTTP/1.1
Host: www.baidu.com
`
rsp, req = poc.HTTP(packet, poc.https(true))~
Repair Packet
packet = `
GET / HTTP/1.1
Host: www.example.com
User-Agent: Mozilla/5.0 (compatible; MSIE 9.0; Windows NT 6.1; Win64; x64; Trident/5.0)
abc123123`
req = poc.FixHTTPRequest(packet)~
Split Packet Header and Body
Code:
rsp, req := poc.HTTP(`
GET / HTTP/1.1
Host: www.example.com
User-Agent: Mozilla/5.0 (compatible; MSIE 9.0; Windows NT 6.1; Win64; x64; Trident/5.0)
`)~
header, body = poc.Split(rsp)
1. Fuzz Module
- Description: Fuzz module for testing HTTP applications by injecting random, invalid, or unexpected data into HTTP requests.
- Commands and Codes:
import fuzz

# Example: Creating an HTTP request for fuzz testing
raw = """GET / HTTP/1.1
Host: www.example.com

abc=1"""
freq = fuzz.HTTPRequest(raw, fuzz.https(true))
freq.Show()
2. Chained Calls
- Description: Method chaining for expressing logic coherently with syntactic sugar.
- Commands and Codes:
# Example: Chained calls for HTTP request creation, display, and execution
raw = """GET / HTTP/1.1
Host: www.example.com

abc=1"""
fuzz.HTTPRequest(raw, fuzz.https(true)).Show().ExecFirst()
3. Send HTTP Request
- Description: Sending HTTP requests and handling results.
- Commands and Codes:
# Example: Sending an HTTP request and executing the first result
raw = """GET / HTTP/1.1
Host: www.example.com

abc=1"""
result = fuzz.HTTPRequest(raw, fuzz.https(true)).FuzzMethod("HEAD").ExecFirst()
4. Packet Deformation
- Description: Deforming HTTP packets for security testing.
- Commands and Codes:
# Example: Fuzz testing HTTP methods
raw = """GET / HTTP/1.1
Host: www.example.com

abc=1"""
for index, result in enumerate(fuzz.HTTPRequest(raw, fuzz.https(true)).FuzzMethod("HEAD", "GET", "POST", "DELETE").Results()):
    print(f"{index}. method:{result.Method}")
5. Fuzz Testing HTTP Paths
- Description: Fuzz testing HTTP paths and path combination.
- Commands and Codes:
# Example: Fuzz testing HTTP paths
raw = """GET / HTTP/1.1
Host: www.example.com

abc=1"""
for index, result in enumerate(fuzz.HTTPRequest(raw, fuzz.https(true)).FuzzMethod("HEAD", "GET", "POST", "DELETE").FuzzPath("/abc", "/target").Results()):
    print(f"{index}. method:{result.Method} path: {result.RequestURI}")
6. Dynamic Parameter Fuzz Testing
- Description: Dynamically identifying and testing parameters in HTTP requests.
- Commands and Codes:
# Example: Dynamic parameter fuzz testing
raw = """GET /target-path?abc=123 HTTP/1.1
Host: www.example.com
User-Agent: Ur-Awesome-UA/1.0001"""
freq = fuzz.HTTPRequest(raw, fuzz.https(true))

for paramName in freq.GetQueryKeys():
    token = str.RandStr(10)
    print(f"Current ParamName: {paramName}, modified to {token}")
    freq.FuzzGetParams(paramName, token).Show()
Syn Scan
Code Example: Basic SYN Scan
res, err := synscan.Scan("**.**.*00.1/24", "80,443")
if err != nil {
    die(err)
}

for result := range res {
    println(result.String())
}
Code Simplification: Using WavyCall
for result := range synscan.Scan("**.**.*00.1/24", "80,443")~ {
    println(result.String())
}
Hidden Scan Targets: In this code example, scan targets are hidden. The library uses native calls and ARP to fetch network details and perform scanning.
Extra Parameters: exclude target – synscan.excludeHosts/excludePorts
for result := range synscan.Scan(
    "**.**.100.1/24", "80,443",
    synscan.excludeHosts("**.**.100.44-100"),
    synscan.excludePorts("443"),
)~ {
    println(result.String())
}
Extra Parameters: rate limit – synscan.concurrent/rateLimit
for result := range synscan.Scan(
    "127.0.0.1", "1-65535",
    synscan.concurrent(500),
)~ {
    println(result.String())
}
Network Card Permission Issue Resolution:
synscan.FixPermission()API Definition:
FixPermission: Fixes network card permissions for non-admin users.Scan: Runs SYN port scan with specified hosts, ports, and optional parameters.ScanFromPing: Runs SYN port scan based on ICMP echo response.callback: Sets the port scan result callback function.submitTaskCallback: Sets the callback function for submitting scanning tasks.excludePorts: Sets a list of ports to exclude.excludeHosts: Sets a list of hosts to exclude.wait: Sets SYN scan waiting time.outputFile: Writes results to the specified file.outputPrefix: Sets the prefix for writing files.initHostFilter: Initializes host filter.initPortFilter: Initializes port filter.rateLimit: Sets SYN scan rate limit.concurrent: Sets the limit on the number of concurrent SYN scans.
1. Parse User Input of Mixed Network Segment + Domain Name + IP
Example:
hosts := str.ParseStringToHosts("192.168.1.1/24,baidu.com,172.168.12.1/26")
for _, host := range hosts {
    println(host)
}
Output:
192.168.1.0
192.168.1.1
...
192.168.1.255
baidu.com
172.168.12.0
...
172.168.12.63- Parses network segments, treats domain names as-is, and supports CIDR notation.
- Comma-separated values are expected.
2. Parse Complex Port Input
Example:
ports := str.ParseStringToPorts("a,22,80,8000-8002,443,8888,abc,af")
for _, port := range ports {
    println(port)
}
Output:
22
80
443
8000
8001
8002
8888- Parses a variety of port inputs, including ranges and individual ports.
- Comma-separated values are expected.
3. Combine Host and Port using str.HostPort
Example:
println(str.HostPort("baidu.com", 80))
println(str.HostPort("baidu.com", "80"))
println(str.HostPort("127.0.0.1", 80))
println(str.HostPort("127.0.0.1", "80"))
Output:
baidu.com:80
baidu.com:80
127.0.0.1:80
127.0.0.1:80- Combines host and port using
str.HostPort.
4. Host:Port Combination using Cartesian Product
Example:
hosts := str.ParseStringToHosts("192.168.1.1/24")
ports := str.ParseStringToPorts("a,22,80,8000-8002,443,8888,abc,af")
for _, host := range hosts {
    for _, port := range ports {
        println(str.HostPort(host, port))
    }
}- Performs a Cartesian product of hosts and ports for effective combination.
5. Group Scanning using x.ChunkGroup
Example:
groups := x.ChunkGroup([]int{1, 2, 3, 4, 5, 6, 7, 8, 9, 10}, 4)
dump(groups)
Output:
([][]int) {
 ([]int) {1, 2, 3, 4},
 ([]int) {5, 6, 7, 8},
 ([]int) {9, 10},
}- Groups elements into specified chunks, useful for tasks or network segments.
6. Group Scanning with Hosts
Example:
hostGroups := x.Chunk(str.ParseStringToHosts("192.168.1.1/24"), 4)
dump(hostGroups)- Groups IP addresses obtained from a network segment into chunks.
1. Basic HTTP Raw Packet Sending
Example:
rsp, req, err := poc.HTTP(`
GET / HTTP/1.1
Host: www.example.com
User-Agent: Mozilla/5.0 (compatible; MSIE 9.0; Windows NT 6.1; Win64; x64; Trident/5.0)
`)
die(err)

println(string(rsp))- Sends a raw HTTP packet with the specified request.
- Automatically repairs packets but not automatically fixing problems.
- Content-Length recalculation is handled by yak.
2. Advanced Parameters for HTTP Raw Packet
Example:
rsp, req, err := poc.HTTP(`
GET / HTTP/1.1
Host: www.google.com
User-Agent: Mozilla/5.0 (compatible; MSIE 9.0; Windows NT 6.1; Win64; x64; Trident/5.0)
`, poc.Proxy("http://127.0.0.1:7890"), poc.HTTPS(true))
die(err)- Utilizes advanced parameters for additional functionality, such as adding a proxy and forcing HTTPS.
3. Dynamically Modify Data Packet
Example:
targetHost := "www.baidu.com"
port := 80
target := str.HostPort(targetHost, port)

rsp, req, err := poc.HTTP(`
GET /admin/ HTTP/1.1
Host: {{params(target)}}
User-Agent: Mozilla/5.0 (compatible; MSIE 9.0; Windows NT 6.1; Win64; x64; Trident/5.0)
`, poc.Params(map[string]interface{}{
    "target": target,
}))
die(err)

printf("http.Response's MD5: %v", codec.Md5(rsp))- Dynamically renders parameters in the data packet using
{{params(*)}}.
4. Parse Bytes to HTTP Response
Example:
rsp, req, err := poc.HTTP(`
GET / HTTP/1.1
Host: www.example.com
User-Agent: Mozilla/5.0 (compatible; MSIE 9.0; Windows NT 6.1; Win64; x64; Trident/5.0)
`, poc.Proxy("http://127.0.0.1:8083"))
die(err)

httpRsp, err := poc.ParseBytesToHTTPResponse(rsp)
poc.Show(httpRsp)- Converts bytecode into a native
http.Responseobject usingpoc.ParseBytesToHTTPResponse.
5. Parse Bytes to HTTP Request
Example:
rsp, req, err := poc.HTTP(`
GET / HTTP/1.1
Host: www.example.com
User-Agent: Mozilla/5.0 (compatible; MSIE 9.0; Windows NT 6.1; Win64; x64; Trident/5.0)
`, poc.Proxy("http://127.0.0.1:8083"))
die(err)

httpReq, err := poc.ParseBytesToHTTPRequest(req)
poc.Show(httpReq)- Converts bytecode into a native
http.Requestobject usingpoc.ParseBytesToHTTPRequest.
1. httpool.Pool: Batch Delivery for Large Packets
- Scenario: Suitable for large batches of packets.
- Usage: Renders templates, repairs Content-Length, and sends packets in bulk.
- Comparison with
fuzz.HTTPRequest: It is considered a batch advanced version ofpoc.HTTP. - Return Type:
chan *palm/common/mutate.(_httpResult)
2. fuzz.HTTPRequest: Detailed Manipulation for Fuzz Testing
- Scenario: Suitable for detailed manipulation of data packets, especially logical and dynamic adjustment of parameters for fuzz testing or vulnerability detection.
- Usage: Offers surgical precision in manipulating the details and parameters of data packets.
- Return Type:
chan *palm/common/mutate.(_httpResult)
Examples:
Example 1: Batch Outsourcing a Website
res, err := httpool.Pool(`GET /target{{int(1-10)}} HTTP/1.1
Host: www.baidu.com
`)
die(err)

loglevel("info")
for result := range res {
    log.info("URL: %v", result.Url)
}
Example 2: Batch Outsourcing Template with Parameter Rendering
res, err := httpool.Pool(`GET /target{{params(suffix)}} HTTP/1.1
Host: www.baidu.com
{{params(body)}}
`, httpool.FuzzParams(map[string]interface{}{"suffix": ["1", "2", "3", "4"], "body": 123}))
die(err)

loglevel("info")
for result := range res {
    log.info("URL: %v", result.Url)
    println(string(poc.Split(result.RequestRaw)[1]))
}
Example 3: Using HTTPS Protocol
res, err := httpool.Pool(`GET /target{{params(suffix)}} HTTP/1.1
Host: www.baidu.com
{{params(body)}}
`, httpool.FuzzParams(map[string]interface{}{"suffix": ["1", "2", "3", "4"], "body": 123}), httpool.HTTPS(true))
die(err)
Example 4: Send to Specified Host Port
domains := [
    "m1.test.example.com",
    "oa.example.com",
    "oa2.example.com",
    "oa3.example.com",
    "ns1.test.example.com",
    "ns2.test.example.com",
    "test1.stage.example.com",
    "test2.stage.example.com",
    "test3.stage.example.com",
    "crm.test.example.com",
    "test1.dev.example.com",
]

res, err := httpool.Pool(`GET /admin/ HTTP/1.1
Host: {{params(domains)}}
User-Agent: test111
`, httpool.FuzzParams(map[string]interface{}{"domains": domains}), httpool.HTTPS(true), httpool.Host("cybertunnel.run", true))
die(err)

loglevel("info")
for result := range res {
    log.info("URL: %v", result.Url)
    if result.Response != nil && result.Response.StatusCode >= 200 && result.Response.StatusCode < 400 {
        // Process results
    }
}
Example 5: Using fuzz.HTTPRequest for Detailed Manipulation
freq, err := fuzz.HTTPRequest(`GET / HTTP/1.1
Host: www.example.com
`)
desc(freq)

freq = freq.FuzzPath("/specific-path1").FuzzMethod("POST").FuzzPostRaw(`{"a": 123}`).FuzzPostJsonParams("KEY", "123")
freq.Show()

res, err := freq.Exec()
die(err)

for result := range res {
    // Handle `palm/common/mutate.(_httpResult)`
}

result, err := freq.ExecFirst()
die(err)
// Handle `palm/common/mutate.(_httpResult)`
Summary:
httpool.Poolis suitable for large batches, whilefuzz.HTTPRequestprovides detailed packet manipulation for fuzz testing.httpool.Poolrenders templates, repairs Content-Length, and sends packets in bulk.- Examples demonstrate batch outsourcing, HTTPS usage, sending to specified host ports, and detailed manipulation for fuzz testing.
fuzz.HTTPRequestallows surgical precision in manipulating packet details and parameters.- Both methods return
chan *palm/common/mutate.(_httpResult)objects, offering flexibility in result handling.
Java Deserialization Exploit Chain (YSO):
- Explores Java deserialization vulnerabilities using `ysoserial`.
- Introduces the implementation of Java deserialization protocols in Golang (Yak).
- Replaces YSoSerial with Yak for Java deserialization exploitation.
Usage Example of Yak:
evilCls, err := yso.GetCommonsCollections5("echo HelloWorld")
die(err)

bytes := java.MarshalJavaObjects(evilCls)
hexStr := codec.EncodeToHex(bytes)
base64Str := codec.EncodeBase64(bytes)

dump(bytes)
println(hexStr + "\n")
println(base64Str + "\n")
- Generates payload using Yak for exploiting Java deserialization.Text Similarity Algorithms in Yak:
- Discusses the importance of text similarity in vulnerability detection.
- Provides three text similarity algorithms: SQLMap, SimHash, and SSDeep.
- Unifies the interface for ease of use.
SQLMap Similarity Calculation Example:
packet1 := ... // HTTP request packet 1
packet2 := ... // HTTP request packet 2

packet1, packet2 = []byte(packet1), []byte(packet2)
stability, err := str.CalcTextMaxSubStrStability(packet1, packet2)
die(err)
printf("stability: %v\n", stability)
- Demonstrates the SQLMap similarity calculation using the Max Substring Stability algorithm.SimHash Similarity Calculation Example:
packet1 := ... // HTTP request packet 1
packet2 := ... // HTTP request packet 2

packet1, packet2 = []byte(packet1), []byte(packet2)
stability, err := str.CalcSimHashStability(packet1, packet2)
die(err)
printf("stability: %v\n", stability)
- Shows the calculation of similarity using the SimHash algorithm.SSDeep Fuzzy Hashing Example:
- Highlights SSDeep's requirement for a minimum text length (4096 characters).
- Introduces the SSDeep algorithm for fuzzy hashing.
Example of SSDeep Usage:
packet1 := ... // Long text content
packet1 = []byte(packet1)
ssdeepHash, err := ssdeep.HashBytes(packet1)
die(err)
printf("SSDeep Hash: %v\n", ssdeepHash)
- Demonstrates the usage of SSDeep for fuzzy hashing with a long text content.Collections
Handling Command-Line Parameters in Yak
The first part introduces the basic usage of Yak for executing code under MacOS/Linux and Windows. It recommends using the Yak Runner for code execution and debugging. The tutorial begins by explaining how to receive and process user input as command-line parameters. The Yak language provides built-in functions like cli.String and cli.Int for handling different parameter types.
Example 1: Basic Command-Line Parameter Handling
# 1_handleCliParam.yak
target = cli.String("target")
intParam = cli.Int("int-param")

println("We received two parameters")
println("--target: ", target)
println("--target type: ", type(target))
println()
println("--int-param: ", intParam)
println("--int-param type: ", type(intParam))
Executing the script:
yak data/yak-basic/1_handleCliParam.yak --target targetParamValue --int-param 125Port Scanning Using Yak’s Built-in Library
The second part showcases a simple port scanning program written in Yak. The script utilizes Yak’s built-in service scanning function (servicescan.Scan) and demonstrates how to pass command-line parameters for specifying the target and ports to scan.
Example 2: Basic Port Scanning
# 2_portScanning.yak
targets := cli.String("target")
ports := cli.String("ports", cli.setDefault("80,22,8080-8082"))

if targets == "" {
    die("empty target")
}

if ports == "" {
    ports = "22,80,443,3306,8000-8002"
}

printf("Start scan %v  ports:%v\n", targets, ports)

ch, err := servicescan.Scan(targets, ports)
die(err)

for result := range ch {
    if result.IsOpen() {
        println(result.String())
    }
}

println("Scan Finished")
Executing the script:
yak 2_portScanning.yak --target example.com --ports 80,443,8080-8082Example 1: Basic SYN Scan
# syn_scan_example.yak
target := cli.String("target", cli.setHelp("Set scan target"))
ports := cli.String("ports", cli.setDefault("80,8080-8082,9000-9002"))

results, err := synscan.Scan(target, ports)
die(err)

for result := range results {
    result.Show()
}
Executing the script:
sudo yak syn_scan_example.yak --target example.com --ports 80,443Example 2: Handling SYN Scan Results
# syn_scan_results_example.yak
target := cli.String("target", cli.setHelp("Set scan target"))
ports := cli.String("ports", cli.setDefault("80,8080-8082,9000-9002"))

results, err := synscan.Scan(target, ports)
die(err)

for result := range results {
    // Handle SYN scan results as needed
    println("Open port:", result.Port)
}
Executing the script:
sudo yak syn_scan_results_example.yak --target example.com --ports 80,443Example 3: Combining SYN Scan with Fingerprint Scan
# syn_with_fingerprint_scan.yak
target := cli.String("target", cli.setHelp("Set scan target"))
ports := cli.String("ports", cli.setDefault("80,8080-8082,9000-9002"))

synResults, err := synscan.Scan(target, ports)
die(err)

fingerprintResults, err := servicescan.ScanFromSynResult(synResults)
die(err)

for fpResult := range fingerprintResults {
    // Handle combined SYN and fingerprint scan results
    println("Service details:", fpResult.String())
}
Executing the script:
sudo yak syn_with_fingerprint_scan.yak --target example.com --ports 80,443Example 4: Customizing SYN Scan Parameters
# custom_syn_scan_params.yak
target := cli.String("target", cli.setHelp("Set scan target"))
ports := cli.String("ports", cli.setDefault("80,8080-8082,9000-9002"))
concurrency := cli.Int("concurrent", cli.setDefault(10))

results, err := synscan.Scan(target, ports, synscan.Concurrent(concurrency))
die(err)

for result := range results {
    result.Show()
}
Executing the script:
sudo yak custom_syn_scan_params.yak --target example.com --ports 80,443 --concurrent 15Example 5: Handling Errors in SYN Scan
# handle_syn_scan_errors.yak
target := cli.String("target", cli.setHelp("Set scan target"))
ports := cli.String("ports", cli.setDefault("80,8080-8082,9000-9002"))

results, err := synscan.Scan(target, ports)
if err != nil {
    println("Error during SYN scan:", err)
    // Handle error accordingly
} else {
    for result := range results {
        result.Show()
    }
}
Executing the script:
sudo yak handle_syn_scan_errors.yak --target example.com --ports 80,443Example 1: Basic Shodan Query
# basic_shodan_query.yak
shodanToken := cli.String("token")
maxRecord := cli.Int("max-record", cli.setDefault(100))

results, err := spacengine.ShodanQuery(shodanToken, "wordpress", spacengine.MaxRecord(maxRecord))
die(err)

for result := range results {
    println("Shodan found:", result.Addr)
}
Executing the script:
yak basic_shodan_query.yak --token YOUR_SHODAN_API_KEYExample 2: Accessing WordPress Admin Page
# access_wordpress_admin.yak
shodanToken := cli.String("token")
maxRecord := cli.Int("max-record", cli.setDefault(100))

results, err := spacengine.ShodanQuery(shodanToken, "wordpress", spacengine.MaxRecord(maxRecord))
die(err)

for result := range results {
    addr := result.Addr
    println("Shodan found:", addr)

    rsp, err := http.Get(sprintf("http://%v/wp-admin/admin.php", addr))
    if err != nil {
        log.error("HTTP error: %v", err)
        continue
    }
    http.Show(rsp)
}
Executing the script:
yak access_wordpress_admin.yak --token YOUR_SHODAN_API_KEYExample 3: Handling HTTP Response Cookies
# handle_http_cookies.yak
url := "http://example.com"

rsp, err := http.Get(url)
die(err)

cookies := rsp.Cookies()
for _, cookie := range cookies {
    println("Cookie:", cookie.Name, "=", cookie.Value)
}
Executing the script:
yak handle_http_cookies.yakExample 4: Checking TLS Connection State
# check_tls_state.yak
url := "https://example.com"

rsp, err := http.Get(url)
die(err)

tlsState := rsp.TLS
println("TLS Version:", tlsState.Version)
println("Handshake Complete:", tlsState.HandshakeComplete)
Executing the script:
yak check_tls_state.yakExample 5: Concurrent Processing of Shodan Results
# concurrent_shodan_processing.yak
shodanToken := cli.String("token")
maxRecord := cli.Int("max-record", cli.setDefault(100))

results, err := spacengine.ShodanQuery(shodanToken, "wordpress", spacengine.MaxRecord(maxRecord))
die(err)

var wg sync.WaitGroup

for result := range results {
    wg.Add(1)
    go func(addr string) {
        defer wg.Done()
        println("Shodan found:", addr)

        rsp, err := http.Get(sprintf("http://%v/wp-admin/admin.php", addr))
        if err != nil {
            log.error("HTTP error: %v", err)
            return
        }
        http.Show(rsp)
    }(result.Addr)
}

wg.Wait()
Executing the script:
yak concurrent_shodan_processing.yak --token YOUR_SHODAN_API_KEYCommon Concurrency Paradigms for Scanners
1. Basic Concurrency: go func(){/* do */}()
The basic concurrency paradigm in YAK is similar to Golang’s goroutine. For example:
go fn() {
    log.info("Goroutine is started")
    sleep(1)
    log.info("I am in Goroutine!")
}()
2. Multitasking Control (WaitGroupMode)
To control the execution of asynchronous tasks, YAK provides a sync.WaitGroup-like feature:
loglevel(`info`)

wg := sync.NewWaitGroup()

def submitTask(value) {
    wg.Add(1)
    go fn{
        defer wg.Done()
        log.info("caller: %v", value)
        sleep(1)
        log.info("task is finished... caller: %v", value)
    }
}

for index, element := range ["cha1", "a2", "d3"] {
    submitTask(element)
}

log.info("start to wait all tasks finishing...")
wg.Wait()
log.info("all tasks finished")
3. Thread Pool: SizedWaitGroup
To limit maximum concurrency, YAK provides a convenient tool class, SizedWaitGroup. This ensures that the number of concurrent tasks does not exceed a specified limit:
loglevel(`info`)

wg := sync.NewSizedWaitGroup(4)

def submitTask(value) {
    wg.Add()
    go fn{
        defer wg.Done()
        log.info("caller: %v", value)
        sleep(1)
        log.info("task is finished... caller: %v", value)
    }
}

for index := range make([]int, 10) {
    submitTask(index)
}

log.info("start to wait all tasks finishing...")
wg.Wait()
log.info("all tasks finished")
Practical Example: Batch Verification of Websites in Space Engine
In the previous section, we obtained data from Shodan using YAK and made HTTP requests for each result. To enhance performance, we’ll modify the code to leverage concurrency:
loglevel(`info`)

shodanToken := cli.String("token")
maxRecord := cli.Int("max-record")
if maxRecord <= 0 {
    maxRecord = 100
}

ch, err := spacengine.ShodanQuery(shodanToken, "wordpress", spacengine.maxRecord(maxRecord))
die(err)

swg := sync.NewSizedWaitGroup(20)

func submitTask(addr) {
    urls := str.ParseStringToUrls(addr)
    swg.Add()
    go func{
        defer swg.Done()

        for _, u := range urls {
            rsp, err := http.Get(u)
            if err != nil {
                log.error("request %v failed: %s", u, err)
                continue
            }

            packetRaw, err := http.dump(rsp)
            if err != nil {
                log.info("url: %v status code: %v", u, rsp.StatusCode)
                continue
            }

            log.info("url: %v status code: %v packet len: %v", u, rsp.StatusCode, len(packetRaw))
        }
    }()
}

for result := range ch {
    addr := result.Addr
    log.info("start to handling shodan result: %v", addr)
    submitTask(addr)
}

log.info("all task is submitted...")
swg.Wait()
This modification integrates the original script with a new function, enabling concurrent HTTP requests for better performance.
Examples:
1. Basic Vulnerability Scan:
res, err := nuclei.Scan("example.com")
die(err)

for result := range res {
    dump(result)
}
Perform a basic vulnerability scan on “example.com” using Yak and print the results.
2. Customized Scan with Tags:
res, err := nuclei.Scan("targets", nuclei.verbose(true), nuclei.tags("thinkphp"))
die(err)

for result := range res {
    dump(result)
}
Customized scan with verbose output and specific tags like “thinkphp” using Yak.
3. Practical Case – Local Environment Scan:
// Build Thinkphp vulnerability environment locally
git clone https://github.com/vulhub/vulhub --depth 1
cd vulhub/thinkphp/5.0.23-rce
docker-compose up -d

// Use Yak and Nuclei to scan the Thinkphp vulnerabilities
res, err := nuclei.Scan("127.0.0.1:8083", nuclei.tags("thinkphp"))
die(err)

for result := range res {
    dump(result)
}
Demonstrates building a local Thinkphp vulnerability environment and scanning with Yak and Nuclei.
4. Automatic Nuclei POC Update:
// Automatically update nuclei PoC
yak update-nuclei-poc

// Scan vulnerabilities with updated PoC
res, err := nuclei.Scan("127.0.0.1:8083", nuclei.tags("thinkphp"))
die(err)

for result := range res {
    dump(result)
}
Automatically update Nuclei PoC library and then perform a vulnerability scan.
5. Handling Nuclei Scan Results in Yak:
res, err := nuclei.Scan("example.com")
die(err)

// Process Nuclei scan results in Yak
for result := range res {
    // Extract and use specific information from the scan result
    pocName := result.PocName
    severity := result.Severity
    target := result.Target

    // Perform actions based on the scan results
    // ...
}
Shows how to handle and process Nuclei scan results within a Yak script for further actions or reporting.
Examples:
1. Reviewing Input and Scanning Ports:
hosts := cli.String("target", cli.setHelp("scan hosts"))
ports := cli.String("ports", cli.setDefault("80,8080-8082,443,888"))

if hosts == "" {
    die("target is empty")
}

// Perform SYN port scan
synResults, err := synscan.Scan(hosts, ports)
die(err)

// Perform fingerprint scanning based on SYN scan results
res, err := servicescan.ScanFromSynResult(synResults)
die(err)
2. Basic Crawler Initialization:
// Create a temporary file location for storing scan results
fp, err := file.TempFile("scan_and_crawler")
die(err)
defer fp.Close()

// Initialize the basic crawler with concurrency control
crawlerSwg := sync.NewSizedWaitGroup(10)
defer crawlerSwg.Wait()

// Define the function to start the crawler
func startCrawler(target) {
    crawlerSwg.Add()
    go func{
        defer crawlerSwg.Done()

        // Start the crawler
        res, err := crawler.Start(target, crawler.maxRequest(50))
        die(err)

        // Display and write crawler results to a file
        for req := range res {
            println(req.Url())
            fp.WriteLine(req.Url())
        }
    }
}
3. Combine Port Scanning and Crawling:
// Process command-line inputs
hosts := cli.String("target", cli.setHelp("scan hosts"))
ports := cli.String("ports", cli.setDefault("80,8080-8082,443,888"))

if hosts == "" {
    die("target is empty")
}

// Perform SYN port scan
synResults, err := synscan.Scan(hosts, ports)
die(err)

// Perform fingerprint scanning based on SYN scan results
res, err := servicescan.ScanFromSynResult(synResults)
die(err)

// Create a temporary file for storing crawl results
fp, err := file.TempFile("scan_and_crawler")
die(err)
defer fp.Close()

// Start the basic crawler based on fingerprint scanning results
crawlerSwg := sync.NewSizedWaitGroup(10)
defer crawlerSwg.Wait()
func startCrawler(target) {
    crawlerSwg.Add()
    go func{
        defer crawlerSwg.Done()

        res, err := crawler.Start(target, crawler.maxRequest(50))
        die(err)
        for req := range res {
            println(req.Url())
            fp.WriteLine(req.Url())
        }
    }
}

// Check fingerprint scanning results and initiate port scanning for HTTP services
for result := range res {
    if result.IsOpen() {
        if result.Fingerprint != nil && result.Fingerprint.HttpFlows != nil{
            // Check if the service is HTTP and initiate crawling
            startCrawler(str.HostPort(result.Target, result.Port))
        }
    }
}
4. Execution and Testing:
yak scan_and_crawler.yak --target 47.***.**.**/24 --ports 80,8000-8003,8080-8083,443Execute the Yak script to perform integrated scanning and crawling based on specified targets and port ranges.
5. Utilizing Results for Vulnerability Scanning:
// Assuming the crawl results are handed over to nuclei for vulnerability scanning
nuclei.Scan("file:///path/to/crawler/results.txt", nuclei.tags("web"))
Use the collected URL results from the basic crawler to perform vulnerability scanning using the nuclei framework.
1. Obtaining Measurable Parameters:
Yak provides methods to retrieve measurable parameters from different parts of an HTTP request. These include common parameters in GET, POST (urlencoded and JSON), cookie parameters, and more.
Examples:
// Get common parameters in GET request
getParams := mutate.GetCommonParams()

// Get parameters from POST request in urlencoded format
postParams := mutate.GetPostParams()

// Get parameters from POST request in JSON object format
jsonParams := mutate.GetPostJsonParams()

// Get parameters from cookies
cookieParams := mutate.GetCookieParams()
2. Fuzzing Discovered Parameters:
Once parameters are obtained, they can be fuzzed using the Fuzz function provided by Yak. This function automatically replaces the original parameter values with the specified fuzzing payload.
Example:
req, err := fuzz.HTTPRequest(`GET /?test=1&key1=23 HTTP/1.1
Host: 127.0.0.1`)
die(err)

fuzzValue := "this_is_payload"

for _, param := range req.GetGetQueryParams() {
    printf("Found Param[%10s]:\n    ParamName: %v\n    OriginValue: %v\n\n", param.Position(), param.Name(), param.Value())
    param.Fuzz(fuzzValue).Show()
    println("-----------------------------------------------")
}
3. Using Discovered Parameters in Fuzzing:
Yak allows users to integrate the discovered fuzzable parameters into fuzzing operations. By combining crawlers and fuzzing, users can achieve full coverage of common parameters in a web application.
Example:
res, err := crawler.Start(cli.String("target"), crawler.MaxRequest(100))
die(err)

for r := range res {
    url := r.Url()

    // Fetching HTTP response from the crawler result
    rsp, err := r.Response()
    dieOnError(err, "fetch [%v]'s response err", r.Url())

    // Creating fuzzable request from crawler result
    fuzzReq, err := fuzz.HTTPRequest(r.Request())
    dieOnError(err, "create fuzz request [%s] failed", url)

    // Getting common parameters from the fuzzable request
    for _, param := range fuzzReq.GetCommonParams() {
        param.Fuzz("test-your-payload!!!!!").Show()
    }
}
4. Combining with MITM (Man-in-the-Middle):
Yak can be used with MITM to capture specific HTTP packages for fuzzing, making it effective for applications with Cookie/Authorization JWT authentication.
Example:
loglevel(`info`)

go func {
    // Start MITM proxy with a callback function
    err = mitm.Start(5534, mitm.Callback(func(isHttps bool, req, rsp []byte) {
        http.Show(req)
        fReq, err := fuzz.HTTPRequest(req)
        if err != nil {
            log.Error("http request failed: %s", err)
            return
        }
        for _, r := range fReq.GetCommonParams() {
            r.Fuzz("this_is_fuzzing_payload").Show()
        }
    }))
    die(err)
}

sleep(1)
log.Info("start to send request with proxy")

// Sending an HTTP request with a proxy to the MITM server
rsp, err := http.Get("http://www.example.com/?test=abc", http.Proxy("http://127.0.0.1:5534"))
die(err)
Yakit
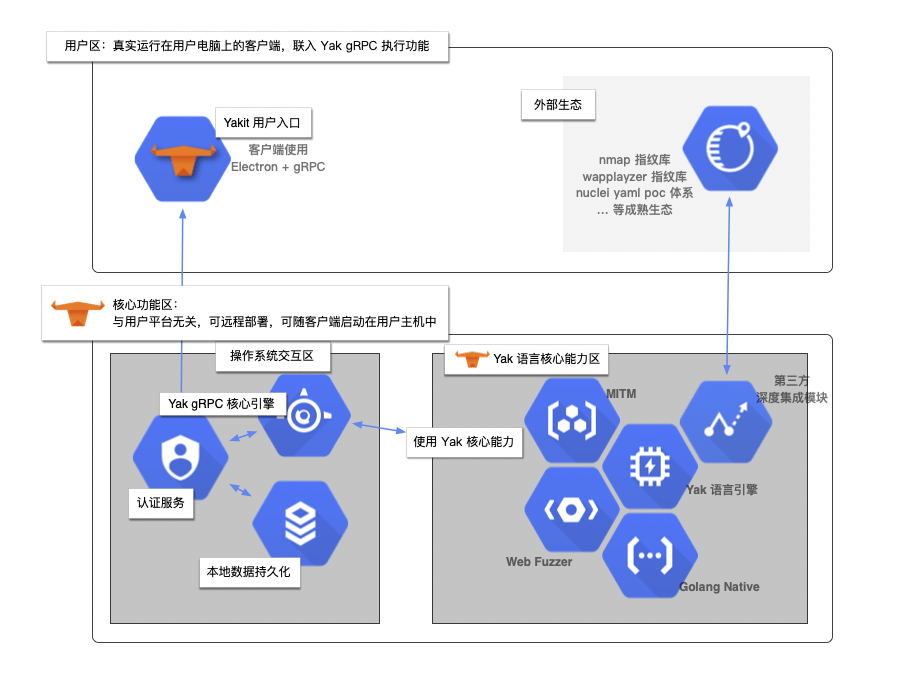
Yakit is a derivative project of Yaklang, designed to make the powerful security capabilities provided by the Yak language more accessible through a graphical user interface (GUI). It acts as a client for the Yak gRPC server, allowing users who may not be proficient in coding to leverage Yak’s security capabilities.
Installation
To use Yakit, follow these steps:
- Install Yak:
- Yakit relies on the Yak engine, so ensure that Yak is installed on your system. Refer to the Yak documentation for installation instructions.
- Download Yakit:
- Visit the Yakit download page provided here (the actual link is not provided in the given text).
- Download the appropriate version for your platform.
- Setup Permissions:
- Yakit stores local files and user data in the
$HOME/yakit-projects/directory. - Set the directory permissions to 0755 and ensure it is in the same group or under the same user as the daily user.
sudo chown -R user ~/yakit-projects sudo chmod 0755 ~/yakit-projects
- Yakit stores local files and user data in the
- Run Yakit:
- Start the Yak engine.
- Run Yakit, either by deploying it remotely or starting it locally on the host.
Yakit Capabilities
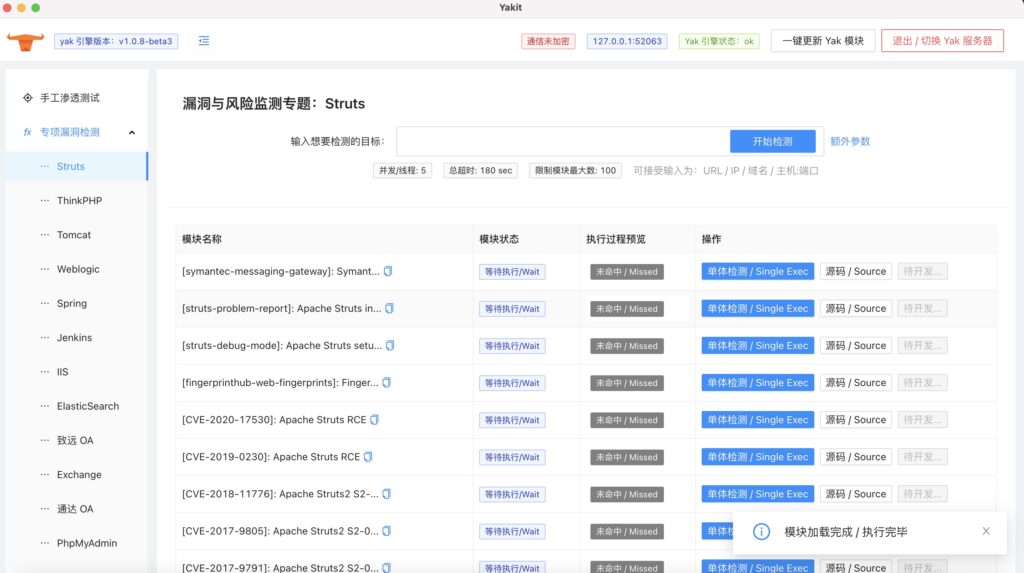
Yakit serves as an integrated output platform for Yak language security capabilities. With Yakit, you can:
- Burpsuite-like MITM Hijack Console:
- Perform Man-in-the-Middle attacks similar to Burpsuite.
- View the history of hijacked requests and analyze request parameters.
- Visual Web Fuzz Testing Tool: Web Fuzzer:
- Conduct visual web fuzz testing using Yakit.
- Yak Cloud IDE:
- Utilize Yak language cloud IDE with built-in smart prompts.
- ShellReceiver:
- Enable a TCP server to receive reverse connections of interactive shells.
- Third-Party Yak Module Store:
- Access a community-led third-party Yak module plug-in store for additional capabilities.
Yakit Architecture
Yakit’s architecture relies on the Yak gRPC interface. It acts as a window to manipulate the Yak engine, allowing users to execute various security capabilities.
Local and Remote Modes
Yakit operates in two modes: Local and Remote.
- Local Mode:
- In this mode, Yakit starts as a client without the need for an explicit server launch.
- Simply download and start Yakit locally.
- Remote Mode:
- Yakit can connect to a Yak gRPC server running remotely.
- The Yak gRPC server can be launched on any platform or network location, including remote hosting (ECS/VPS), local personal PCs, or intranet environments.
- Remote mode supports secure connections with parameters like
--tlsand--secretfor authentication.
Usage Examples
Local Mode
- No server setup is required.
- Download and start Yakit.
Remote Mode: Launch Yak gRPC Server
yak grpc --host 0.0.0.0 --port 8087 --secret your-awesome-PAss --tls--host: Local address to start the GRPC server (default: “localhost”).--port: Port for the GRPC server (default: 8087).--secret: Authentication token for securing the connection.--tls: Enable TLS to protect communications from eavesdropping.
Switching Connection Modes
- After starting the GRPC server, select the local Yakit client to connect in the settings.
Additional Security Considerations
- Use TLS for Public Network:
- To protect communications from eavesdropping, always use TLS.
- The
--tlsoption significantly reduces the risk of communication hijacking.
- Set a Password for Privacy:
- Use the
--secret [yourpassword]parameter to add simple password authentication to the gRPC server. - This ensures privacy and adds a layer of security.
- Use the
Understanding the Principles
- gRPC is a full two-way communication protocol based on the HTTP2 protocol.
- The
--secretparameter sets the authorization header in the HTTP headers of each request/response/stream request, authenticating gRPC communication. - This verification is supported in both Yakit and Yak, eliminating the need for additional settings by users.
Reference
- https://www.yaklang.io/
- https://www.yaklang.io/docs/startup
- https://www.yaklang.io/products/intro